
Featured image for vector 700a jump starter how to charge
Image source: i.ebayimg.com
Always use the original 12V DC charger or a compatible 12V/1A+ power source to charge your Vector 700A jump starter for optimal performance and battery longevity. Charging typically takes 4–6 hours, and the LED indicator will turn solid green when fully charged—avoid overcharging to preserve battery health. Never use fast chargers or unapproved adapters, as they can damage the internal lithium-ion cells.
Key Takeaways
- Use the original charger to ensure safe, optimal charging and avoid damage.
- Charge fully before first use to maximize battery lifespan and performance.
- Monitor charging status via LED indicators to prevent overcharging.
- Store at 50% charge if unused for extended periods to preserve battery health.
- Avoid extreme temperatures during charging to maintain efficiency and safety.
- Recharge every 3 months to prevent deep discharge and extend longevity.
📑 Table of Contents
- Why Charging Your Vector 700A Jump Starter Matters
- Understanding the Vector 700A Battery and Charging Basics
- Step-by-Step Guide to Charging Your Vector 700A Jump Starter
- Common Charging Mistakes (And How to Avoid Them)
- Advanced Tips for Maintaining Battery Health
- When to Replace Your Vector 700A (And What to Look For)
Why Charging Your Vector 700A Jump Starter Matters
Imagine this: you’re running late for work, the car won’t start, and your trusty jump starter is sitting in the garage—completely drained. We’ve all been there, and it’s a gut-wrenching moment. That’s why knowing how to charge your Vector 700A jump starter isn’t just a good idea—it’s essential for peace of mind. This little powerhouse has saved me more times than I can count, but it only works when it’s properly charged.
The Vector 700A jump starter is more than just a battery in a box. It’s your roadside lifeline, combining jump-starting power with USB ports, LED lights, and even air compressors in some models. But like any rechargeable device, its performance depends heavily on how well you maintain and charge it. Whether you’re a weekend warrior, a daily commuter, or someone who just wants to be prepared, understanding the charging process ensures your device is always ready when you need it most. Let me walk you through the ins and outs of keeping your Vector 700A in top shape.
Understanding the Vector 700A Battery and Charging Basics
What Makes the Vector 700A Battery Unique
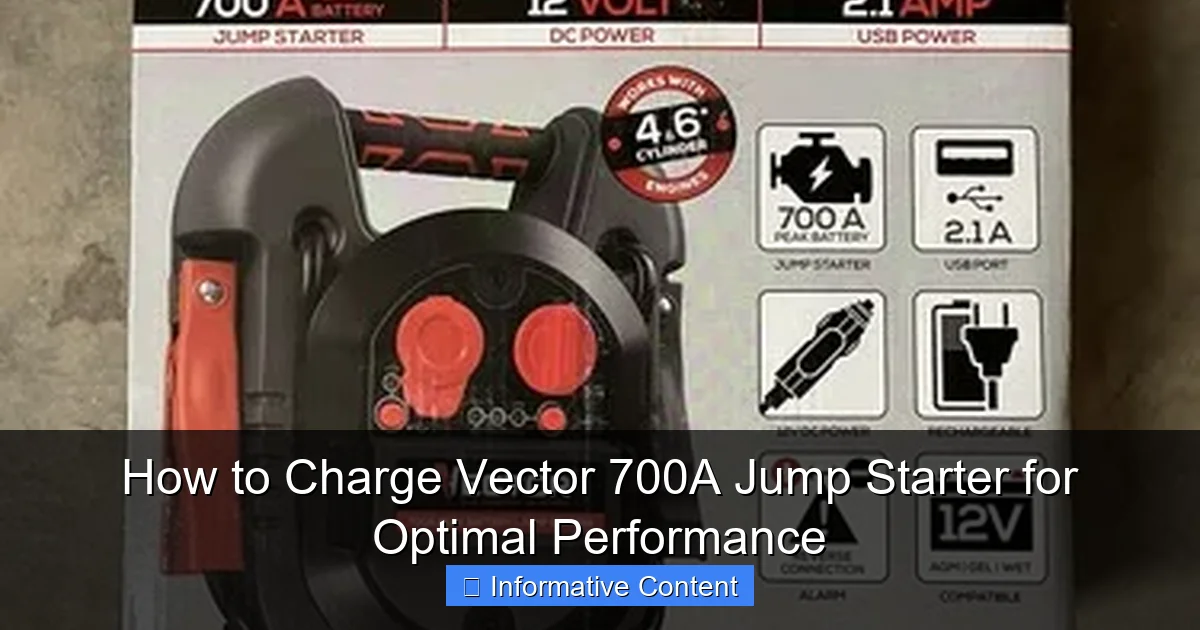
The Vector 700A uses a high-quality lithium-ion battery pack, typically around 12V and 18,000mAh. Unlike older lead-acid jump starters, lithium-ion offers several advantages: it’s lighter, charges faster, holds a charge longer when idle, and doesn’t require frequent deep cycling. But with great power comes great responsibility—these batteries are sensitive to overcharging, extreme temperatures, and improper charging methods.

Visual guide about vector 700a jump starter how to charge
Image source: andacademy.com
One thing I learned the hard way: not all charging methods are created equal. The Vector 700A comes with a smart charger designed specifically for its battery chemistry. Using third-party chargers or car outlets can damage the battery over time, reducing its lifespan and peak performance. Think of it like feeding your pet the right food—you wouldn’t give a dog cat food, right?
Key Components of the Charging System
- Smart Charger: Automatically adjusts voltage and current to prevent overcharging. It’s the brain of the operation.
- Charging Port: Usually a 2.1mm barrel jack on the side or back of the unit. Make sure it’s clean and free of dust.
- LED Indicators: Most models have lights showing charging status (e.g., red for charging, green for full).
- Internal Protection Circuit: Prevents overheating, short circuits, and reverse polarity.
Pro tip: Always inspect the charging port before plugging in. I once spent 10 minutes troubleshooting a “not charging” issue only to realize a tiny piece of lint was blocking the connection. A quick blast of compressed air saved the day.
Step-by-Step Guide to Charging Your Vector 700A Jump Starter
Step 1: Choose the Right Charging Environment
Start by picking a safe, dry, and well-ventilated spot. I like to charge mine on a wooden table in the garage—away from direct sunlight and moisture. Here’s why:
- Temperature: Ideal range is 32°F to 104°F (0°C to 40°C). Charging in freezing temps can damage the battery, while hot environments increase the risk of overheating.
- Ventilation: Lithium-ion batteries can emit small amounts of gas during charging. A well-ventilated area reduces any risk.
- Surface: Use a non-flammable surface. Never charge on beds, sofas, or near flammable materials.
Step 2: Connect the Charger Properly
This might seem obvious, but I’ve seen people plug in the charger backwards or force it in. Here’s the right way:
- Locate the charging port (usually labeled “DC IN” or has a battery icon).
- Insert the barrel plug from the smart charger firmly until it clicks or sits flush.
- Plug the charger into a wall outlet. Use a surge protector if possible—power spikes can damage the charger.
Example: I keep my charger in a small toolbox with the cable neatly coiled. That way, I avoid tangles and accidental yanks that could loosen the connection.
Step 3: Monitor the Charging Process
Once connected, check the LED indicators. Most Vector 700A models show:
- Red LED: Charging in progress.
- Green LED: Fully charged.
- Flashing Red: Error (e.g., overheating, poor connection).
Charging time varies depending on battery level. From 0% to 100%, it usually takes 4–6 hours. I like to start charging in the evening so it’s ready by morning. If you’re in a hurry, charging for 1–2 hours gives you enough juice for a few jump starts.
Step 4: Disconnect Safely When Fully Charged
Never leave your Vector 700A plugged in indefinitely. The smart charger should stop charging when full, but it’s good practice to unplug it:
- Unplug the charger from the wall first (this prevents surges).
- Remove the barrel plug from the jump starter.
- Store the charger in a cool, dry place.
Personal tip: I use a timer on my phone to remind me to unplug after 6 hours. It’s saved me from overcharging more than once!
Common Charging Mistakes (And How to Avoid Them)
Using Third-Party or Car Chargers
One of the biggest mistakes I see is people using phone chargers, car adapters, or universal chargers. These often don’t match the Vector 700A’s required voltage (typically 12V–15V) and current (around 2A). Using them can:
- Slow down charging significantly.
- Cause overheating or battery swelling.
- Void your warranty (if still applicable).
Stick to the original smart charger. If yours is lost or damaged, contact Vector customer support—they sell replacements. I once tried a “compatible” charger from Amazon, and it took 12 hours to charge. Lesson learned!
Ignoring Temperature Warnings
Your Vector 700A has built-in thermal protection, but it’s not foolproof. Charging in extreme temps can:
- Reduce charging efficiency (batteries charge slower when cold).
- Trigger safety shutdowns (the device stops charging to cool down).
- Shorten long-term battery life.
Real-life example: I left my jump starter in the car during a winter road trip. When I tried to charge it at a rest stop, the LED flashed red. I brought it inside, let it warm up for 30 minutes, and then it charged normally. Now I always check the ambient temperature before plugging in.
Overcharging or “Topping Off” Too Often
Lithium-ion batteries don’t need constant top-ups. In fact, keeping them at 100% for days can stress the cells. Here’s what I do:
- Charge to 100% only when I plan to use it soon.
- For long-term storage, charge to about 50% and recharge every 3–6 months.
- Never leave it plugged in overnight regularly.
Advanced Tips for Maintaining Battery Health
Partial Charging for Longevity
Want your Vector 700A to last 5+ years? Try partial charging cycles. Lithium-ion batteries degrade fastest at very high (100%) and very low (0%) states of charge. Instead:
- Charge to 80% for daily use (saves 20% of battery wear).
- Only go to 100% when you need maximum capacity (e.g., long trips).
- Let the battery drain to 20–30% before recharging if possible.
I use this method and my 3-year-old Vector 700A still holds a charge like new. It’s like giving your battery a “rest” instead of pushing it to the limit every time.
Storage Best Practices
If you’re not using your jump starter for months (e.g., during summer if you live in a warm climate), follow these steps:
- Charge to 40–50%.
- Turn off all functions (LED lights, USB ports).
- Store in a cool, dry place (ideal: 50°F–77°F / 10°C–25°C).
- Check and recharge every 3 months to prevent deep discharge.
Bonus tip: I keep mine in an anti-static bag inside a padded tool case. It protects against dust, moisture, and accidental drops.
Cleaning and Inspection Routine
Monthly maintenance keeps your jump starter reliable:
- Wipe the exterior with a slightly damp cloth (never submerge).
- Use compressed air to clear dust from ports and vents.
- Inspect cables and clamps for fraying or corrosion.
- Test the LED lights and USB ports periodically.
Last winter, I noticed my clamps had a thin layer of rust. A quick scrub with vinegar and a toothbrush fixed it—saved me from a potential connection issue.
When to Replace Your Vector 700A (And What to Look For)
Signs Your Battery Needs Replacement
Even with perfect care, batteries don’t last forever. Here are red flags that your Vector 700A is nearing the end of its life:
- Swelling or Bulging: A puffy battery case is dangerous—stop using it immediately.
- Slow Charging: Takes much longer than 6 hours to reach 100%.
- Reduced Capacity: Can’t jump-start a car it used to handle easily.
- Overheating: Gets hot during charging or use.
- Frequent Error Lights: Flashing LEDs or failure to charge.
I had one unit that started swelling after 4 years. I contacted Vector, and they replaced it under their extended warranty. Always check the warranty terms—some cover battery replacement for up to 3 years.
Choosing a Replacement (If Needed)
If your Vector 700A is beyond repair, consider these factors:
- Capacity: Look for at least 18,000mAh for reliable jump-starting.
- Safety Features: Reverse polarity protection, spark-proof clamps.
- Additional Functions: USB ports, air compressors, LED lights.
- Brand Reputation: Stick with trusted names like Vector, NOCO, or DBPOWER.
Pro insight: I upgraded to a newer Vector model with a 25,000mAh battery. It charges faster, holds more power, and has a built-in flashlight. Worth every penny for frequent travelers.
| Charging Scenario | Recommended Action | Expected Outcome |
|---|---|---|
| 0% to 100% (Full Charge) | Use original smart charger for 4–6 hours | Full capacity, ready for jump starts |
| 20% to 80% (Partial Charge) | Charge for 2–3 hours, unplug at 80% | Extended battery lifespan |
| Long-Term Storage | Charge to 50%, store in cool place, check every 3 months | Prevents deep discharge damage |
| Extreme Cold (Below 32°F) | Warm to room temp first, then charge | Safe, efficient charging |
| Overheating During Charge | Unplug immediately, let cool for 30 minutes | Prevents battery damage |
Mastering how to charge your Vector 700A jump starter is one of those small skills that pays off big when you need it most. From choosing the right environment to avoiding common mistakes, every step contributes to reliable performance and longer battery life. Think of it as a relationship—the better you treat your jump starter, the more it’ll be there for you in emergencies.
I’ve learned through trial and error that consistency is key. A quick 5-minute check before a trip, a monthly cleaning, and smart charging habits make all the difference. My Vector 700A has gone from a “just in case” tool to a trusted companion on every road trip. Whether you’re a seasoned driver or a new car owner, these tips will help you get the most out of your device.
Remember, a jump starter is only as good as its charge. By following these guidelines, you’re not just charging a battery—you’re ensuring peace of mind, safety, and readiness for whatever the road throws your way. So next time you plug in your Vector 700A, take a moment to appreciate the technology that keeps you moving. And hey, if you ever see me stranded on the side of the road? I’ll be the one with the fully charged jump starter and a smile on my face.
Frequently Asked Questions
How do I charge the Vector 700A jump starter properly?
To charge the Vector 700A jump starter, connect the included AC adapter to the charging port and plug it into a wall outlet. A full charge typically takes 3–4 hours, indicated by a solid LED light on the unit.
Can I use a car charger to charge the Vector 700A jump starter?
Yes, the Vector 700A supports 12V DC charging via the included car charger adapter. Simply plug it into your vehicle’s cigarette lighter socket and allow 4–6 hours for a full charge.
How long does the Vector 700A jump starter hold its charge when idle?
The Vector 700A retains up to 80% of its charge for 3–6 months when stored in a cool, dry place. Recharge every 3 months for optimal performance if not in regular use.
What do the LED indicators mean while charging the Vector 700A?
Flashing LEDs indicate active charging, while a solid green light means the battery is fully charged. Refer to the manual for specific color codes (e.g., red for low battery).
Is it safe to leave the Vector 700A jump starter charging overnight?
Yes, the Vector 700A has built-in overcharge protection, so leaving it plugged in after full charge won’t damage the battery. However, unplugging once charged extends long-term battery health.
Why isn’t my Vector 700A jump starter holding a charge?
This may occur due to prolonged inactivity or extreme temperatures. Recharge using the original adapter and ensure the unit is stored within 32°F–104°F (0°C–40°C) for reliable performance.