

Featured image for types jump starter how to use
Image source: dygtyjqp7pi0m.cloudfront.net
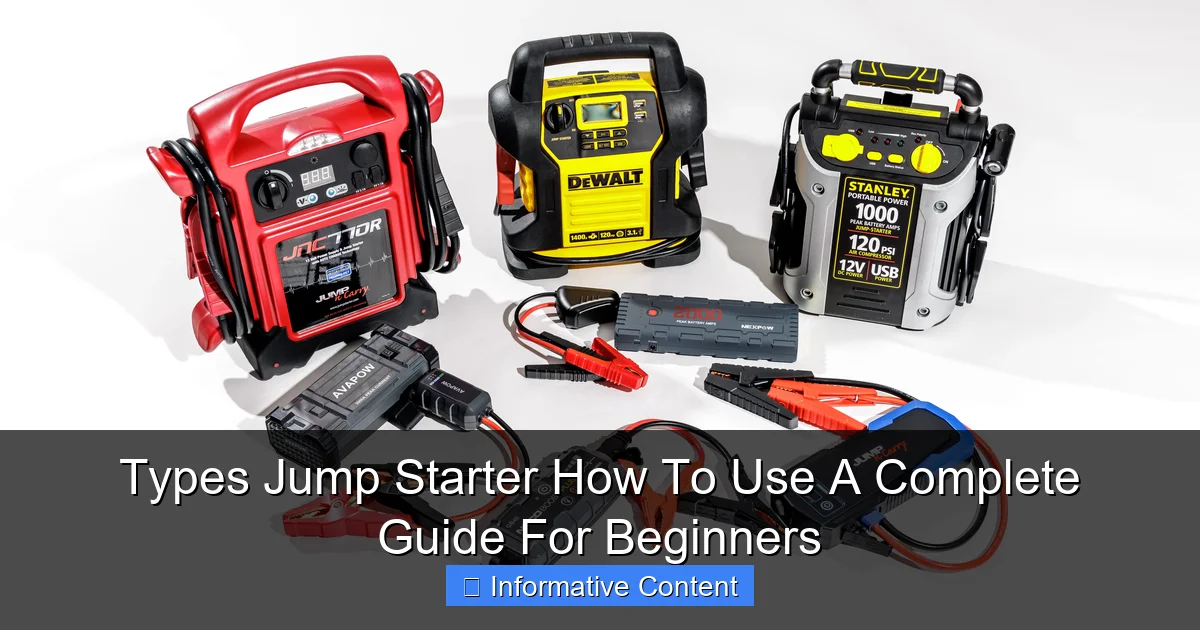
Jump starters come in three main types—traditional battery-powered, portable lithium-ion, and capacitor-based models—each designed for quick, safe vehicle revival. Knowing how to use a jump starter properly, from connecting the clamps in the right order to ensuring a stable power source, is essential to avoid damage or injury. This guide breaks down every step, making it easy for beginners to jump-start with confidence.
Key Takeaways
- Choose the right type: Match your jump starter to your vehicle’s engine size and battery type.
- Inspect before use: Always check battery levels and cable connections for safety.
- Follow polarity rules: Connect red to positive (+) and black to negative (−) terminals first.
- Power on after connection: Turn on the jump starter only after clamps are securely attached.
- Start and disconnect safely: Start the vehicle, then remove clamps in reverse order.
- Recharge promptly: Recharge your jump starter immediately after use to maintain battery health.
📑 Table of Contents
- Understanding Jump Starters: A Lifesaver for Every Driver
- Types of Jump Starters: Which One Is Right for You?
- How to Use a Jump Starter: Step-by-Step Guide
- Jump Starter Safety Tips: Avoiding Common Mistakes
- Choosing the Right Jump Starter: Key Features to Consider
- Real-Life Scenarios: When a Jump Starter Shines
- Jump Starter Comparison Table
- Final Thoughts: Your Car’s Best Backup Plan
Understanding Jump Starters: A Lifesaver for Every Driver
Have you ever been stuck with a dead car battery, maybe right before an important meeting or during a cold winter morning? If so, you know how frustrating and helpless that moment feels. I remember my first time—I was late for a job interview, the engine wouldn’t turn over, and I had no one to call for help. That’s when I discovered the humble yet powerful jump starter, a portable device that can breathe life back into a dead battery without needing another car. Since then, it’s become a must-have in my trunk.
Jump starters are no longer bulky, complicated machines. Today, they come in sleek, compact designs with smart features like USB ports, flashlights, and even air compressors. Whether you’re a new driver or someone who just wants to be prepared, knowing the types of jump starter how to use them can save you time, stress, and money. In this guide, we’ll walk through everything you need to know—from the different types available to step-by-step instructions, safety tips, and real-world scenarios where a jump starter shines.
Types of Jump Starters: Which One Is Right for You?
Not all jump starters are created equal. Choosing the right one depends on your vehicle, driving habits, and how often you plan to use it. Let’s explore the most common types so you can pick the best match.
Visual guide about types jump starter how to use
Image source: hips.hearstapps.com
Traditional Lead-Acid Jump Starters
These are the original portable jump boxes. They use a lead-acid battery (similar to your car’s battery) to deliver a high burst of power. Think of them as a mini power station you carry in your trunk.
- Pros: High cranking power, durable, and often include built-in chargers.
- Cons: Heavy (10–20 lbs), slower to recharge, and can lose charge if stored too long.
- Best for: Trucks, SUVs, and older vehicles with larger engines.
For example, my neighbor owns a 2005 Ford F-150 with a 5.4L V8. He swears by his lead-acid model because it can handle the high cold-cranking amps (CCA) needed to start his engine in freezing weather.
Lithium-Ion (Li-ion) Jump Starters
The modern favorite. These are lightweight, compact, and pack serious power in a small package—often no bigger than a smartphone.
- Pros: Lightweight (1–3 lbs), fast charging, long shelf life, and many include USB ports for charging phones.
- Cons: Can be pricier, and some models struggle with very large engines in extreme cold.
- Best for: Most cars, sedans, hatchbacks, and daily drivers.
I use a lithium-ion model in my 2018 Honda Civic. It’s small enough to fit in my glove compartment and has saved me twice—once from a dead battery and once from a friend’s stranded SUV (with a little help from jumper cables).
Ultra-Capacitor Jump Starters
A newer, high-tech option. Instead of storing energy in a battery, these use capacitors that charge quickly from your car’s dead battery (yes, really).
- Pros: Charges in seconds, works in extreme temperatures (-40°F to 150°F), and lasts 10+ years.
- Cons: Expensive, requires a small amount of battery charge to work, and not widely available.
- Best for: Extreme climates, off-roaders, and tech enthusiasts.
A friend of mine lives in Alaska and uses an ultra-capacitor model. He says it’s the only jump starter that reliably works during the -30°F winters when lithium batteries fail.
Multi-Functional Jump Starters
These do more than just jump-start your car. They often include air compressors, LED flashlights, power banks, and even tire inflators.
- Pros: All-in-one tool, great for road trips and emergencies.
- Cons: Heavier, more complex, and can be overkill if you only need jump-starting.
- Best for: Families, campers, and drivers who want a complete emergency kit.
For instance, my sister’s multi-functional jump starter has a built-in air compressor that saved her when she had a slow tire leak on a highway. She inflated the tire and got home safely—no tow truck needed.
Smart Jump Starters
These come with digital displays, app connectivity, and safety features like reverse polarity alerts and spark-proof clamps.
- Pros: User-friendly, safe, and great for beginners.
- Cons: Higher price point, may require app setup.
- Best for: New drivers, tech-savvy users, and anyone who wants extra peace of mind.
My cousin, who’s just learning to drive, uses a smart jump starter. The voice prompts guide her through the process, and she feels confident knowing it won’t spark or damage her car.
How to Use a Jump Starter: Step-by-Step Guide
Using a jump starter is easier than you think—but doing it wrong can be dangerous. Let’s walk through the process safely and effectively.
Step 1: Safety First – Prepare Your Vehicle
Before you even touch the jump starter, make sure you’re in a safe spot. Pull over to the side of the road, turn on hazard lights, and set the parking brake. If you’re on a busy street, call for roadside assistance instead.
- Turn off the ignition and all electronics (radio, lights, AC).
- Open the hood and locate the battery. Look for a red (+) and black (-) terminal.
- Wear safety gloves and goggles if available (optional but smart).
Pro tip: If the battery is cracked, leaking, or swollen, don’t jump it. Replace it instead. Jump-starting a damaged battery can cause explosions.
Step 2: Charge and Inspect Your Jump Starter
Even if you think it’s charged, check it. Most lithium models have LED indicators (green = full, red = low). If it’s low, charge it using the included cable (usually via USB or wall adapter).
- Ensure the jump starter is at least 50% charged for reliable performance.
- Inspect the clamps and cables for fraying, rust, or damage.
I learned this the hard way once. I tried to jump a car with a nearly dead jump starter—it sparked and failed. Now I always check the charge level before leaving the house.
Step 3: Connect the Jumper Cables Correctly
Follow the color-coded clamps to avoid sparks or short circuits.
- Connect the red (+) clamp to the positive (+) terminal of the dead battery.
- Connect the black (-) clamp to a metal ground point (like an unpainted bolt or bracket) on the engine block. Never connect to the negative (-) terminal of the dead battery—this can cause sparks near flammable gases.
For example, in my Honda, I connect the black clamp to the engine’s alternator bracket. It’s solid metal and far from the battery.
Step 4: Power On the Jump Starter
Turn on the jump starter (if it has a power button). Some models automatically detect when clamps are connected. Wait 1–2 minutes for it to stabilize.
- If it’s a smart model, follow on-screen prompts.
- If it’s a traditional model, make sure the indicator light shows it’s ready.
Step 5: Start the Engine
Get in the car, insert the key, and turn the ignition. The engine should start within a few seconds. If it doesn’t:
- Wait 30 seconds, then try again.
- Check connections—are clamps tight and secure?
- Don’t crank for more than 5–10 seconds at a time. Let the jump starter rest between attempts.
Once the engine runs, let it idle for 1–2 minutes to stabilize. This helps recharge the battery slightly.
Step 6: Disconnect in the Right Order
Remove clamps in the reverse order:
- First, remove the black (-) clamp from the ground point.
- Then, remove the red (+) clamp from the battery.
- Turn off the jump starter and store it safely.
Never let the clamps touch each other or any metal while connected—this can cause sparks or damage.
Step 7: Drive and Recharge
Drive for at least 20–30 minutes to let the alternator recharge the battery. Avoid short trips. Recharge your jump starter as soon as possible (most take 3–4 hours).
Bonus tip: After a jump, have your battery and alternator tested at an auto shop. A jump start is a fix, not a cure—the underlying issue (like a bad alternator) might need attention.
Jump Starter Safety Tips: Avoiding Common Mistakes
Jump-starting is simple, but a few mistakes can lead to injury, damage, or even explosions. Here’s what to watch out for.
Always Check Polarity
Connecting clamps backward (red to negative, black to positive) is a common error. It can fry your car’s electronics or the jump starter itself.
- Use color-coded clamps and double-check before connecting.
- If you’re unsure, look for a “+” or “-” symbol on the battery.
I once saw a guy connect the red clamp to the negative terminal. The jump starter sparked and died instantly. He had to buy a new one.
Never Jump a Frozen or Swollen Battery
Frozen batteries can explode when charged. Look for bulging, cracks, or frost on the case.
- If the battery is frozen, let it thaw in a warm garage first.
- Swollen batteries are a fire risk—replace them immediately.
Keep Jump Starters Away from Water
Even water-resistant models can short-circuit if submerged. Store them in a dry, secure place in your car.
- Use a protective case or bag.
- Avoid using in heavy rain unless absolutely necessary.
Don’t Overuse the Jump Starter
Most models can handle 5–10 jump attempts per charge. Overusing can overheat the device.
- Let it cool for 10–15 minutes between uses.
- If it feels hot, stop and recharge.
Store Properly When Not in Use
Jump starters lose charge over time, especially lead-acid models.
- Recharge every 3–6 months (lithium) or monthly (lead-acid).
- Store in a cool, dry place (not the trunk in summer).
Choosing the Right Jump Starter: Key Features to Consider
With so many options, how do you pick the best one? Here’s what to look for based on your needs.
Cranking Amps (CA) and Cold Cranking Amps (CCA)
These measure the power the jump starter can deliver. Higher numbers mean more power.
- Small cars (4-cylinder): 800–1,200 CA
- Mid-size cars/SUVs: 1,200–2,000 CA
- Trucks/4x4s: 2,000+ CA
For cold climates, choose a model with high CCA. My lithium jump starter has 1,500 CA and works great down to 10°F.
Battery Capacity (mAh)
Measured in milliamp-hours, this tells you how much charge the jump starter holds. Higher mAh = more jumps per charge.
- 10,000–15,000 mAh: Good for 2–4 jumps
- 15,000–20,000+ mAh: 4–6+ jumps
Portability and Size
Do you want something that fits in your glove box or a heavy-duty unit in the trunk?
- Lithium models: 1–3 lbs, palm-sized
- Lead-acid: 10–20 lbs, bulky
Additional Features
Consider extras that add value:
- USB ports (for charging phones)
- LED flashlight (great for night emergencies)
- Air compressor (for flat tires)
- Smart features (app alerts, reverse polarity protection)
Price vs. Value
You don’t need to spend $200 to get a good jump starter. Many reliable lithium models cost $80–$120. But avoid the $20 knockoffs—they often lack safety features and fail when you need them most.
Real-Life Scenarios: When a Jump Starter Shines
Let’s look at common situations where a jump starter can be a game-changer.
Scenario 1: Dead Battery in a Parking Lot
You park your car at the mall, and when you return, the battery is dead (maybe lights were left on). No one around to help? Your jump starter gets you back on the road in 5 minutes.
Scenario 2: Winter Morning in the Driveway
It’s 15°F outside, and your car won’t start. Instead of waiting for a tow truck, you grab your jump starter, connect it, and start the engine while sipping coffee.
Scenario 3: Road Trip Emergency
You’re 100 miles from home when the battery dies. Your multi-functional jump starter not only starts the car but also inflates a low tire and charges your phone.
Scenario 4: Helping a Friend
A friend’s car won’t start, and they don’t have jumper cables. You lend your portable jump starter—no second car needed.
Scenario 5: Older Vehicle with Weak Battery
Classic cars or older models often have batteries that drain quickly. A jump starter is a reliable backup for frequent short trips.
Jump Starter Comparison Table
| Type | Weight | Power Range (CA) | Battery Type | Best Use Case | Price Range |
|---|---|---|---|---|---|
| Lead-Acid | 10–20 lbs | 1,500–3,000 | Lead-Acid | Trucks, SUVs, extreme cold | $50–$120 |
| Lithium-Ion | 1–3 lbs | 800–2,000 | Lithium | Daily drivers, compact cars | $80–$150 |
| Ultra-Capacitor | 2–4 lbs | 1,000–1,500 | Capacitor | Extreme temperatures, tech users | $150–$300 |
| Multi-Functional | 5–15 lbs | 1,200–2,500 | Lithium or Lead-Acid | Road trips, families | $100–$250 |
| Smart | 1–2 lbs | 1,000–1,800 | Lithium | Beginners, safety-focused | $100–$200 |
Final Thoughts: Your Car’s Best Backup Plan
A jump starter isn’t just a tool—it’s peace of mind. Whether you’re dealing with a dead battery, helping a friend, or facing a winter morning, knowing the types of jump starter how to use them empowers you to handle emergencies with confidence. From lightweight lithium models to rugged lead-acid units and smart tech, there’s a perfect fit for every driver.
Remember, it’s not about having the most expensive model. It’s about having the right one for your needs, using it safely, and maintaining it properly. I keep mine charged, in a dry spot, and check it every few months. It’s one of those things you hope you never need—but you’ll be so glad you have it when you do.
So, whether you drive a compact sedan, a pickup truck, or a vintage classic, take the time to pick a reliable jump starter today. Because the next time your car won’t start, you won’t be stranded—you’ll be the one saving the day.
Frequently Asked Questions
What are the different types of jump starters and how do they work?
Jump starters come in three main types: traditional battery-powered, lithium-ion portable, and capacitor-based models. Traditional ones require pre-charging, lithium-ion units are compact and maintenance-free, while capacitor types charge quickly from a weak battery. Each connects to your car’s battery terminals to deliver a surge of power to start the engine.
How do I use a lithium-ion jump starter safely?
First, ensure the jump starter is charged. Connect the red clamp to the positive (+) terminal and black to negative (-) or engine ground, then turn on the device. Always follow the manufacturer’s instructions to avoid short-circuiting or sparks. Disconnect in reverse order after starting.
Can I use a portable jump starter on any vehicle type?
Most modern jump starters work on cars, SUVs, and trucks, but check the unit’s peak amps and compatibility with diesel engines (if applicable). Smaller models may struggle with larger engines, so verify specifications before purchasing. Always confirm the voltage matches your battery (usually 12V).
How to use a jump starter with a dead battery that has no charge?
For a completely dead battery, some lithium-ion jump starters have a “boost” or “low-voltage override” mode. Attach clamps properly, activate this mode (if available), and allow 30 seconds for the device to trickle charge the battery before attempting to start. Avoid prolonged use to prevent overheating.
What safety precautions should I follow when using a jump starter?
Always wear safety glasses and gloves, and ensure the ignition is off during connection. Keep the jump starter away from water, and never touch clamps together. Store in a cool, dry place to maintain battery health. Improper use can damage electronics or cause injury.
How do I maintain my jump starter for long-term reliability?
Recharge lithium-ion jump starters every 3-6 months, even if unused, to prevent battery degradation. Store in temperature-controlled environments and clean terminals periodically. For traditional models, check water levels (if applicable) and avoid full discharges to extend lifespan.