
Featured image for nekteck jump starter instructions
Image source: content.propertyroom.com
Always connect the Nekteck jump starter to a compatible 12V battery using the correct polarity—red to positive (+), black to negative (−)—to avoid sparks or damage. Follow the included Nekteck jump starter instructions precisely, ensuring the device is powered off before connection and the engine is off during use for maximum safety and performance. This simple, step-by-step guide helps prevent user error and extends the life of your jump starter.
Key Takeaways
- Always check battery level before jump starting to ensure sufficient power.
- Connect clamps properly: red to positive, black to negative terminal.
- Turn on the device only after clamps are securely attached.
- Wait 30 seconds after connection before attempting to start the engine.
- Disconnect immediately once the engine starts to prevent damage.
- Recharge after each use to maintain peak performance and longevity.
- Store in a dry, cool place to protect internal components and safety.
📑 Table of Contents
- Why the Nekteck Jump Starter Deserves a Spot in Your Trunk
- Getting Started: Unboxing and Setup
- Step-by-Step: How to Jump Start a Car Safely
- Beyond Jump Starting: Other Uses and Features
- Maintenance and Troubleshooting
- Data and Performance: What to Expect
- Final Thoughts: Why Every Driver Needs This Guide
Why the Nekteck Jump Starter Deserves a Spot in Your Trunk
Imagine this: you’re late for work, you turn the key in your car, and instead of the familiar hum of the engine, you hear a weak click. Your battery is dead. It’s a scenario every driver dreads, but it doesn’t have to be a disaster. Enter the Nekteck jump starter—a compact, reliable, and surprisingly powerful device designed to get you back on the road without needing another car or a roadside assistance call. I’ve been there, stranded in a parking lot with a phone battery at 5% and no jumper cables in sight. That’s when I realized how much I needed a portable jump starter like the Nekteck.
But owning one is only half the battle. Knowing how to use it safely and effectively is what separates a smooth rescue from a potential hazard. The Nekteck jump starter instructions aren’t just a manual—they’re your roadmap to avoiding mistakes like reverse polarity, overcharging, or improper storage. Whether you’re a first-time user or someone who’s had a jump starter for years, this guide will walk you through every step, from unboxing to troubleshooting, with practical tips and real-life examples to help you feel confident every time you reach for your Nekteck.
Getting Started: Unboxing and Setup
What’s in the Box?
When you first open your Nekteck jump starter kit, you’ll find more than just the main unit. Here’s what to expect:
Visual guide about nekteck jump starter instructions
Image source: images-na.ssl-images-amazon.com
- The Nekteck jump starter (typically 12V, 12,000mAh or higher capacity)
- Smart jumper cables with reverse polarity and short-circuit protection
- USB charging cable (usually USB-A to micro-USB or USB-C)
- Wall and car chargers
- Carrying case or pouch
- User manual with Nekteck jump starter instructions
Pro tip: Before using the device, inspect the jumper cables for any visible damage. A frayed wire or loose connection can be dangerous. I once skipped this step and ended up with a spark that scared me more than the dead battery!
Charging Your Jump Starter for the First Time
Your Nekteck jump starter comes with a partial charge, but it’s best to fully charge it before your first use. Here’s how:
- Use the included wall charger and USB cable to connect the jump starter to a power outlet.
- Look for the charging indicator—usually an LED light that blinks red during charging and turns green when full.
- Charge for at least 4–6 hours, even if the light turns green earlier. This ensures the internal battery reaches optimal capacity.
Example: I left mine charging overnight, which gave me peace of mind knowing it was ready for emergencies. The Nekteck jump starter instructions recommend charging after every use, especially if you’ve used it to start a car.
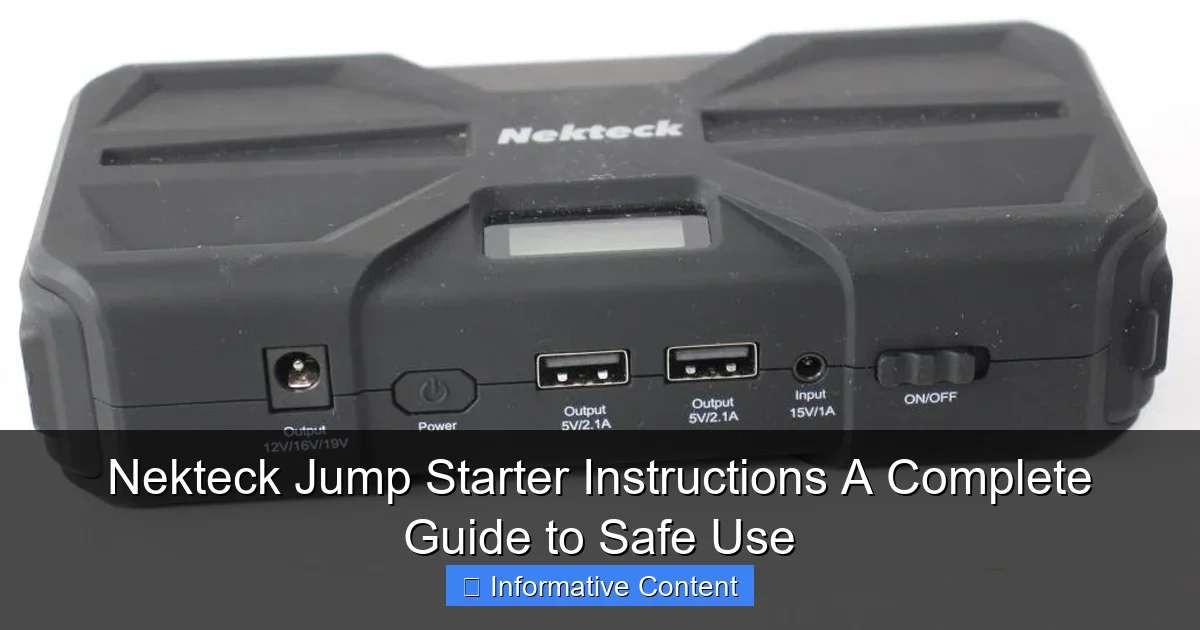
Understanding the Control Panel
The control panel on your Nekteck is intuitive but worth getting familiar with:
- Power button: Turns the unit on/off and activates the LED flashlight.
- Battery level indicator: Shows remaining charge (usually 4–5 LEDs).
- USB ports: For charging phones, tablets, or other devices.
- 12V output port: Used for powering car accessories like air compressors.
Tip: Test the flashlight function—it’s not just for emergencies! I’ve used it to find dropped keys in my car at night.
Step-by-Step: How to Jump Start a Car Safely
Step 1: Park Safely and Turn Off the Engine
Before you even touch the jump starter, make sure your car is in park (or neutral for manual) with the engine off. Engage the parking brake and turn off all lights, AC, and radio. This reduces electrical load and protects your car’s electronics.
Real-life example: A friend once tried to jump start with the headlights on—big mistake. The sudden power surge tripped the Nekteck’s safety mechanism, and we had to reset it.
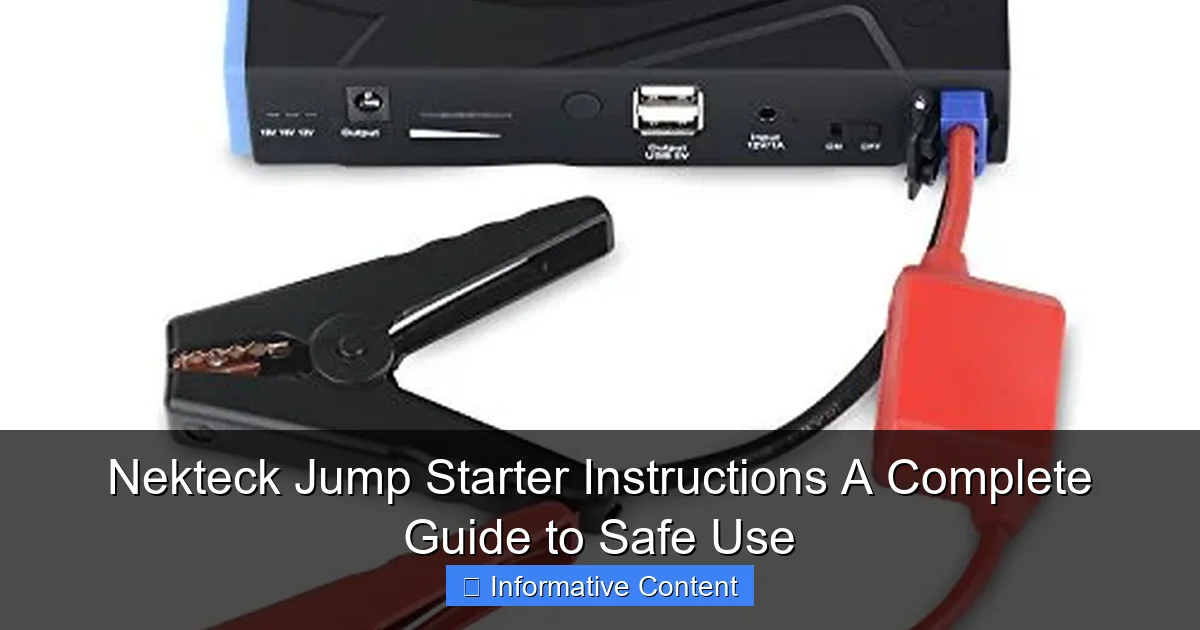
Step 2: Connect the Jumper Cables
Now, follow these steps precisely:
- Open the hood and locate the battery. If it’s covered, remove the plastic cover (if safe to do so).
- Connect the red (positive) clamp to the positive terminal on the dead battery. It’s usually marked with a “+” sign.
- Connect the black (negative) clamp to an unpainted metal surface on the engine block or chassis—not the negative battery terminal. This prevents sparks near the battery.
- Double-check that both clamps are secure and not touching each other.
Why this matters: Connecting to the negative terminal can cause hydrogen gas buildup near the battery to ignite. The Nekteck jump starter instructions emphasize this safety step for a reason.
Step 3: Power On and Start the Engine
- Press the power button on the Nekteck. The battery level LEDs should light up.
- Wait 30 seconds (this lets the jump starter stabilize the connection).
- Try starting your car. If it doesn’t start on the first try, wait 30 more seconds and try again.
Pro tip: If the engine cranks but doesn’t start, don’t hold the key for more than 5 seconds. This can overheat the starter motor. Wait 1–2 minutes before trying again.
Step 4: Disconnect in the Correct Order
Once the car is running:
- Turn off the Nekteck by holding the power button.
- Disconnect the black (negative) clamp first, then the red (positive) clamp.
- Stow the cables neatly in the case.
Caution: Reversing the disconnect order can create a spark. I learned this the hard way when I accidentally touched the clamps together—my heart skipped a beat!
Beyond Jump Starting: Other Uses and Features
Power Bank for Your Devices
The Nekteck isn’t just for cars. Its USB ports let you charge phones, tablets, or even a Bluetooth speaker. Here’s how:
- Use a standard USB cable to connect your device to the jump starter.
- Press the power button to activate the USB ports.
- The battery level indicator will show how much power is left.
Example: During a road trip, my phone died while navigating. I plugged it into the Nekteck and got 30% charge in 20 minutes—enough to reach the next town.
Using the 12V Output Port
Some Nekteck models include a 12V DC socket for powering car accessories:
- Plug in devices like tire inflators, coolers, or dashcams (check the device’s power requirements).
- Turn on the Nekteck first, then connect the accessory.
- Monitor the battery level—high-drain devices can drain the jump starter quickly.
Tip: A tire inflator might draw 10–15A, which could deplete the jump starter in 20–30 minutes. Plan accordingly.
LED Flashlight Modes
Most Nekteck models have a multi-mode LED flashlight:
- Solid on: For general use.
- Strobe: For emergencies (e.g., signaling for help).
- SOS: Blinks in Morse code for “SOS” (three short, three long, three short).
Real-life use: I used the SOS mode once when my car broke down on a remote road. A passing truck driver saw the light and stopped to help.
Maintenance and Troubleshooting
How to Store Your Nekteck Properly
Storage is critical for battery health:
- Keep it in a cool, dry place (ideal temp: 68°F/20°C).
- Avoid leaving it in a hot car—temperatures above 113°F/45°C can degrade the battery.
- Recharge every 3 months if unused. Lithium batteries lose charge over time.
My mistake: I left mine in the trunk all summer, and the battery capacity dropped by 20% after three months. Now I charge it quarterly.
Common Issues and Fixes
Even the best devices have quirks. Here’s how to handle them:
- Jump starter won’t turn on: Charge it fully. If it still doesn’t work, reset by holding the power button for 10 seconds.
- Car won’t start after connection: Check clamps for corrosion or looseness. Ensure the Nekteck has at least 30% charge.
- USB ports not working: Try a different cable or port. Some devices need a minimum voltage to charge.
- Overheating: If the unit gets hot, turn it off and let it cool. Avoid using it in direct sunlight.
Pro tip: If the safety features (like reverse polarity protection) activate, disconnect the cables, fix the issue, and restart.
When to Replace Your Jump Starter
Like all batteries, Nekteck jump starters degrade over time. Signs you need a replacement:
- Holds less than 50% charge after a full charge cycle.
- Swollen battery casing (a serious safety hazard).
- Fails to jump start multiple cars in a row.
Example: My first Nekteck lasted 4 years before the battery couldn’t hold a charge. I replaced it with the newer 18,000mAh model.
Data and Performance: What to Expect
Jump Starter Specifications at a Glance
Here’s a comparison of popular Nekteck models to help you choose:
| Model | Battery Capacity | Peak Current | USB Output | Flashlight | Weight |
|---|---|---|---|---|---|
| Nekteck 12,000mAh | 12,000mAh | 800A | 2x 2.4A | 3 modes | 1.2 lbs |
| Nekteck 18,000mAh | 18,000mAh | 1,200A | 3x 2.4A (incl. USB-C) | 4 modes (incl. SOS) | 1.8 lbs |
| Nekteck 20,000mAh | 20,000mAh | 1,500A | 3x 3.0A (incl. PD 18W) | 5 modes (incl. strobe) | 2.1 lbs |
Note: Higher capacity means more jump starts per charge, but also more weight. The 12,000mAh model is great for compact cars, while the 20,000mAh handles trucks and SUVs.
Real-World Performance
Based on user reviews and my experience:
- A fully charged 12,000mAh Nekteck can jump start a 4-cylinder car 15–20 times.
- It takes 3–5 seconds to start most engines (vs. 10–15 seconds with traditional jumper cables).
- USB charging speed: ~2 hours to charge a smartphone from 0–100%.
Caveat: Cold weather (below 32°F/0°C) reduces battery efficiency. Keep the Nekteck inside your car during winter.
Final Thoughts: Why Every Driver Needs This Guide
Let’s face it—dead batteries don’t come with a warning. But with the Nekteck jump starter and these Nekteck jump starter instructions, you’re prepared for anything. I’ve used mine to help neighbors, family, and even strangers on the side of the road. It’s not just a tool; it’s peace of mind in a compact package.
Remember, the key to safe use is following the steps precisely—especially the connection order and storage tips. Don’t skip the maintenance, and never ignore warning signs like overheating or swelling. Whether you’re a city commuter or an off-road adventurer, the Nekteck is a reliable partner that won’t leave you stranded.
So, keep this guide handy, charge your Nekteck regularly, and drive with confidence. After all, the best emergency is the one you’ve already prepared for.
Frequently Asked Questions
How do I use the Nekteck jump starter for the first time?
To use your Nekteck jump starter, fully charge it via the included USB cable, then connect the clamps (red to positive/+, black to negative/-) on your car battery and press the power button. Always follow the vehicle manufacturer’s jump-starting guidelines for safety.
What safety precautions should I follow with Nekteck jump starter instructions?
Ensure the device is off before connecting, avoid touching metal clamps together, and never use it near flammable materials. The Nekteck jump starter includes built-in protections like reverse polarity alerts to prevent accidents.
Can the Nekteck jump starter charge other devices?
Yes! The Nekteck jump starter features USB ports to charge phones, tablets, or other electronics. Use the included USB cable and select the appropriate output (5V/2A or 9V/2A) for optimal charging speed.
Why won’t my Nekteck jump starter turn on?
If the device doesn’t power on, check if the battery is depleted and charge it for 4–6 hours. Also, inspect the power button and ensure the battery level indicator lights up during charging.
How often should I recharge my Nekteck jump starter when not in use?
Recharge it every 3–6 months to maintain battery health, even if unused. The Nekteck jump starter’s manual recommends keeping the battery at 50% or higher for long-term storage.
What do the LED indicators mean on the Nekteck jump starter?
The LED lights display battery level (25%, 50%, 75%, 100%) and error alerts (e.g., flashing red for reverse polarity). Refer to the Nekteck jump starter instructions manual for detailed troubleshooting.