
Featured image for nekteck car jump starter instructions
Image source: tiretractionmats.com
Master your Nekteck Car Jump Starter in minutes with this clear, step-by-step guide designed to get your vehicle running safely and efficiently. Follow simple instructions—from charging the device to jump-starting your car— and avoid common mistakes that can damage your battery or void the warranty.
Key Takeaways
- Read the manual first: Always review Nekteck jump starter instructions before use to avoid errors.
- Check battery levels: Ensure the device is fully charged before jump-starting your car.
- Connect clamps properly: Attach red to positive (+) and black to negative (-) terminals securely.
- Power on before connecting: Turn on the jump starter only after clamps are correctly placed.
- Wait before starting: Allow 30 seconds after connection before attempting to start the engine.
- Disconnect safely: Remove clamps in reverse order after the car starts to prevent sparks.
📑 Table of Contents
- Why You Need a Reliable Jump Starter (And How the Nekteck Can Help)
- Getting to Know Your Nekteck Jump Starter
- Step-by-Step: How to Jump Start Your Car with the Nekteck
- Charging and Maintaining Your Nekteck Jump Starter
- Using Your Nekteck as a Power Bank and Emergency Tool
- Common Problems and How to Fix Them
- Final Thoughts: Why the Nekteck Jump Starter Is Worth It
- Quick Reference: Nekteck Jump Starter Specs and Tips
Why You Need a Reliable Jump Starter (And How the Nekteck Can Help)
Picture this: It’s 7 a.m. on a freezing winter morning. You’re already running late for work, and when you turn the key in your car, all you hear is a weak click-click-click. Your battery is dead. Again. You’re stranded, stressed, and your phone battery is at 12%. Sound familiar? We’ve all been there. A dead car battery doesn’t care about your schedule, your plans, or how much you’ve prepared. That’s why having a dependable jump starter in your car isn’t just a nice-to-have—it’s a must-have.
Enter the Nekteck car jump starter. This compact, powerful device has become a lifesaver for countless drivers. Whether you’re stuck in a grocery store parking lot, a remote campsite, or just your own driveway, the Nekteck jump starter can get your car running again in minutes—no jumper cables or second vehicle required. But like any tool, it only works well if you know how to use it properly. That’s where this Nekteck car jump starter instructions guide comes in. I’ve used mine for over a year, and I’ve learned the ins and outs—what works, what to avoid, and how to get the most out of your device. Whether you’re a first-time buyer or just need a refresher, this step-by-step guide will walk you through everything you need to know.
Getting to Know Your Nekteck Jump Starter
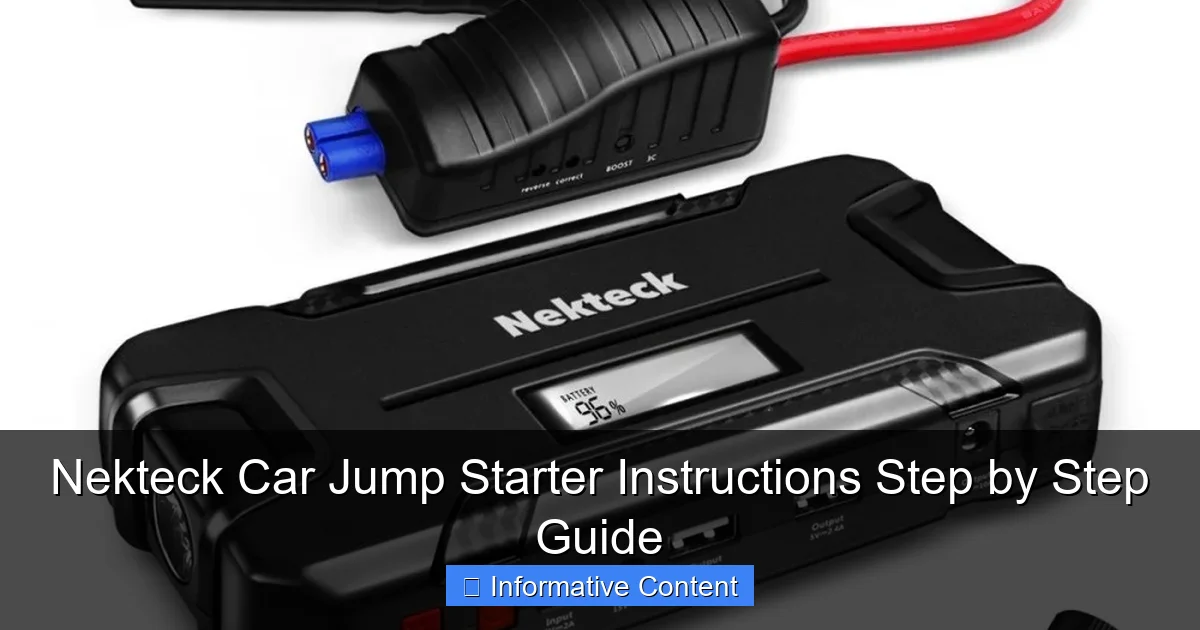
Before you even think about reviving a dead battery, it’s important to understand what you’re working with. The Nekteck jump starter isn’t just a battery pack—it’s a multi-functional emergency tool. But to use it safely and effectively, you need to know its parts, features, and capabilities.
Visual guide about nekteck car jump starter instructions
Image source: content.propertyroom.com
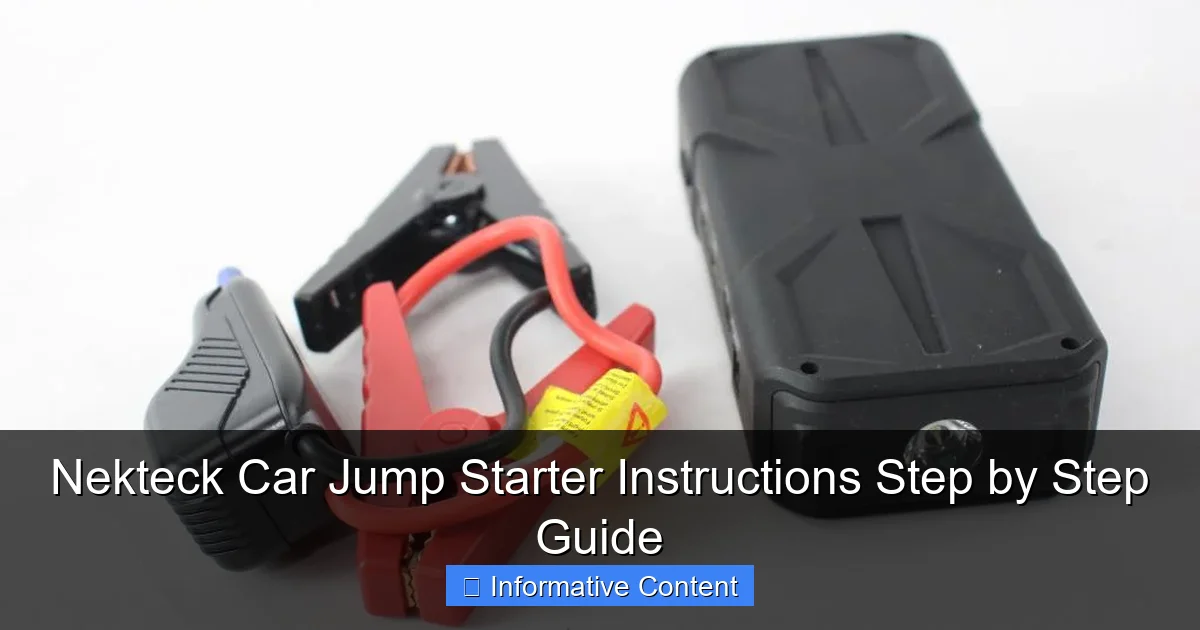
What’s in the Box?
When you first unbox your Nekteck jump starter, you’ll typically find:
- The main jump starter unit (available in various capacities like 12,000mAh, 18,000mAh, etc.)
- Smart jumper cables with built-in protection
- USB charging cable (often micro-USB or USB-C)
- Wall charger (sometimes included, sometimes not)
- User manual (don’t skip this!)
- Carrying case or pouch
Take a moment to inspect each component. Make sure the jumper cables aren’t frayed or bent, and that the clamps open and close smoothly. The unit itself should feel solid, with no cracks or loose parts. If anything looks damaged, contact customer support right away.
Key Features and Specifications
The Nekteck jump starter is more than just a jump starter. Depending on your model, you might have:
- Peak current output: Usually 1,000–2,000 amps—enough to start most 12V gasoline and diesel engines (up to 7.0L gas or 5.5L diesel)
- Battery capacity: Ranges from 12,000mAh to 20,000mAh—this affects how many jumps you can do on a single charge
- Built-in safety protections: Reverse polarity, over-current, short-circuit, and temperature protection
- LED flashlight: With multiple modes (steady, SOS, strobe)—super handy in emergencies
- USB ports: For charging phones, tablets, GPS units, or other small electronics
- LCD or LED display: Shows battery level, input/output status, and error codes (on newer models)
One thing I love about my Nekteck (18,000mAh model) is the smart cable system. The jumper cables have a small control box that prevents sparks, reverses polarity warnings, and cuts off power if something goes wrong. This isn’t just a safety feature—it’s peace of mind.
Choosing the Right Model for Your Vehicle
Not all Nekteck jump starters are the same. A compact 12,000mAh model might be perfect for a small sedan, but if you drive an SUV or a diesel truck, you’ll want at least 18,000mAh with higher cranking amps. Here’s a quick guide:
- Small cars (compact sedans, hatchbacks): 12,000–14,000mAh, 800–1,000A peak
- Midsize cars, crossovers: 16,000–18,000mAh, 1,200–1,500A peak
- SUVs, trucks, diesel engines: 18,000mAh+, 1,800–2,000A peak
Pro tip: Check your vehicle’s manual or the battery label for its cold-cranking amps (CCA). Your jump starter should have at least 2–3 times the CCA rating for reliable starts, especially in cold weather.
Step-by-Step: How to Jump Start Your Car with the Nekteck
Now that you know your device, let’s get into the heart of the matter: Nekteck car jump starter instructions for actually starting your car. This process is safe, fast, and—once you’ve done it once—almost effortless.
Step 1: Safety First – Park and Prepare
Before touching anything, make sure you’re safe:
- Park your car on a flat surface, away from traffic.
- Turn off the engine, headlights, radio, and any accessories.
- Engage the parking brake. If you have a manual transmission, put it in neutral (or first gear if on a hill).
- Pop the hood and locate the battery. It’s usually in the engine bay, but some cars (like BMWs) hide it under the floor mat in the trunk or under a seat.
Wear gloves if possible—battery terminals can get dirty or corroded. And keep pets and kids away from the area.
Step 2: Check Your Nekteck’s Battery Level
Press the power button on the Nekteck to check the battery level. You’ll see LED indicators or an LCD display. You need at least 25–30% charge to safely jump start a car. If it’s lower, charge it first (more on that later).
Example: My Nekteck has 4 LED bars. If only one bar is lit, I know I need to charge it before using it. Trying to jump start with a nearly dead jump starter is like trying to start a fire with a damp match—it won’t work.
Step 3: Connect the Smart Jumper Cables
This is where the magic happens—and where most people get nervous. But with the Nekteck’s smart cables, it’s foolproof if you follow the steps:
- Connect the red (positive) clamp to the positive (+) terminal on your car battery. It’s usually marked with a “+” sign and may have a red cover.
- Connect the black (negative) clamp to a ground point on the engine block or a clean, unpainted metal surface. Do not connect it to the negative (-) terminal of the battery if the battery is leaking or damaged. Grounding to the engine block prevents sparks near the battery.
- Once connected, the Nekteck’s smart cable should light up or beep. Some models show “OK” on the display, indicating a safe connection.
Common mistake: Swapping the clamps. If you connect red to negative and black to positive, the Nekteck’s safety system will detect reverse polarity and flash a warning light. Do not force it. Disconnect and reconnect correctly.
Step 4: Start Your Engine
Now the moment of truth:
- Get in your car and turn the key to “ON” (don’t start yet). Wait 10–15 seconds. This allows the car’s electronics to reset and the jump starter to stabilize.
- Turn the key to start the engine. If it doesn’t start on the first try, wait 15–20 seconds before trying again. Most cars start on the first or second try.
If the engine turns over but doesn’t start, don’t panic. Try one more time. If it still fails, the issue might not be the battery—it could be the starter, fuel pump, or something else. But in 90% of cases, one or two attempts are all you need.
Step 5: Disconnect and Store
Once your car is running:
- Disconnect the black clamp first, then the red clamp. This order prevents sparks.
- Let your engine run for at least 10–15 minutes to recharge the battery. If possible, take a short drive—this helps the alternator fully recharge the battery.
- Store the Nekteck in its case and put it back in your car (I keep mine under the driver’s seat).
Pro tip: After a jump start, your car’s battery might still be weak. Consider replacing it soon—especially if the jump was due to age, cold weather, or frequent short trips.
Charging and Maintaining Your Nekteck Jump Starter
Your Nekteck won’t help you if it’s dead when you need it. Proper charging and maintenance are crucial for reliability.
How to Charge Your Nekteck
Charging is simple, but there are a few best practices:
- Use the included charger or a high-quality USB-C wall adapter (5V/2A or higher).
- Plug the USB cable into the input port on the Nekteck (usually marked “IN” or with a battery icon).
- Charge until all LED bars are lit or the display shows 100%. This usually takes 4–6 hours.
- Do not leave it charging overnight—overcharging can reduce battery lifespan.
I charge mine every 2–3 months, even if I haven’t used it. Lithium-ion batteries degrade over time, and a fully charged unit lasts longer.
How Often Should You Recharge?
Nekteck jump starters can hold a charge for 3–6 months, depending on the model and ambient temperature. But here’s the catch: heat and cold are enemies.
- High temperatures (above 95°F/35°C) can damage the battery.
- Freezing temperatures (below 32°F/0°C) reduce battery efficiency and capacity.
I keep mine in my car, but in summer, I store it in the trunk (cooler than the cabin). In winter, I move it to the glove compartment or under the seat to avoid extreme cold.
Long-Term Storage Tips
If you’re not using your Nekteck for a while (e.g., storing a car for winter), follow these steps:
- Charge it to 50–70% (not 100%). Full charge accelerates battery degradation during storage.
- Store in a cool, dry place (68–77°F/20–25°C is ideal).
- Recharge every 3–4 months to keep the battery healthy.
- Check the manual for model-specific storage guidelines.
Using Your Nekteck as a Power Bank and Emergency Tool
The Nekteck isn’t just for jump starts. It’s a versatile emergency kit in one compact package.
Charging Your Phone, Tablet, or GPS
Need to call for help or navigate to a mechanic? Use the USB ports:
- Connect your device with a USB cable.
- Press the power button to activate output.
- Most models have multiple ports (USB-A, USB-C, sometimes QC 3.0 for fast charging).
I once used mine to charge my phone while waiting for a tow truck. The Nekteck gave me an extra 80% charge—enough to call, text, and use GPS for hours.
Using the Built-in LED Flashlight
The flashlight has three modes:
- Steady light: For general use (e.g., checking under the hood at night).
- SOS mode: Flashes the international distress signal (three short, three long, three short).
- Strobe mode: High-intensity blinking—great for visibility in fog or heavy rain.
To switch modes, hold the flashlight button for 2–3 seconds. I’ve used the SOS mode during a nighttime breakdown on a dark road—it caught the attention of a passing motorist who stopped to help.
Other Handy Features
Some Nekteck models include:
- Air compressor (in combo models)—for inflating tires or sports equipment.
- Digital voltmeter—to test your car battery’s voltage without a separate tool.
- Overload protection—automatically shuts off if you try to charge a device that draws too much power.
Common Problems and How to Fix Them
Even the best tools have issues. Here are the most common problems with the Nekteck jump starter and how to solve them.
“The Nekteck Won’t Turn On”
Possible causes:
- Dead battery (charge it for 30+ minutes).
- Faulty power button (try holding it longer or pressing multiple times).
- Internal damage (if dropped or exposed to water).
Solution: Try charging with a different cable or wall adapter. If it still won’t turn on, contact Nekteck support. Most units have a 1–2 year warranty.
“It Won’t Jump Start My Car”
This is the big one. If your Nekteck powers on but your car won’t start:
- Check connections: Are the clamps clean and tight? Corrosion on terminals can block current.
- Check the Nekteck’s charge: Even if it shows 25%, cold weather can reduce effective capacity.
- Check your car’s battery: If it’s completely dead (0 volts), the jump starter might not detect it. Try “force mode” (if your model has it) or tap the battery terminals with a wrench to wake it up.
- Check the starter: If the engine clicks but doesn’t turn over, the starter might be bad.
Pro tip: If your Nekteck has a “force mode,” use it for stubborn batteries. This bypasses some safety checks but should only be used when necessary.
“The Clamps Get Hot”
A little warmth is normal during a jump start. But if they’re too hot to touch, disconnect immediately. This could mean:
- A short circuit in the cables.
- Excessive current draw (e.g., trying to jump a large diesel engine with a small unit).
- Damaged internal wiring.
Stop using the unit and contact support. Don’t risk a fire.
“It Charges Slowly”
If your Nekteck takes longer than 6 hours to charge:
- Use a higher-output charger (2A or 3A).
- Make sure the USB cable isn’t damaged.
- Check the charging port for debris.
Final Thoughts: Why the Nekteck Jump Starter Is Worth It
After using my Nekteck jump starter for over a year—through winter freezes, summer heatwaves, and multiple dead batteries—I can confidently say it’s one of the best investments I’ve made for my car. It’s not just about the Nekteck car jump starter instructions; it’s about the peace of mind that comes with knowing you’re prepared for the unexpected.
Sure, it has a few quirks. The flashlight could be brighter, and the charging time is a bit long. But compared to the stress of being stranded, waiting for help, or paying for a tow, those are minor trade-offs. The safety features, compact size, and multi-functionality make it a standout in a crowded market.
Whether you’re a daily commuter, a road-trip enthusiast, or someone who just wants to be ready for anything, the Nekteck jump starter is a smart addition to your car kit. Follow these instructions, maintain it properly, and you’ll never have to rely on a stranger with jumper cables again. And when your phone dies at the worst possible time? You’ve got that covered too.
Stay safe, stay prepared, and keep that Nekteck charged and ready. Because when your car says “not today,” you’ll have the power to say “yes, we are.”
Quick Reference: Nekteck Jump Starter Specs and Tips
| Feature | Details | Tip |
|---|---|---|
| Best for | Gasoline engines up to 7.0L, diesel up to 5.5L | Check your vehicle’s CCA rating |
| Battery Capacity | 12,000mAh to 20,000mAh | Higher capacity = more jumps per charge |
| Charge Time | 4–6 hours (with 2A charger) | Use a fast charger to reduce time |
| Storage Temp | 32°F–95°F (0°C–35°C) | Keep out of direct sun and freezing temps |
| Jump Attempts per Charge | 10–20 (depends on model and battery condition) | Charge after 3–5 uses |
| Warranty | 1–2 years (varies by model) | Register your product online |
Frequently Asked Questions
How do I use the Nekteck car jump starter for the first time?
Before using your Nekteck car jump starter, fully charge it using the included USB cable or AC adapter. Connect the clamps to the battery terminals (red to positive, black to negative) and start the vehicle—the jump starter will automatically detect the connection and supply power.
Can I use the Nekteck jump starter on different vehicle types?
Yes, the Nekteck car jump starter is compatible with 12V vehicles, including cars, trucks, motorcycles, and boats. Always check your vehicle’s manual to confirm voltage requirements before use.
What should I do if the Nekteck jump starter doesn’t turn on?
If your Nekteck jump starter doesn’t power on, ensure it’s fully charged. If it still fails, press and hold the power button for 3 seconds or reset it by connecting it to a charger briefly to reactivate the battery.
How do I safely disconnect the Nekteck car jump starter after jump-starting?
After the engine starts, disconnect the black (negative) clamp first, followed by the red (positive) clamp. Avoid touching the clamps together and store them in the included case to prevent short circuits.
How often should I recharge my Nekteck jump starter when not in use?
Recharge your Nekteck car jump starter every 3–6 months to maintain optimal battery health, even if it’s unused. The device’s LED indicator will alert you when the battery is low.
Does the Nekteck jump starter have safety protections?
Yes, the Nekteck car jump starter includes overcurrent, short-circuit, and reverse polarity protections. The LED indicators and smart clamps help prevent damage to your vehicle or the device during use.