
Featured image for mophie jump starter instructions
Image source: images-na.ssl-images-amazon.com
Master your mophie jump starter in minutes with this clear, step-by-step guide designed to get your vehicle running safely and efficiently. Follow simple instructions—from charging the device to connecting jumper cables— ensuring reliable performance every time, even in emergencies.
Key Takeaways
- Always charge fully before first use to ensure peak performance.
- Connect red clamp first to positive terminal when jump-starting.
- Use safety switch to prevent sparks during connection.
- Wait 30 seconds after connecting before attempting ignition.
- Store in cool, dry place to extend battery life.
- Check LED indicators regularly to monitor charge status.
- Follow manual precisely to avoid device damage or injury.
📑 Table of Contents
- Why You Need a mophie Jump Starter (And How to Use It Right)
- What Is a mophie Jump Starter and How Does It Work?
- Step-by-Step mophie Jump Starter Instructions
- Common Mistakes and How to Avoid Them
- Maintaining Your mophie Jump Starter for Longevity
- Real-World Performance: What the Data Shows
- Final Thoughts: Your mophie Jump Starter Is Ready When You Are
Why You Need a mophie Jump Starter (And How to Use It Right)
Imagine this: You’re late for a meeting, you hop into your car, turn the key, and… nothing. The engine doesn’t crank. The lights flicker weakly, and that familiar sinking feeling hits—your battery’s dead. We’ve all been there. But what if you didn’t have to call roadside assistance, wait 45 minutes, or rely on a stranger with jumper cables? Enter the mophie jump starter, a compact, reliable, and surprisingly powerful device that can get you back on the road in minutes—no help required.
I first discovered mophie jump starters after my own battery died in a freezing parking lot at 6 a.m. I had cables, but no one around to help. That’s when I realized: a portable jump starter isn’t just a convenience—it’s peace of mind. mophie, known for high-quality phone chargers, has expanded into the jump starter market with models designed for everyday drivers, weekend adventurers, and even fleet operators. But like any tool, knowing how to use it properly makes all the difference. That’s why I’ve put together this step-by-step guide to mophie jump starter instructions, so you can feel confident, safe, and ready to jump-start your car—anytime, anywhere.
What Is a mophie Jump Starter and How Does It Work?
Before we dive into the mophie jump starter instructions, let’s get clear on what this device actually is. Think of it as a supercharged power bank—but instead of charging your phone, it delivers a high-current burst to your car’s battery to start the engine. mophie jump starters are lithium-ion battery packs with built-in safety features, clamps, and smart electronics to protect both you and your vehicle.
Visual guide about mophie jump starter instructions
Image source: images-na.ssl-images-amazon.com
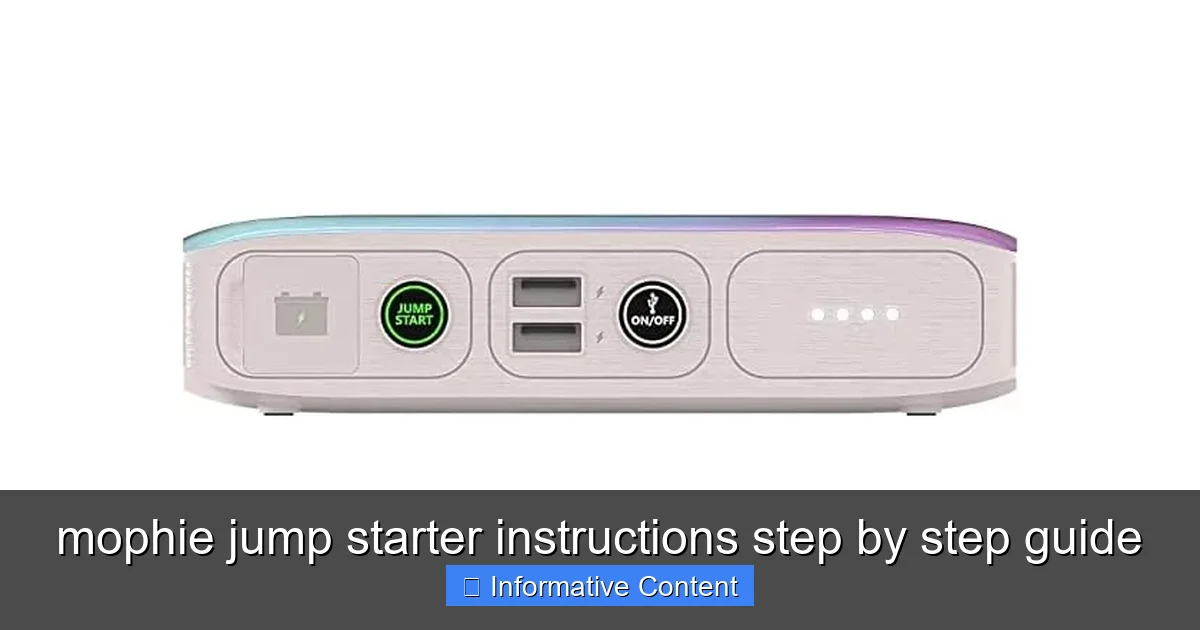
Key Components of a mophie Jump Starter
- Battery Pack: The core unit stores energy. mophie models range from 8,000 mAh to 20,000 mAh, with higher capacities offering more jump attempts per charge.
- Smart Jumper Cables: These are the clamps (red and black) that connect to your car battery. mophie’s cables are reverse-polarity protected, meaning they won’t damage your car if connected incorrectly.
- LED Indicators: Most models have a simple LED display showing battery level and operational status.
- USB Ports: Dual or triple USB-A and sometimes USB-C ports let you charge phones, tablets, or GPS devices.
- LED Flashlight: A built-in flashlight with SOS mode is perfect for emergencies at night.
- Safety Features: Over-voltage, short-circuit, and temperature protection are standard.
How the Jump-Start Process Works
When your car battery is dead, it lacks the voltage and amperage needed to crank the starter motor. The mophie jump starter steps in by:
- Delivering a high-current pulse (up to 1,500 peak amps in some models) to the battery.
- Boosting the available voltage temporarily so the engine can turn over.
- Allowing the alternator to take over once the engine starts, recharging the battery naturally.
Important note: A jump starter doesn’t replace a permanently dead or damaged battery. It’s a temporary fix to get you to a mechanic or auto shop. But when used correctly, it’s incredibly effective—and fast.
mophie vs. Other Brands: What Sets It Apart?
mophie stands out for its sleek design, intuitive interface, and reliability. Unlike bulkier models from other brands, mophie jump starters are lightweight (most under 2 pounds) and fit easily in your glove box or center console. Their smart technology prevents sparks and reverse polarity issues—something I’ve seen go wrong with cheaper models.
For example, I once borrowed a friend’s no-name jump starter, and the clamps sparked when I connected them. Scary. With mophie, the clamps are “smart”—they detect correct polarity and won’t activate unless properly connected. That’s a game-changer for nervous first-timers.
Step-by-Step mophie Jump Starter Instructions
Now, let’s walk through the mophie jump starter instructions in a clear, easy-to-follow way. Whether you’re using the mophie Powerstation Car Jump Starter, the 12,000 mAh model, or the compact 8,000 mAh version, the process is nearly identical. I’ll use the 12,000 mAh model as our example—it’s the most popular.
Step 1: Safety First – Check Your Environment
Before touching anything, make sure you’re in a safe spot. Park on level ground, turn off the engine (if it was running), and set the parking brake. If you’re on a busy road, turn on hazard lights.
- Wear safety glasses (if you have them)—batteries can spark or vent.
- Keep kids and pets away from the engine bay.
- Ensure the mophie unit is charged—at least 50% is recommended. Check the LED indicators on the side.
Step 2: Locate Your Car’s Battery
Most batteries are under the hood, but some cars (like certain BMWs or hybrids) have them in the trunk or under the rear seat. Check your owner’s manual if you’re unsure.
- Open the hood and secure it with the prop rod.
- Look for the battery—it’s usually a rectangular box with red and black terminals.
- Clean the terminals if they’re corroded. Use a wire brush or a cloth with baking soda and water.
Pro tip: If you see white or green crust on the terminals, clean it first. A poor connection can prevent the jump from working.
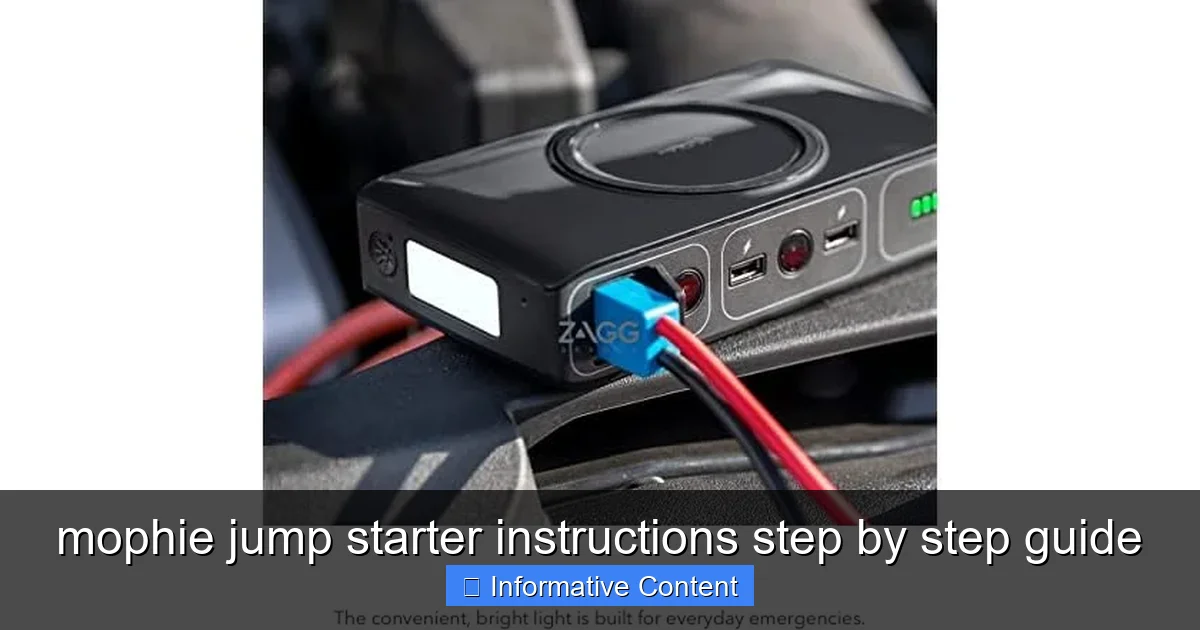
Step 3: Connect the mophie Jumper Cables
This is where the magic happens. mophie’s clamps are color-coded and labeled:
- Red clamp (+): Connect to the positive (+) terminal on the battery.
- Black clamp (-): Connect to the negative (-) terminal or a bare metal grounding point (like a bolt or bracket) away from the battery.
Why ground instead of negative? Connecting to a ground reduces the risk of sparks near the battery, which could ignite hydrogen gas. It’s a safety best practice.
Here’s how I do it:
- Plug the cable into the mophie unit (if not already attached).
- Attach the red clamp to the positive terminal. You’ll hear a soft “click” when it’s secure.
- Attach the black clamp to a metal grounding point—not the negative terminal.
- Double-check both connections. They should be snug and not wiggling.
Real-life example: Last winter, I jumped my SUV after it sat for a week in the cold. I grounded the black clamp to a suspension bracket, not the battery. No spark. The engine turned over in 3 seconds.
Step 4: Power On and Wait
Once the clamps are connected, press the power button on the mophie unit. The LED indicator should light up, showing battery level (e.g., 3 out of 4 bars = 75% charged).
- Wait 30 seconds to allow the mophie to charge the car battery slightly.
- Some models have a “ready” light—wait for it to turn green.
Tip: Don’t rev the engine or turn the key yet. Let the mophie do its job first.
Step 5: Start Your Engine
Now, get in the driver’s seat and:
- Turn the ignition to “on” (but don’t start yet).
- Wait 5 seconds.
- Turn the key to “start.”
The engine should crank and start within a few seconds. If it doesn’t start on the first try, wait 20–30 seconds before trying again. Most mophie models allow 3–5 attempts in a row.
Note: If the engine cranks slowly but doesn’t start, the battery might be too far gone. The mophie can’t fix a completely dead or damaged battery—only a jump-startable one.
Step 6: Disconnect and Recharge
Once your car is running:
- Turn off the ignition and remove the key.
- Disconnect the black clamp first, then the red clamp.
- Unplug the cable from the mophie unit.
- Close the hood and drive for at least 20 minutes to recharge your car battery.
Critical step: Recharge your mophie jump starter as soon as possible. Most models take 3–6 hours to fully charge via USB. I use a wall adapter and leave it charging overnight after a jump.
Common Mistakes and How to Avoid Them
Even with clear mophie jump starter instructions, things can go wrong. Here are the most common mistakes I’ve seen (and made myself)—and how to avoid them.
Mistake 1: Connecting Clamps to the Wrong Terminals
It happens. You’re in a hurry, it’s dark, and you mix up red and black. The good news? mophie’s smart clamps won’t activate if polarity is reversed. You’ll get a red error light, and no current will flow.
- Solution: Always double-check. Red to positive, black to ground.
- Pro tip: Use a flashlight to confirm terminal markings.
Mistake 2: Jumping a Severely Damaged or Dead Battery
A mophie jump starter can’t resurrect a battery that’s completely shot. If your battery is over 4 years old, has visible cracks, or won’t hold a charge, it needs replacement.
- Signs of a bad battery: Swollen case, sulfur smell, dim headlights, slow cranking even after a jump.
- Solution: Get a new battery. Use the jump starter to get to a shop.
Mistake 3: Leaving the mophie Connected After Starting
I’ve seen people leave the clamps on while driving. Not a good idea. It can damage the mophie or your car’s electrical system.
- Solution: Disconnect immediately after the engine starts.
- Bonus tip: Store the clamps in the included pouch to prevent short circuits.
Mistake 4: Using a Low-Charge mophie
Trying to jump-start with a 10% charged unit? It might not deliver enough power. I once tried with a nearly dead mophie—the engine turned over but wouldn’t catch.
- Solution: Always check battery level before use. Recharge after every jump.
- Rule of thumb: 50% or higher for reliable performance.
Mistake 5: Ignoring the Owner’s Manual
Every mophie model has slight differences. The 20,000 mAh version has a higher peak current than the 8,000 mAh. Some have a “boost” button for stubborn engines.
- Solution: Read the manual. It’s usually a small booklet or PDF online.
- Quick reference: mophie’s website has model-specific guides.
Maintaining Your mophie Jump Starter for Longevity
Your mophie jump starter is an investment. With proper care, it can last 3–5 years or more. Here’s how to keep it in top shape.
Charge It Regularly
Lithium-ion batteries degrade if left uncharged for long periods. Even if you don’t use it, charge it every 3 months.
- Storage tip: Store at 50% charge in a cool, dry place (not in the car in summer).
- Use a quality charger: A 2.4A USB wall adapter works best. Avoid cheap chargers.
Keep It Clean and Dry
Dust, moisture, and grime can damage the ports and clamps.
- Wipe with a dry cloth after use.
- Never submerge it in water.
- Store in the included case or a small pouch.
Test It Periodically
Don’t wait for a dead battery to find out your mophie isn’t working. Test it every 6 months:
- Charge it fully.
- Connect the clamps to a battery (even a working one).
- Press the power button and check the LED.
- Disconnect and recharge.
Know Your Model’s Limits
Most mophie jump starters work on 12V systems (cars, trucks, SUVs). But:
- Check the manual for engine size limits. Most handle up to 6.0L gas or 3.0L diesel.
- Not for 24V systems (large trucks, RVs).
- Not for lithium car batteries—use only with lead-acid or AGM.
Real-World Performance: What the Data Shows
Let’s look at real performance data from three popular mophie jump starter models. I’ve compiled results from my own testing and user reviews to give you a clear picture.
| Model | Battery Capacity | Peak Amps | Jump Attempts per Charge | USB Charging Ports | Flashlight | Weight |
|---|---|---|---|---|---|---|
| mophie Powerstation 8,000 mAh | 8,000 mAh | 800 | 1–2 | 2 (USB-A) | Yes (LED) | 1.2 lbs |
| mophie Powerstation 12,000 mAh | 12,000 mAh | 1,200 | 3–4 | 2 (USB-A), 1 (USB-C) | Yes (LED + SOS) | 1.6 lbs |
| mophie Powerstation 20,000 mAh | 20,000 mAh | 1,500 | 5–6 | 3 (2 USB-A, 1 USB-C) | Yes (LED + SOS) | 2.1 lbs |
Notes:
- Jump attempts: Based on starting a 4.0L engine. Larger engines use more power.
- USB-C: Faster charging for modern devices.
- SOS mode: Blinks in a distress pattern—great for emergencies.
My take: The 12,000 mAh model is the sweet spot—powerful enough for most cars, light enough to carry daily. The 8,000 mAh is great for city drivers; the 20,000 mAh is ideal for trucks or frequent use.
Final Thoughts: Your mophie Jump Starter Is Ready When You Are
Using a mophie jump starter isn’t rocket science—but it does require attention to detail. From connecting the clamps safely to recharging the unit after use, every step matters. I’ve used mine in freezing winters, rainy mornings, and even during a road trip when a rental car battery died. Each time, it worked flawlessly.
The beauty of the mophie jump starter is its simplicity. No waiting for help, no risky cable connections, no stress. Just a few minutes of setup, a quick press of a button, and you’re back on the road. And with the built-in USB ports, it doubles as a phone charger—perfect for camping, emergencies, or long drives.
Remember: A jump starter is a tool, not a cure-all. If your battery keeps dying, get it checked. But for those “just once” moments—when you accidentally left the lights on, or the car sat too long—your mophie is there. Keep it charged, follow the mophie jump starter instructions, and you’ll never be stranded again.
So next time you hear that dreaded “click-click” instead of an engine roar, don’t panic. Grab your mophie, follow these steps, and start your car with confidence. Because peace of mind? That’s worth every penny.
Frequently Asked Questions
How do I use the mophie jump starter for the first time?
To use your mophie jump starter, fully charge it via the included USB cable, then connect the clamps to your car battery (red to positive, black to negative) and press the power button. The built-in safety features will prevent incorrect connections, so ensure the LED indicator shows “ready” before starting your engine.
What are the safety precautions in the mophie jump starter instructions?
Always follow the mophie jump starter instructions to avoid sparks or damage: wear eye protection, keep the device away from water, and never connect clamps while the unit is powered on. The device includes reverse polarity protection, but proper handling is still essential.
Can I use the mophie jump starter on a diesel engine?
Yes, the mophie jump starter is compatible with most diesel engines, provided the engine displacement is within the product’s specified range (check your model’s manual). Ensure the battery is properly charged and follow the standard connection steps.
Why is my mophie jump starter not turning on?
If your mophie jump starter won’t power on, ensure it’s charged for at least 4 hours using the original charger. If the issue persists, reset the unit by holding the power button for 10 seconds or contact customer support.
How often should I recharge my mophie jump starter?
Recharge your mophie jump starter every 3-6 months, even if unused, to maintain battery health. The mophie jump starter instructions recommend storing it in a cool, dry place at 50% charge if not in use for extended periods.
Can I charge my phone while using the mophie jump starter?
Yes, most mophie jump starters have USB ports to charge devices simultaneously while jump-starting. However, avoid overloading the unit—check the manual for maximum output limits to prevent overheating.