
Featured image for mighty whistler jump starter instructions
Image source: content.propertyroom.com
Master your Mighty Whistler jump starter with these simple, step-by-step instructions to ensure fast, safe vehicle jumps every time. Always connect the clamps correctly—red to positive, black to ground—and power on the unit before starting the engine to avoid sparks or damage. Keep this guide handy for reliable roadside assistance without the stress.
Key Takeaways
- Always read the manual first: Understand safety warnings and specific model instructions before use.
- Inspect clamps and cables: Check for damage to avoid sparks or poor connections.
- Connect red to positive (+): Attach the red clamp to the dead battery’s positive terminal first.
- Ground the black clamp properly: Attach it to an unpainted metal surface away from the battery.
- Charge fully before first use: Ensure maximum power delivery for reliable jump starts.
- Store in a cool, dry place: Preserve battery life and device performance over time.
📑 Table of Contents
- Why a Mighty Whistler Jump Starter Might Save Your Day
- Getting to Know Your Mighty Whistler Jump Starter
- Step-by-Step: How to Use Your Mighty Whistler Jump Starter
- Using Other Features: Charging Devices and Emergency Lights
- Maintenance, Storage, and Troubleshooting
- Comparing Mighty Whistler Models: Which One is Right for You?
- Final Thoughts: Why Every Driver Should Have One
Why a Mighty Whistler Jump Starter Might Save Your Day
Picture this: it’s a cold winter morning, you’re running late for work, and your car won’t start. The engine cranks once… then silence. Your heart sinks. The battery is dead. Again. You call a friend, wait for a jump, or worse—call a tow truck. But what if you had a compact, reliable tool in your trunk that could fix this in minutes—without needing another car?
That’s where the Mighty Whistler jump starter comes in. It’s not just another gadget; it’s peace of mind. Whether you’re a weekend adventurer, a daily commuter, or someone who just wants to avoid roadside panic, this portable powerhouse can jump-start your car, charge your phone, and even power small devices. But like any tool, it works best when you know how to use it safely and effectively. That’s exactly what this guide is for: to walk you through every step of using your Mighty Whistler jump starter, from unboxing to troubleshooting, with real-world tips and a no-nonsense approach.
Getting to Know Your Mighty Whistler Jump Starter
Before you plug in or press anything, it’s important to understand what you’re working with. The Mighty Whistler jump starter is more than just a battery—it’s a multi-functional emergency kit in a sleek, portable package. But to use it right, you need to know its parts, features, and what makes it different from other jump starters on the market.
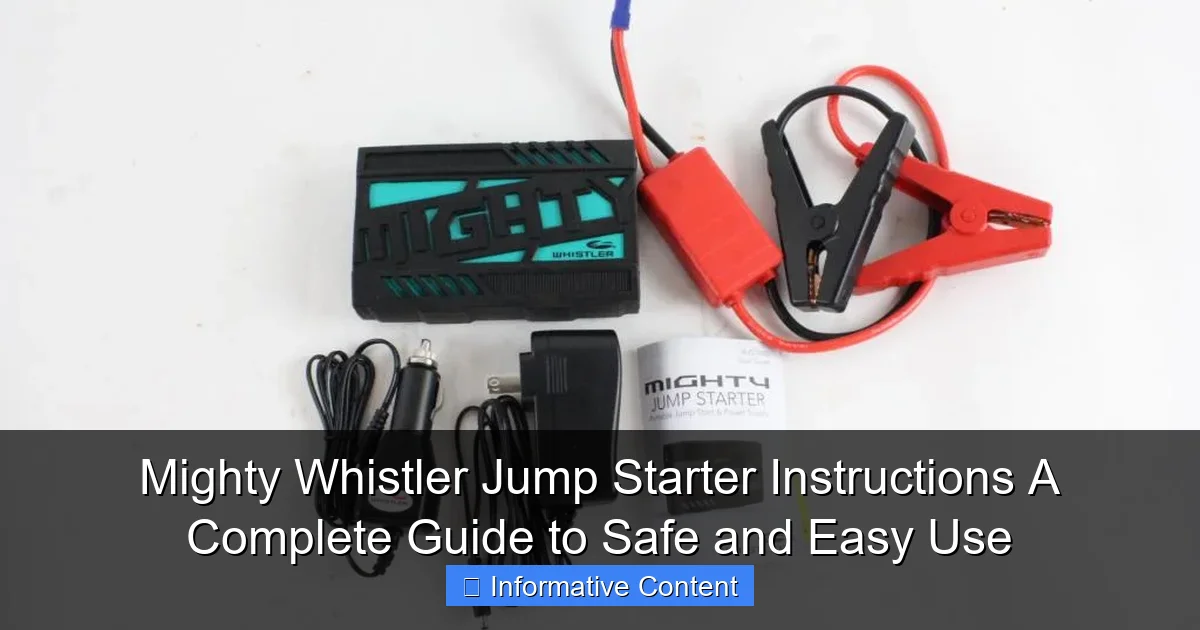
Visual guide about mighty whistler jump starter instructions
Image source: content.propertyroom.com
What’s in the Box?
When you open the box, you’ll typically find:
- The Mighty Whistler jump starter unit
- Smart jumper cables (with built-in protection)
- USB charging cable (usually USB-A to micro-USB or USB-C)
- Wall charger and/or 12V car charger
- User manual (yes, read it!)
- Carrying case (on higher-end models)
Pro tip: Keep all the accessories in the carrying case or a labeled bag. Nothing’s worse than needing a jump and realizing you left the cables at home.
Key Features and Specs
The Mighty Whistler comes in several models, but most share these core features:
- Battery capacity: Ranges from 12,000mAh to 20,000mAh (higher = more jumps per charge)
- Peak current: 1200A to 2000A (enough for most cars, SUVs, and light trucks)
- USB ports: 1-3 ports (5V/2.1A for phones, tablets, GPS)
- LED flashlight: With SOS and strobe modes
- Safety protections: Reverse polarity, short circuit, over-current, over-voltage
- LCD or LED battery display: Shows charge level and error codes
One thing I love is the smart cable system. Unlike old-school jumper cables, these have built-in protection that alerts you if you connect the clamps backward. That means less stress and fewer mistakes—especially in a panic.
Understanding the Controls and Display
On the front of the unit, you’ll usually find:
- A power button (press and hold to turn on)
- LED indicators (for battery level and status)
- A flashlight button (tap for on/off, hold for SOS)
- USB ports (sometimes with a rubber cover)
- A “Jump Start” button (on some models)
The display might show battery percentage, voltage, or error codes. For example, “E1” might mean reverse polarity, while “E3” could indicate low battery. Refer to your manual for exact codes—but don’t worry, the unit will usually prevent damage even if you make a mistake.
Step-by-Step: How to Use Your Mighty Whistler Jump Starter
Now for the main event: using the jump starter to bring your car back to life. This process is simple, but every step matters for safety and success. Let’s walk through it together, like we’re standing next to your car on a chilly morning.
Step 1: Check the Jump Starter’s Charge
Before anything else, check the battery level. Most Mighty Whistler models have an LED display or a “Check Battery” button. Press it—if all four bars are lit, you’re good to go. If it’s below 50%, charge it first. A low jump starter might not have enough power to crank a cold engine.
Real-world tip: I once tried to jump my SUV with a 30% charged unit. The car cranked but wouldn’t start. After charging to 100%, it worked perfectly. Lesson learned: never skip this step.
Step 2: Prepare Your Vehicle
Turn off the car completely. Remove the keys. Put the gear in park (or neutral for manual) and set the parking brake. This prevents the car from lurching forward when it starts.
Open the hood and locate the battery. Look for the positive (+) and negative (-) terminals. They’re usually marked clearly, but if not, the positive is the one with a red cover or cable.
Safety note: Don’t touch both terminals at the same time. Metal tools or jewelry can cause sparks. Keep your hands clear.
Step 3: Connect the Jumper Cables
Here’s the key part:
- Connect the red (positive) clamp to the positive terminal on your car battery.
- Connect the black (negative) clamp to a ground point—not the negative terminal. Use an unpainted metal surface like a bolt, bracket, or engine block. This reduces the risk of sparks near the battery.
- Double-check the connections. The clamps should be tight and not wobble.
If the cables have a “reverse polarity” alarm, you’ll hear a beep or see a red light if you connect them wrong. That’s your cue to disconnect and fix it. No harm done.
Step 4: Power On and Start the Engine
Now, turn on the Mighty Whistler. Press and hold the power button until the lights come on. Some models have a “Jump Start” mode—activate it if available.
Get in the car, turn the key, and crank the engine. It should start within a few seconds. If it doesn’t, wait 30-60 seconds and try again. Don’t crank for more than 5 seconds at a time—this can overheat the starter.
Tip: If the car starts but dies quickly, the battery might be too weak. Let the engine run for 10-15 minutes to charge the battery before turning it off.
Step 5: Disconnect Safely
Once the car is running, reverse the order:
- Turn off the jump starter.
- Disconnect the black clamp first.
- Disconnect the red clamp.
- Put the cables back in the case. Don’t leave them on the ground—they can get damaged or lost.
Close the hood, and you’re done! The jump starter should still have plenty of charge left for future use.
Using Other Features: Charging Devices and Emergency Lights
The Mighty Whistler isn’t just for jump-starting. It’s a full-on power station in a compact form. Here’s how to make the most of its other features.
Charging Your Phone, Tablet, or GPS
Most models have USB-A and/or USB-C ports. To charge a device:
- Use the included cable or your own high-quality one.
- Plug it into a USB port on the jump starter.
- Turn on the unit (if it doesn’t auto-power).
- Your device will start charging.
With a 15,000mAh model, you can charge an iPhone 15 about 4-5 times. A tablet might get 1-2 full charges. The charging speed depends on the device and port output (look for “2.1A” or “QC 3.0” on the label).
Tip: Keep the jump starter charged between uses. I charge mine every 3-4 months, even if I haven’t used it. This keeps the battery healthy.
Using the LED Flashlight
Stuck on the side of the road at night? The built-in flashlight is a lifesaver. Here’s how it works:
- Tap the flashlight button once for steady beam.
- Tap again to turn off.
- Hold for 3 seconds to activate SOS mode (flashes in a distress pattern).
- Some models have a strobe mode for signaling.
I used the SOS mode once when my car broke down on a dark highway. A passing truck driver saw the flashes and stopped to help. That light might just be the most underrated feature.
Powering 12V Devices (With an Adapter)
Some Mighty Whistler models have a 12V DC output (cigarette lighter socket). With the right adapter, you can power:
- Portable air compressors
- 12V coolers or heaters
- Inflation pumps for tires
- Emergency radios
Just plug the adapter into the 12V socket, then connect your device. Make sure the device’s power draw doesn’t exceed the jump starter’s max output (usually 10-15A).
Maintenance, Storage, and Troubleshooting
A jump starter is an investment. Treat it right, and it’ll last for years. Treat it poorly, and it might fail when you need it most. Here’s how to keep yours in top shape.
Charging and Storage Tips
- Charge fully every 3-4 months: Even if unused, lithium batteries degrade over time. A fully charged battery lasts longer than a low one.
- Store in a cool, dry place: Avoid extreme heat (like a hot garage) or freezing temperatures. Room temperature is ideal.
- Keep the unit clean: Wipe with a dry cloth. Don’t use water or solvents.
- Don’t leave it in the car long-term: Summer heat can damage the battery. Take it inside when not in use.
I keep mine in my home garage, in its case, on a shelf. It’s out of the way but easy to grab in an emergency.
Common Problems and How to Fix Them
Even the best tools have hiccups. Here are a few issues and solutions:
- Jump starter won’t turn on: Charge it for 1-2 hours. If still dead, the battery might be deeply discharged. Try a longer charge (up to 6 hours).
- Car won’t start after connection: Check clamps—are they tight? Is the jump starter charged? Try a different ground point.
- USB ports not working: Try a different cable. Some cheap cables don’t carry power well.
- Error codes (E1, E2, etc.): Refer to the manual. Most are safety alerts that resolve when you fix the connection.
- Flashlight won’t turn on: The unit might be in low-power mode. Turn it on fully first.
Pro tip: If the jump starter gets hot during use, let it cool down before storing. Don’t cover it while charging.
When to Replace the Battery
Most lithium jump starters last 3-5 years with proper care. Signs it’s time to replace:
- Holds less charge than before (e.g., only 2 jumps instead of 4)
- Takes much longer to charge
- Swelling or physical damage
- Frequent error codes
Unfortunately, most Mighty Whistler models aren’t user-replaceable. If the battery fails, contact customer support. Some offer battery replacement services for a fee.
Comparing Mighty Whistler Models: Which One is Right for You?
Not all Mighty Whistler jump starters are the same. They come in different sizes, capacities, and features. Here’s a quick guide to help you choose—or understand your current model better.
| Model | Battery (mAh) | Peak Current (A) | USB Ports | 12V Output | Best For |
|---|---|---|---|---|---|
| Whistler 12K | 12,000 | 1200 | 2 (1 USB-A, 1 USB-C) | No | Compact cars, sedans, small SUVs |
| Whistler 15K | 15,000 | 1500 | 3 (2 USB-A, 1 USB-C) | Yes (5A max) | Most vehicles, daily drivers |
| Whistler 20K | 20,000 | 2000 | 3 (2 USB-A, 1 USB-C) | Yes (10A max) | Large SUVs, trucks, frequent use |
| Whistler Pro 18K | 18,000 | 1800 | 3 (with QC 3.0) | Yes (15A max) | Off-road, camping, heavy-duty |
My take: For most people, the Whistler 15K is the sweet spot. It’s powerful enough for 90% of vehicles, has all the key features, and fits in a glovebox. If you drive a big truck or live in a cold climate, go for the 20K or Pro 18K. If you want something ultra-portable, the 12K works—but charge it more often.
Final Thoughts: Why Every Driver Should Have One
After using my Mighty Whistler jump starter for over two years—through winter freezes, summer road trips, and a few dead batteries—I can say this: it’s one of the most useful tools I’ve ever owned. It’s not flashy. It doesn’t need an app. But it works. Every. Single. Time.
What I love most is the independence it gives me. No more waiting for help. No more awkward phone calls. No more stress. Just a simple, safe, and effective way to get back on the road.
And while the Mighty Whistler isn’t perfect—some models could use longer cables, and the carrying case on lower-end units feels a bit flimsy—the core function is rock solid. The safety features are top-notch. The battery lasts. And the peace of mind? Priceless.
So whether you’re a new driver, a seasoned road warrior, or someone who just wants to be prepared, I highly recommend keeping a Mighty Whistler jump starter in your vehicle. Read the manual. Practice the steps. Charge it regularly. And when that cold morning comes and your car won’t start, you’ll know exactly what to do.
Because sometimes, the mightiest tool is the one that fits in your glovebox.
Frequently Asked Questions
How do I use the Mighty Whistler jump starter for the first time?
To use the Mighty Whistler jump starter, fully charge it via the included USB cable. Connect the clamps to the battery (red to positive, black to negative), turn on the device, and start your vehicle. Always follow the mighty whistler jump starter instructions for safety.
What should I do if the Mighty Whistler jump starter won’t turn on?
Ensure the device is charged for at least 3–4 hours. If it still doesn’t power on, check the battery level indicator or reset it by holding the power button for 10 seconds. Refer to the user manual for troubleshooting tips.
Can I charge my phone with the Mighty Whistler jump starter?
Yes! The jump starter includes a USB port for charging devices like phones or tablets. Simply connect your charging cable to the USB port and press the power button to activate output.
How long does the Mighty Whistler jump starter hold its charge?
The device retains its charge for up to 6 months in standby mode. For optimal performance, recharge it every 3 months, especially if unused. The mighty whistler jump starter instructions recommend periodic charging.
Is it safe to leave the jump starter connected after starting my car?
No, disconnect the clamps immediately after the engine starts. Leaving it connected can damage the jump starter or vehicle electronics. Always remove cables in reverse order (black first, then red).
What do the LED indicators on the Mighty Whistler mean?
The LED lights show battery level (green = full, yellow = medium, red = low) and alert you to errors (e.g., reversed clamps). Consult the manual for specific blink patterns and their meanings.