
Featured image for ideaplay jump starter instructions
Image source: everstartjumpstarter.com
Master your Ideaplay jump starter with these simple, foolproof instructions for instant power boosts anytime, anywhere. Designed for safety and efficiency, this guide walks you through proper cable connection, voltage checks, and jump-starting in minutes—no mechanical skills needed. Keep your engine running smoothly with reliable, step-by-step guidance that prevents damage and maximizes battery life.
Key Takeaways
- Read the manual first: Always review safety guidelines before using the Ideaplay jump starter.
- Check battery levels: Ensure the jump starter is fully charged prior to use.
- Connect red first: Attach red clamp to positive terminal, then black to ground.
- Wait before cranking: Allow 30 seconds after connection for voltage stabilization.
- Store properly: Keep in a cool, dry place to extend battery life.
- Test monthly: Power cycle every 30 days to maintain peak performance.
📑 Table of Contents
- Why You Need a Jump Starter (And How It Can Save Your Day)
- Understanding Your Ideaplay Jump Starter: Features and Components
- Step-by-Step Ideaplay Jump Starter Instructions
- Common Mistakes and How to Avoid Them
- Maintenance Tips to Keep Your Ideaplay Jump Starter Ready
- Beyond Jump-Starting: Other Useful Features
- Final Thoughts: Confidence Comes from Practice
Why You Need a Jump Starter (And How It Can Save Your Day)
Remember that sinking feeling when your car won’t start on a cold morning? Or worse—you’re stranded in a parking lot, late for work, with a dead battery and no jumper cables in sight? That’s exactly when an ideaplay jump starter becomes your best friend. It’s not just another gadget in your trunk; it’s peace of mind packed into a compact, powerful device. Whether you’re a daily commuter, a weekend road-tripper, or someone who just wants to avoid awkward calls for help, a jump starter can be a game-changer.
I learned this the hard way during a winter road trip. My car sputtered to a stop in a remote gas station, and the nearest mechanic was 45 minutes away. But because I had my ideaplay jump starter tucked in the glove box, I was back on the road in under five minutes. No waiting, no stress, just quick, reliable power. That moment sold me on the idea of carrying a portable jump starter. But here’s the catch: it only works if you know how to use it. And that’s where many people get stuck—confused by buttons, cables, or safety warnings. In this guide, I’ll walk you through everything you need to know about ideaplay jump starter instructions, so you can jump-start your vehicle with confidence, every time.
Understanding Your Ideaplay Jump Starter: Features and Components
Before you dive into using your ideaplay jump starter, it’s important to get familiar with what you’re working with. Not all jump starters are built the same, but the ideaplay line is known for its user-friendly design, solid performance, and added features that go beyond just jump-starting cars.
Visual guide about ideaplay jump starter instructions
Image source: autoboosting.com
What’s in the Box?
When you unbox your ideaplay jump starter, you’ll typically find:
- The main jump starter unit (usually compact, about the size of a thick phone or small tablet)
- Heavy-duty jumper cables with smart clamps
- USB charging cables (for charging your jump starter and other devices)
- Wall and car chargers
- User manual (keep this handy!)
- Storage case or pouch
One thing I love about ideaplay models is the smart clamps. Unlike traditional jumper cables, these have built-in protections—reverse polarity, over-current, short-circuit, and spark-proof technology. That means even if you connect them backward (which I’ve done in a panic), the device won’t let you damage your car or the jump starter.
Key Features That Set Ideaplay Apart
Here’s what makes ideaplay jump starters stand out from the crowd:
- High peak amps (ranging from 1000A to 3000A depending on the model) – enough to start cars, trucks, SUVs, and even small boats
- Built-in LED flashlight with SOS and strobe modes—perfect for nighttime emergencies
- USB power bank functionality (5V/2.1A and 5V/3A ports) to charge phones, tablets, and GPS devices
- LCD display showing battery level, output status, and error codes (on higher-end models)
- Compact and lightweight design – easy to store in a glove box or center console
- Multiple safety protections – a big reason I trust this brand
For example, the ideaplay P120 model (a personal favorite) delivers 2000 peak amps, has a 20,000mAh battery, and can jump-start a 7.0L gas or 5.5L diesel engine. That’s enough for most sedans, trucks, and SUVs. And because it doubles as a power bank, I’ve used it to charge my phone during long drives when my car charger wasn’t working.
Know Your Battery Type and Compatibility
Not all vehicles are the same. Your ideaplay jump starter works with 12V lead-acid batteries—the standard in most cars, motorcycles, ATVs, and lawn mowers. But it won’t work with 6V systems or lithium car batteries (though some newer ideaplay models support lithium, so check your model number).
Pro tip: Before your first use, verify your vehicle’s battery voltage. You can usually find this on the battery label or in your owner’s manual. Most cars are 12V, but older models or certain European vehicles might differ. When in doubt, stick to 12V—ideaplay jump starters are designed for that.
Step-by-Step Ideaplay Jump Starter Instructions
Now, let’s get into the nitty-gritty: how to use your ideaplay jump starter safely and effectively. I’ll walk you through the process step by step, based on real-world use and the official ideaplay jump starter instructions from the manual. The goal? A smooth, safe jump-start every time.
Step 1: Charge Your Jump Starter Fully
Before you even think about jump-starting, make sure your ideaplay unit is charged. Most models come partially charged (around 50%), but you should top it off.
- Use the included wall charger or car charger to plug it in.
- Charging time varies: 4–6 hours for a full charge, depending on the model.
- The LCD screen (if your model has one) will show the battery level. Aim for 100% before use.
I keep mine on a shelf in the garage, plugged in via a smart outlet so it charges overnight once a month. That way, it’s always ready.
Step 2: Prepare the Vehicle
Safety first! Here’s how to prep your car:
- Turn off the ignition and all electronics (lights, radio, AC).
- Park the vehicle on a flat, stable surface. Engage the parking brake.
- Open the hood and locate the battery. Clean off any corrosion if needed (use a wire brush or baking soda/water mix).
- Identify the positive (+) and negative (–) terminals. They’re usually labeled, but if not, the positive terminal is larger and often has a red cover.
One time, I tried to jump-start my car in a hurry and left the headlights on. The jump starter worked, but the battery drained quickly afterward. Lesson learned: always power down the vehicle completely.
Step 3: Connect the Clamps (The Right Way!)
This is where most mistakes happen. But with ideaplay’s smart clamps, you’re protected. Still, follow the correct order:
- Attach the red (positive) clamp to the positive terminal of the dead battery.
- Attach the black (negative) clamp to an unpainted metal surface on the engine block or frame—never to the negative battery terminal. This helps avoid sparks near the battery, which can be dangerous.
- Ensure both clamps are secure and not touching each other or other metal parts.
Here’s a tip: I use the engine’s alternator bracket as my grounding point. It’s sturdy, unpainted, and away from moving parts. Avoid plastic or painted surfaces—they won’t conduct electricity well.
Step 4: Power On and Start the Vehicle
Now, turn on your ideaplay jump starter. On most models, press and hold the power button for 3 seconds. The LED indicator will light up, and if you have an LCD screen, it will show “Ready” or “Connected.”
- Wait 30 seconds to allow the jump starter to transfer power to the battery.
- Try starting your vehicle. If it doesn’t start on the first try, wait 30 seconds, then try again.
- Most ideaplay models allow up to 5–6 attempts before needing a recharge.
I’ve had success starting my car after just one attempt, but in cold weather (below 32°F), it sometimes takes two tries. The jump starter warms the battery slightly, which helps.
Step 5: Disconnect and Power Down
Once your car is running:
- Turn off the ideaplay unit (press the power button).
- Remove the black (negative) clamp first, then the red (positive) clamp.
- Close the hood and let your engine run for at least 10–15 minutes to recharge the battery.
Never disconnect the jump starter while the engine is off—it can damage the unit. And always disconnect in the reverse order you connected: negative first, then positive.
Step 6: Recharge Your Jump Starter
After use, plug your ideaplay jump starter back in to recharge. It’s a good habit—like refueling your car after a long drive. Most models will show a low battery warning after 3–5 jump-starts, so keep it topped up.
Common Mistakes and How to Avoid Them
Even with clear ideaplay jump starter instructions, things can go wrong. I’ve made a few of these mistakes myself, and I’ve seen others struggle too. Let’s fix them before they happen.
Connecting Clamps to the Wrong Terminals
This is the #1 mistake. Connecting red to negative and black to positive can cause sparks, damage electronics, or even fry the jump starter. But here’s the good news: ideaplay clamps have reverse polarity protection. If you connect them backward, the device won’t output power and will display an error (like “REVERSE” on the LCD).
Still, it’s best to get it right the first time. Double-check the labels on the battery. And if you’re unsure, use a multimeter to test voltage before connecting.
Using a Low-Charge Jump Starter
A jump starter with less than 20% battery might not deliver enough power to start a car, especially in cold weather. Always keep it charged. I set a monthly reminder on my phone to top it off, even if I haven’t used it.
Pro tip: If the jump starter shows low power during use, it may automatically shut off to protect the internal battery. Recharge it fully before the next attempt.
Grounding to the Battery (Instead of Metal Frame)
Connecting the black clamp to the negative battery terminal might seem logical, but it’s not recommended. Why? Because batteries can emit hydrogen gas, and a spark near the terminal could cause an explosion. Always ground to unpainted metal on the engine or chassis.
Leaving Electronics On
If your headlights, radio, or AC are running, the jump starter has to power those too—reducing the energy available for starting. Turn everything off before connecting the clamps.
Not Letting the Engine Run After Starting
Jump-starting gives your battery a boost, but it doesn’t fully recharge it. Let your engine run for at least 10–15 minutes (longer if possible) to let the alternator recharge the battery. If you shut off the engine right away, the battery may die again.
Using It on Non-12V Systems
Most ideaplay models are for 12V systems only. Using them on 6V batteries (like in vintage cars or some motorcycles) can damage the jump starter or battery. Check your vehicle’s specs before using.
Maintenance Tips to Keep Your Ideaplay Jump Starter Ready
A jump starter is an investment—and like any tool, it needs care. With proper maintenance, your ideaplay unit can last 3–5 years or more. Here’s how to keep it in top shape.
Charge It Regularly (Even When Not in Use)
Lithium-ion batteries degrade if left uncharged. Even if you haven’t used your jump starter in months, recharge it every 3–6 months. I do mine every 90 days, no matter what.
Storing it at 50% charge is ideal for long-term storage, but 100% is fine if you’re using it often.
Clean the Clamps and Ports
Dust, dirt, and corrosion can affect performance. Every few months, wipe the clamps with a dry cloth. Use a cotton swab and isopropyl alcohol to clean the USB and charging ports.
Store in a Cool, Dry Place
Extreme heat (like in a car on a summer day) can damage the battery. Store your ideaplay in a glove box, center console, or trunk—but avoid direct sunlight. Temperatures above 120°F can reduce battery life.
Same goes for freezing temps. While the jump starter can work in cold weather, storing it at sub-zero temps can harm the internal battery.
Check for Firmware Updates (On Smart Models)
Some newer ideaplay models (like the P200 series) support firmware updates via USB. Check the manufacturer’s website occasionally to see if there’s a performance or safety update available.
Inspect for Damage
After each use, look for cracks, frayed cables, or loose clamps. If anything looks off, stop using it and contact support. A damaged jump starter can be unsafe.
Beyond Jump-Starting: Other Useful Features
Your ideaplay jump starter isn’t just for dead batteries. It’s a multi-tool for emergencies and daily use. Let’s explore the extras.
Use It as a Power Bank
With USB-A and USB-C ports, you can charge phones, tablets, cameras, and even laptops (if the model supports 12V/19V output). I’ve used mine to charge my phone during a 3-hour power outage—no problem.
Tip: Use the 5V/2.1A port for phones and the 5V/3A for tablets. Charging time varies, but a 10,000mAh jump starter can fully charge a smartphone 2–3 times.
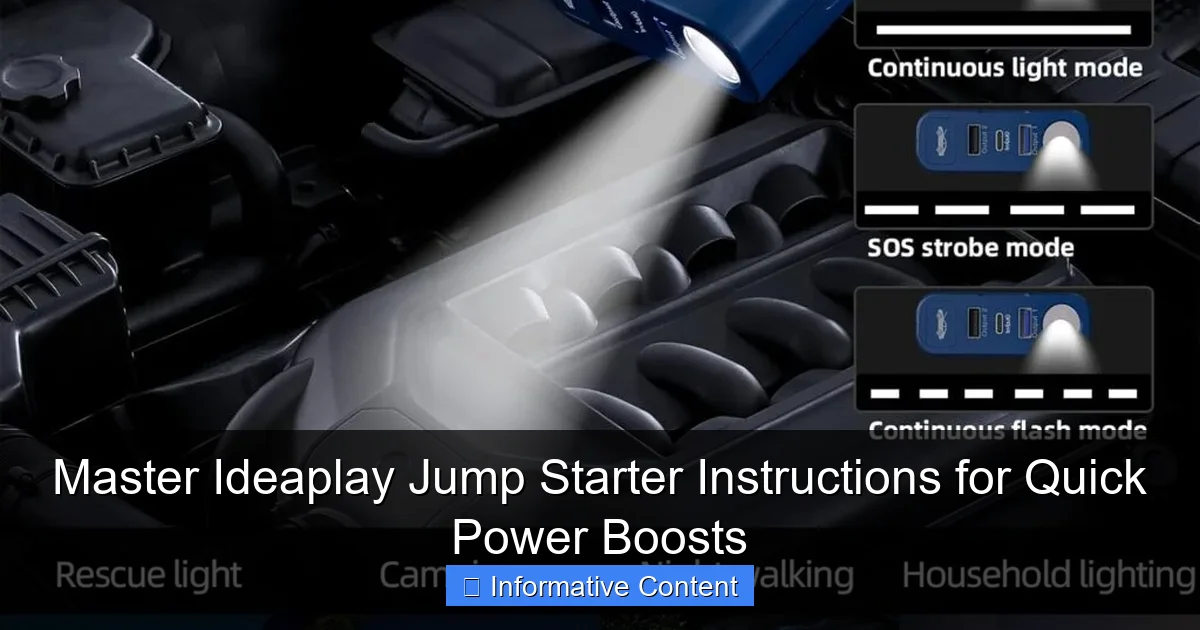
Emergency Flashlight
The built-in LED flashlight has three modes: steady, SOS, and strobe. I’ve used it to signal for help during a flat tire at night. It’s bright enough to be seen from 100+ feet away.
Press and hold the flashlight button to cycle through modes. The SOS mode blinks in a Morse code pattern—great for emergencies.
Air Compressor (On Select Models)
Some ideaplay models (like the P150) include a built-in air compressor. It’s not a full tire inflator, but it can add 10–15 PSI to a flat tire—just enough to get you to a gas station.
Attach the included nozzle, set the PSI (if digital), and let it run. It’s slow, but better than being stranded.
Jump-Start Motorcycles, Boats, and More
Thanks to high amperage, ideaplay jump starters work on motorcycles, ATVs, jet skis, and small boats. Just make sure the engine size is within the unit’s rating (check the manual).
| Ideaplay Model | Peak Amps | Capacity (mAh) | USB Ports | Flashlight | Air Compressor |
|---|---|---|---|---|---|
| P80 | 1000A | 12,000mAh | 2 (5V/2.1A) | Yes (LED) | No |
| P120 | 2000A | 20,000mAh | 3 (5V/2.1A, 5V/3A, USB-C) | Yes (LED + SOS) | No |
| P150 | 2500A | 25,000mAh | 3 (5V/3A, USB-C, 12V/19V) | Yes (LED + SOS) | Yes |
| P200 | 3000A | 30,000mAh | 4 (with QC3.0) | Yes (LED + SOS) | Yes |
Final Thoughts: Confidence Comes from Practice
Using an ideaplay jump starter isn’t rocket science, but it does require attention to detail. The first time I used mine, I was nervous—what if I fried the battery? What if it didn’t work? But after following the ideaplay jump starter instructions step by step, I realized it’s actually foolproof, especially with the built-in safety features.
The key is preparation. Keep your jump starter charged, store it where you can reach it fast, and practice the steps when your car is running (just to get the hang of it). I even keep the manual in the storage case—because in a panic, you might forget the order of the clamps.
And remember: a jump starter is not a replacement for a dead or dying battery. If your car keeps dying, get the battery tested. But for occasional dead batteries—from leaving the lights on, cold weather, or old age—an ideaplay jump starter is your best bet for a quick, safe fix.
So go ahead, tuck that jump starter in your glove box, and drive with confidence. You’ve got the power—literally—to handle the unexpected. And when that moment comes, you’ll be ready, calm, and back on the road in minutes.
Frequently Asked Questions
How do I use the Ideaplay jump starter for the first time?
Before your first use, fully charge the Ideaplay jump starter using the provided cable. Connect the clamps to the battery terminals (red to positive, black to negative) and turn on the device to deliver a quick power boost.
Can I use the Ideaplay jump starter in cold weather?
Yes, the Ideaplay jump starter is designed to work in temperatures as low as -4°F (-20°C). For optimal performance, store it in a warm place before use during winter months.
How long does the Ideaplay jump starter hold its charge?
The Ideaplay jump starter typically retains its charge for 3–6 months when unused. To maintain battery health, recharge it every 3 months if not in frequent use.
What safety features are included in the Ideaplay jump starter instructions?
The device includes spark-proof clamps, reverse polarity protection, and overload protection. Always follow the Ideaplay jump starter instructions to ensure safe and proper operation.
Can I charge my phone with the Ideaplay jump starter?
Yes! Most Ideaplay models feature USB ports for charging phones, tablets, and other devices. Use the included USB cable to power your gadgets on the go.
Why won’t my Ideaplay jump starter turn on?
If the device doesn’t power on, ensure it’s fully charged. If the issue persists, check the battery level indicator or consult the Ideaplay jump starter instructions for troubleshooting steps.