
Featured image for how to use types jump starter
Image source: content.propertyroom.com
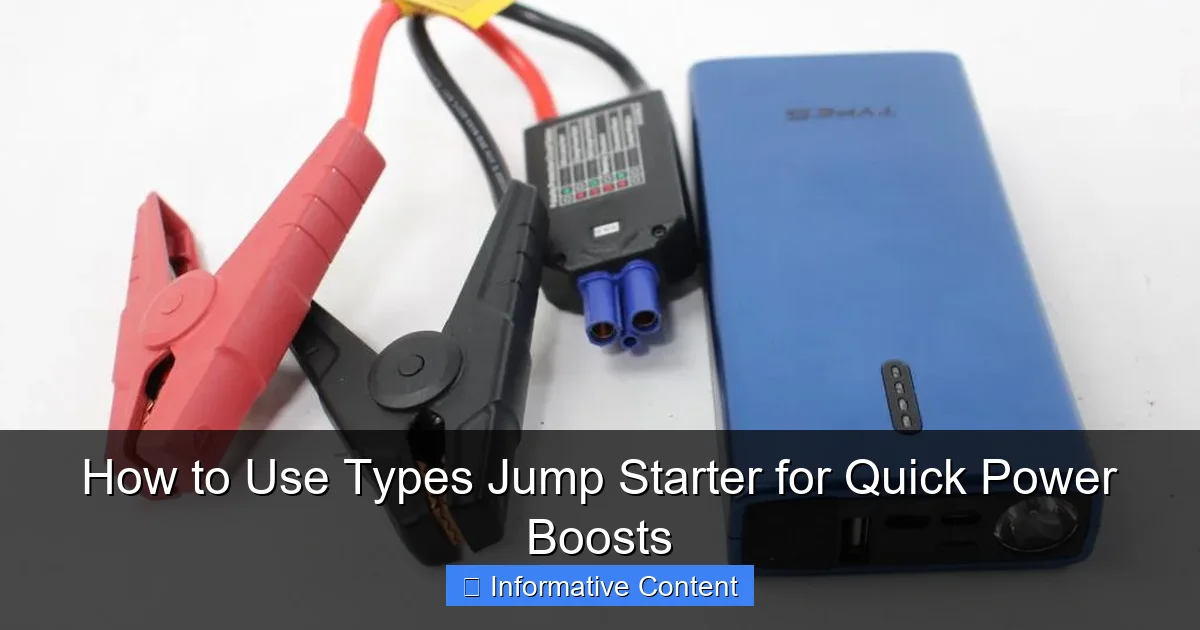
Always connect the red clamp to the positive terminal first when using a types jump starter to ensure a safe, effective power boost. Match the jump starter’s voltage and type to your vehicle—whether lithium-ion, lead-acid, or portable USB—for optimal performance and battery protection. Follow the manufacturer’s instructions closely to avoid damage and get back on the road fast.
Key Takeaways
- Choose the right type: Match your vehicle’s engine size with the correct jump starter type.
- Inspect connections first: Ensure battery terminals are clean and free of corrosion before use.
- Follow the manual: Always refer to the jump starter’s instructions for safe, effective operation.
- Charge fully before use: Pre-charge your jump starter to maximize power delivery.
- Prioritize safety: Wear gloves and eye protection to prevent electrical mishaps.
- Store properly: Keep your jump starter in a cool, dry place when not in use.
📑 Table of Contents
- How to Use Types Jump Starter for Quick Power Boosts
- Understanding the Different Types of Jump Starters
- How to Use a Jump Starter Safely and Effectively
- Tips for Maximizing Jump Starter Performance
- Jump Starters for Different Vehicles and Scenarios
- Common Mistakes to Avoid and Troubleshooting
- Jump Starter Comparison Table
- Final Thoughts: Be Prepared, Not Scared
How to Use Types Jump Starter for Quick Power Boosts
We’ve all been there—you’re late for work, rushing out the door, only to find your car won’t start. The dreaded click of a dead battery is enough to ruin anyone’s morning. Or maybe you’ve been on a long road trip, camping in the wilderness, and your phone or portable fridge suddenly dies, leaving you stranded without power. In those moments, a jump starter can feel like a lifeline. It’s not just a tool for emergencies; it’s a compact, powerful device that can save you time, money, and stress.
But here’s the thing: not all jump starters are created equal. From traditional clunky battery packs to sleek, multi-functional power stations, the types of jump starter available today can be overwhelming. Some are designed for cars, others for motorcycles, and some even double as portable power banks for your gadgets. Knowing how to use each type correctly is crucial—not just for getting your engine running, but for doing it safely and efficiently. In this guide, I’ll walk you through the different types of jump starters, how to use them properly, and share some real-life tips to help you avoid common mistakes.
Understanding the Different Types of Jump Starters
Before you grab the first jump starter you see on the shelf, it’s important to understand the types of jump starters available and which one suits your needs. Each type has its own strengths, limitations, and ideal use cases. Let’s break them down so you can make an informed choice.

Visual guide about how to use types jump starter
Image source: cdn.shopify.com
1. Traditional Lead-Acid Jump Starters
These are the bulky, heavy units you might remember from your dad’s garage. They use a rechargeable lead-acid battery (the same type found in most car batteries) to deliver a high burst of power to jump-start a vehicle. While they’re powerful, they’re also heavy—often weighing 10 to 20 pounds—and take hours to recharge.
- Best for: Large vehicles like trucks, SUVs, or boats.
- Pros: High cranking power (often 1,000+ amps), reliable in cold weather.
- Cons: Heavy, slow to recharge, bulkier to store.
Example: A lead-acid jump starter might be perfect for someone who drives a diesel pickup truck in the winter. But if you’re a city dweller with a compact sedan, it might be overkill—and a pain to carry.
2. Lithium-Ion (Li-ion) Jump Starters
These are the modern, lightweight alternatives. They use lithium-ion batteries (like in your smartphone) to deliver a quick power boost. They’re compact, often fitting in a glove compartment, and recharge in under 2 hours. Most also come with USB ports to charge phones, tablets, and even laptops.
- Best for: Everyday drivers, motorcycles, and small to mid-sized vehicles.
- Pros: Lightweight (1–3 lbs), fast charging, multi-functional (power bank, flashlight, etc.).
- Cons: Lower cranking power than lead-acid (usually 300–800 amps), can lose charge if unused for long periods.
Tip: I once used a lithium-ion jump starter to revive my wife’s hybrid car after leaving the lights on overnight. It was small enough to keep in her purse, and it worked in under a minute. Game-changer.
3. Lithium-Polymer (LiPo) Jump Starters
A newer, more advanced version of lithium tech. LiPo batteries are even lighter and more energy-dense than standard Li-ion. They’re often found in high-end models and are ideal for performance vehicles or frequent travelers.
- Best for: Sports cars, frequent travelers, or tech-savvy users.
- Pros: Ultra-lightweight, higher energy density, longer lifespan.
- Cons: More expensive, requires careful handling (LiPo batteries can be sensitive to overcharging).
Note: If you’re into road trips or off-roading, a LiPo jump starter might be worth the investment. I used one during a camping trip in Colorado when my truck wouldn’t start at 5,000 feet. It worked flawlessly—even in sub-zero temperatures.
4. Multi-Function Jump Starters (Power Stations)
These are the Swiss Army knives of jump starters. They combine a jump starter with a portable power station, offering AC outlets, DC ports, and multiple USB connections. Great for powering small appliances, camping gear, or even a mini-fridge.
- Best for: Campers, RV owners, or anyone who needs portable power.
- Pros: Versatile, high-capacity, can power devices for hours.
- Cons: Larger and heavier than standard jump starters, more expensive.
Real-life use: During a recent storm that knocked out power for 12 hours, my multi-function jump starter powered a space heater and kept my fridge running. It wasn’t just a jump starter—it was a survival tool.
How to Use a Jump Starter Safely and Effectively
Using a jump starter isn’t rocket science, but it’s not as simple as just connecting cables and pressing a button. A few small mistakes can lead to sparks, battery damage, or even injury. Here’s a step-by-step guide to using types of jump starter safely and effectively.
Step 1: Read the Manual (Yes, Really)
Every jump starter is slightly different. Some have safety features like reverse polarity protection, while others don’t. Always check the user manual for specific instructions, especially if it’s your first time using a particular model.
- Look for warnings about battery type (e.g., AGM, gel cell).
- Note the maximum cranking amps and recommended vehicle size.
- Check if it requires charging before first use.
Tip: I once skipped the manual on a new LiPo jump starter and accidentally overcharged it. It took me a week to fix the issue. Lesson learned.
Step 2: Prepare the Vehicle and Jump Starter
Before connecting anything, make sure both the jump starter and the dead battery are ready.
- Turn off the engine and all accessories (lights, radio, etc.).
- Engage the parking brake and put the vehicle in park (or neutral for manual).
- Check the dead battery for cracks, leaks, or excessive corrosion. If you see any, do not attempt to jump-start—replace the battery instead.
- Ensure the jump starter is charged. Most models have an indicator light or digital display to show battery level.
Example: My neighbor once tried to jump-start a car with a corroded battery. The jump starter sparked, and the battery cracked. Not worth the risk.
Step 3: Connect the Cables in the Right Order
This is where most people make mistakes. Always follow the correct sequence to avoid short circuits.
- Connect the red (positive) clamp to the positive terminal on the dead battery. It’s usually marked with a “+” and may be covered with a red cap.
- Connect the other red clamp to the positive terminal on the jump starter.
- Connect the black (negative) clamp to the negative terminal on the jump starter.
- Connect the other black clamp to an unpainted metal surface on the vehicle’s frame (like a bolt or bracket). This is called “grounding” and helps prevent sparks near the battery.
Warning: Never connect the black clamp directly to the dead battery’s negative terminal if it’s damaged or corroded. It can cause a spark and ignite battery gases.
Step 4: Power On and Start the Engine
Once the cables are connected:
- Turn on the jump starter (if it has a power switch).
- Wait 30–60 seconds for the jump starter to stabilize (some models have a “ready” light).
- Start the engine. If it doesn’t start on the first try, wait 1–2 minutes and try again. Avoid cranking for more than 5–10 seconds at a time to prevent overheating.
Pro tip: If the engine still won’t start after 3 attempts, the battery may be beyond help. It could be a starter motor issue or a completely dead battery that needs replacement.
Step 5: Disconnect in Reverse Order
Once the engine is running, disconnect the cables in the opposite order you connected them:
- Remove the black clamp from the vehicle frame.
- Remove the black clamp from the jump starter.
- Remove the red clamp from the jump starter.
- Remove the red clamp from the dead battery.
Important: Do not let the clamps touch each other while they’re connected to the jump starter. A short circuit can damage the device or cause injury.
Tips for Maximizing Jump Starter Performance
Even the best types of jump starter won’t last forever if you don’t take care of them. Here are some practical tips to keep your device in top shape and ensure it’s ready when you need it.
1. Charge It Regularly (Even When Not in Use)
Lithium-based jump starters can lose charge over time. Most manufacturers recommend charging every 3–6 months, even if you haven’t used it.
- Set a reminder on your phone or calendar.
- Store it in a cool, dry place (avoid extreme heat or cold).
My routine: I charge my jump starter every 4 months, even in summer. It’s now 3 years old and still holds a full charge.
2. Use the Right Jump Starter for Your Vehicle
Using a 400-amp jump starter on a diesel truck is like using a butter knife to cut a steak—it won’t work well. Match the cranking amps (CA) or peak amps to your vehicle’s needs.
- Compact cars: 300–600 amps
- Mid-sized sedans/SUVs: 600–1,000 amps
- Trucks/diesel engines: 1,000+ amps
Example: My diesel SUV requires at least 1,200 peak amps. I upgraded to a high-capacity LiPo model, and it starts every time—even in -10°F weather.
3. Keep It Clean and Dry
Dirt, moisture, and corrosion can damage the clamps and battery terminals.
- Wipe the clamps with a dry cloth after each use.
- Store it in a padded case or bag to prevent scratches.
- Never use it in heavy rain or snow unless it’s rated for water resistance.
4. Test It Periodically
Don’t wait until you’re stranded to find out your jump starter is dead. Test it every few months by turning it on and checking the battery level.
- Some models have a “test” button that simulates a jump-start.
- If the lights are dim or it powers off quickly, it may need charging or replacement.
Jump Starters for Different Vehicles and Scenarios
Not all jump starters are one-size-fits-all. The types of jump starter you choose should depend on your vehicle, lifestyle, and typical use cases.
Cars and Sedans
For most everyday drivers, a mid-range lithium-ion jump starter (600–800 amps) is ideal. It’s lightweight, fast-charging, and can handle cold starts in winter.
- Recommended: NOCO Boost Plus GB40, DBPOWER 800A
- Bonus: Most come with built-in flashlights and USB ports for charging phones.
Motorcycles and ATVs
Smaller engines require less power, but space is limited. A compact Li-ion or LiPo model (300–500 amps) works best.
- Recommended: Tacklife T8, GOOLOO GP4000
- Tip: Look for models with short cables—they’re easier to maneuver in tight engine compartments.
Trucks and Diesel Engines
Diesel engines have high compression and need more cranking power. A lead-acid or high-capacity LiPo model (1,000+ amps) is essential.
- Recommended: Clore Automotive Jump-N-Carry JNC660, DEWALT DXAEJ14
- Note: Some diesel trucks may still require traditional jumper cables if the battery is completely dead.
Camping and Off-Grid Use
If you’re into outdoor adventures, a multi-function jump starter with power station capabilities is a must.
- Recommended: Jackery Explorer 500, EcoFlow River 2
- Features: AC outlets, solar charging, USB-C PD, and jump-start capability.
Common Mistakes to Avoid and Troubleshooting
Even experienced users make mistakes with types of jump starter. Here are the most common pitfalls and how to fix them.
1. Connecting Cables in the Wrong Order
This is the #1 cause of sparks and damage. Always follow the sequence: red to battery, red to jump starter, black to jump starter, black to ground.
- What to do if it sparks: Disconnect immediately, wait 5 minutes, then reconnect in the correct order.
2. Using a Dead Jump Starter
If your jump starter won’t turn on or shows a low battery, it can’t help you.
- Solution: Charge it fully before use. If it won’t hold a charge, the battery may be degraded.
3. Overheating the Device
Cranking for too long can overheat the jump starter or damage the battery.
- Rule: Wait 1–2 minutes between attempts. If it doesn’t start after 3 tries, check the battery or starter motor.
4. Ignoring Safety Features
Many modern jump starters have reverse polarity protection, short-circuit protection, and spark-proof clamps. Don’t disable these features.
- Tip: If the jump starter beeps or flashes red, it’s detecting a problem—stop and recheck connections.
Jump Starter Comparison Table
| Type | Weight | Cranking Amps | Recharge Time | Best For | Price Range |
|---|---|---|---|---|---|
| Lead-Acid | 10–20 lbs | 800–2,000+ | 8–12 hours | Trucks, boats | $50–$150 |
| Lithium-Ion | 1–3 lbs | 300–800 | 1–2 hours | Cars, sedans | $60–$120 |
| Lithium-Polymer | 0.5–2 lbs | 500–1,200 | 1.5–3 hours | Performance vehicles | $100–$200 |
| Multi-Function | 5–15 lbs | 800–1,500 | 4–6 hours | Camping, RVs | $150–$400 |
Choosing the right types of jump starter isn’t just about power—it’s about matching the tool to your needs. Whether you’re a city commuter, a weekend camper, or a truck owner, there’s a jump starter that fits your lifestyle.
Final Thoughts: Be Prepared, Not Scared
A jump starter isn’t just a backup plan—it’s peace of mind. I’ve used mine to help strangers on the side of the road, revive my own car after a long vacation, and even power a mini-fridge during a blackout. The right types of jump starter can turn a stressful situation into a quick fix.
Remember, it’s not about having the most expensive or powerful model. It’s about having one that’s reliable, easy to use, and suited to your needs. Keep it charged, store it properly, and practice using it before you actually need it. And most importantly—don’t wait until you’re stranded to learn how it works. Because when your car won’t start, you’ll be glad you did.
Whether you choose a compact lithium-ion for your daily commute or a rugged lead-acid for your truck, the key is preparation. So go ahead—grab a jump starter, read the manual, and tuck it in your trunk. You’ll never know when that quick power boost will save your day.
Frequently Asked Questions
What is a Types Jump Starter and how does it work?
A Types Jump Starter is a portable battery device designed to jump-start vehicles with dead batteries. It works by connecting the clamps to your car battery terminals, delivering a quick power boost to start the engine without needing another vehicle.
How do I safely use a Types Jump Starter on my car?
First, ensure the jump starter is fully charged. Connect the red clamp to the positive (+) terminal and the black clamp to the negative (-) terminal of your battery, then start your vehicle. Always follow the manufacturer’s safety instructions to avoid sparks or damage.
Can I use a Types Jump Starter on any vehicle type?
Most Types Jump Starters work with gasoline and diesel engines, including cars, motorcycles, boats, and small trucks. Check your jump starter’s specifications to confirm compatibility with your vehicle’s engine size and voltage.
How long does a Types Jump Starter hold its charge?
A fully charged Types Jump Starter typically holds its charge for 3–6 months when stored properly. Recharge it every few months to ensure it’s ready when you need it.
Is it safe to leave the Types Jump Starter connected after starting the car?
No, disconnect the clamps immediately after the engine starts to prevent overcharging or damage. Leaving it connected can strain the jump starter and your vehicle’s electrical system.
What safety features should I look for in a Types Jump Starter?
Look for reverse polarity protection, spark-proof clamps, and overload protection to ensure safe operation. These features reduce risks like short circuits or accidental sparks during use.