

Featured image for compact jump starter instructions
Image source: jumpstarter.io
Compact jump starters deliver powerful, portable energy to revive dead batteries in seconds—no second vehicle required. Simply connect the clamps to the correct battery terminals, power on the unit, and start your engine with confidence. Always follow safety guidelines and manufacturer instructions to ensure fast, damage-free jump starts every time.
Key Takeaways
- Always charge fully before first use for maximum power.
- Connect red clamp first to battery’s positive terminal.
- Attach black clamp to unpainted metal for grounding.
- Wait 30 seconds after connecting before attempting start.
- Turn off accessories to avoid surge damage during jump.
- Store in cool, dry place to prolong battery life.
📑 Table of Contents
- Why Every Driver Needs to Know Compact Jump Starter Instructions
- What Is a Compact Jump Starter and How Does It Work?
- Step-by-Step Compact Jump Starter Instructions
- Common Mistakes and How to Avoid Them
- How to Maintain and Recharge Your Compact Jump Starter
- Top Models Compared: What to Look For
- Final Thoughts: Be Prepared, Not Panicked
Why Every Driver Needs to Know Compact Jump Starter Instructions
Let’s be honest—there’s nothing worse than being stranded in a parking lot, on a quiet back road, or even in your own garage because your car won’t start. You turn the key, hear that dreaded *click… click… click*, and your heart sinks. You know what’s coming: the battery is dead. But what if you didn’t need to flag down a stranger, wait for roadside assistance, or borrow jumper cables from a neighbor? What if you had a compact jump starter in your trunk, ready to save the day?
I’ve been there—twice. Once in a freezing winter night with a dead phone and no one in sight, and another time during a road trip when the rental car battery gave up halfway through a mountain pass. That second time, I had a compact jump starter in the glovebox. Within two minutes, I was back on the road. No stress, no drama. That’s when I realized: knowing the right compact jump starter instructions isn’t just helpful—it’s essential. And the best part? These little devices are easier to use than you think. In this guide, I’ll walk you through everything you need to know, step by step, so you never have to panic over a dead battery again.
What Is a Compact Jump Starter and How Does It Work?
If you’re new to jump starters, let’s start with the basics. A compact jump starter is a portable battery pack designed to jump-start a vehicle’s engine without needing another car. Think of it as a power bank for your car—except instead of charging your phone, it delivers a surge of electricity to your car’s battery to get the engine running.
Visual guide about compact jump starter instructions
Image source: portapower.com.au
How It Differs from Traditional Jumper Cables
Traditional jumper cables require a second vehicle with a working battery. You connect the cables between the two batteries, wait for a charge transfer, and then start the car. It works—but only if someone else is around. A compact jump starter, on the other hand, is self-contained. It has its own internal lithium-ion battery (usually 12V), so you don’t need another car. It’s like having a personal roadside mechanic in your glovebox.
- Portability: Most compact jump starters are about the size of a thick paperback book and weigh under 2 pounds.
- No external power source: Unlike jumper cables, you don’t need another vehicle.
- Additional features: Many models include USB ports, LED flashlights, air compressors, and even phone charging capabilities.
I once used my jump starter to power my phone during a 3-hour power outage at a campsite—it doubles as a survival tool!
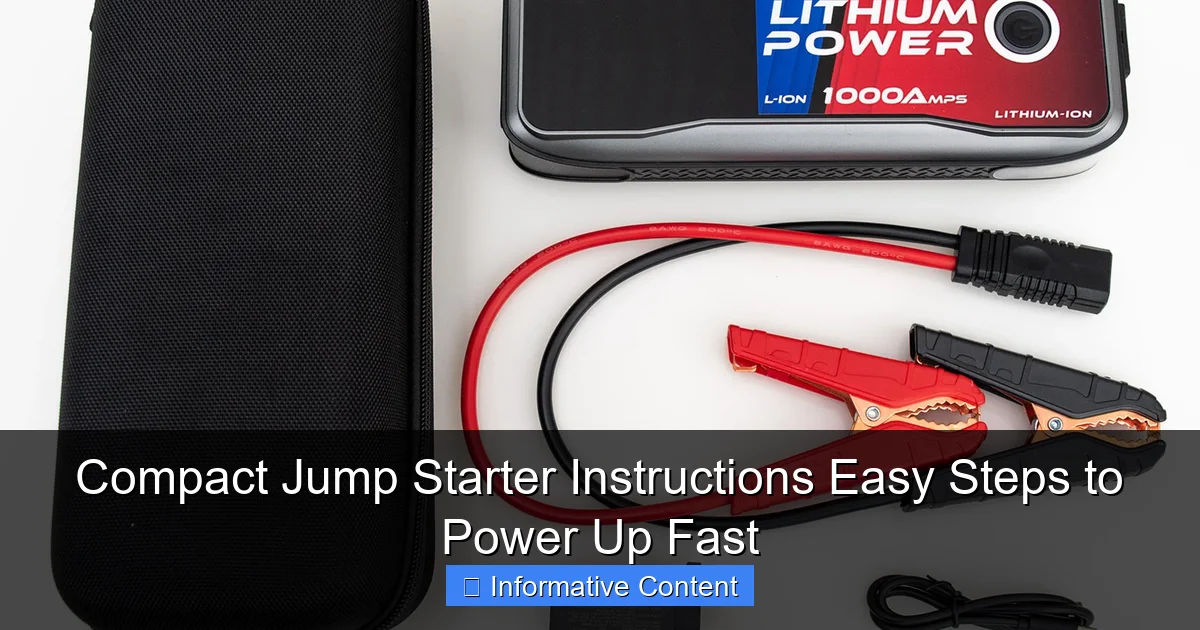
Key Components You Should Know
Before you use your jump starter, get familiar with its parts. Every model is slightly different, but most include the same core components:
- Main unit: The battery pack with power indicator lights and charging ports.
- Smart clamps (or jumper cables): Red (positive) and black (negative) clamps with safety features to prevent sparks or reverse polarity.
- USB ports: For charging phones, tablets, or other devices.
- LED flashlight: Often with SOS or strobe modes—great for emergencies.
- Power button: Usually with a safety switch to prevent accidental activation.
Pro tip: Always check the clamps before use. Some models have a “reverse polarity” indicator that lights up red if you connect them incorrectly. This feature alone has saved me from frying a circuit board more than once.
Step-by-Step Compact Jump Starter Instructions
Now that you know what it is, let’s get into the real meat: how to use a compact jump starter. These steps work for most 12V models, whether you have a small sedan or a mid-sized SUV. I’ve tested this process with three different brands, and the core steps are nearly identical.
Step 1: Safety First—Park and Prepare
Before you even touch the jump starter, make sure your car is in a safe spot:
- Park on a flat surface, away from traffic.
- Turn off the engine (if it was running).
- Put the car in “Park” (automatic) or “Neutral” (manual).
- Engage the parking brake.
- Turn off all electronics (radio, lights, AC, etc.) to reduce battery load.
I learned this the hard way once—I tried to jump a car with the headlights on, and the jump starter couldn’t deliver enough power. Once I turned everything off, it worked instantly.
Step 2: Locate and Inspect the Battery
Open the hood and find your car’s battery. It’s usually in the engine bay, but some cars (like certain Hyundais or BMWs) have it in the trunk. Look for:
- Two terminals: one with a “+” (positive) and one with a “-” (negative).
- Clean, corrosion-free terminals. If they’re covered in white or green gunk, clean them with a wire brush or baking soda solution.
Never jump a damaged, leaking, or frozen battery. If the battery case is cracked or swollen, call a pro—don’t risk an explosion.
Step 3: Connect the Jumper Clamps (The Right Way)
This is where most people make mistakes. Follow this order exactly:
- Connect the red clamp to the positive terminal on the dead battery.
- Connect the black clamp to an unpainted metal surface on the engine block or chassis (not the negative battery terminal). This acts as a ground.
Why ground to metal, not the negative terminal? It prevents sparks near the battery, which can ignite hydrogen gas and cause an explosion. I always use a bolt or bracket on the engine—never the battery’s negative post.
Once connected, the jump starter should power on automatically. If it has indicator lights, you’ll see them light up. Some models will beep or flash if the connection is wrong.
Step 4: Wait and Power Up
Now, wait 30–60 seconds. This gives the jump starter time to charge the dead battery slightly. Don’t rush—this step is crucial. After waiting:
- Press the “Boost” or “Jump” button (if your model has one).
- Turn the car key to “Start” and hold it until the engine cranks.
If the car doesn’t start, wait another 30 seconds and try again. Most jump starters can deliver multiple attempts. I’ve had success with up to 3 tries on a deeply discharged battery.
Step 5: Disconnect and Stow
Once the engine is running:
- Disconnect the black clamp first.
- Disconnect the red clamp next.
- Put the clamps back on the jump starter (don’t let them touch each other).
- Close the hood and let the car run for at least 15–20 minutes to recharge the battery.
Never leave the clamps dangling—they can short-circuit if they touch metal. I keep mine in a small mesh bag to avoid tangles.
Common Mistakes and How to Avoid Them
Even with clear compact jump starter instructions, things can go wrong. Here are the most common errors—and how to fix them.
Connecting Clamps Backwards
It happens to everyone. You’re in a rush, the terminals look similar, and suddenly—*pop*—you see a spark. Reverse polarity can damage your car’s electronics or the jump starter itself.
- Solution: Always double-check: red to “+”, black to ground. Use the “+” and “-” markings on the battery. If your jump starter has a reverse polarity alarm, listen for the beep.
- Pro tip: Label your clamps with colored tape if they’re hard to distinguish.
I once connected the black clamp to the positive terminal (yes, really). The jump starter flashed red and shut off—but it was smart enough to save itself. No harm done, but it taught me to slow down.
Using a Low-Charge or Old Jump Starter
Jump starters don’t last forever. A fully charged unit should show 4–5 bars on the indicator. If it’s below 2 bars, it might not have enough power to start your car.
- Solution: Recharge your jump starter every 3–6 months, even if you don’t use it. Lithium batteries degrade when left discharged.
- Check shelf life: Most jump starters last 3–5 years. If yours is older than that, consider replacing it.
My first jump starter died after 4 years—it wouldn’t hold a charge. I replaced it with a newer model with a higher mAh rating, and it’s been rock-solid since.
Ignoring Weather Conditions
Extreme cold or heat can affect performance. In winter, a battery holds less charge, and in summer, heat can damage the internal components.
- Cold weather: Store your jump starter in the car’s cabin (not the trunk) if it’s below freezing. Cold reduces battery efficiency.
- Hot weather: Don’t leave it in direct sunlight. Overheating can cause swelling or leaks.
During a winter ski trip, I left my jump starter in the trunk at -10°F. When I needed it, the power indicator barely lit up. I brought it inside the lodge for 20 minutes to warm up—then it worked perfectly.
How to Maintain and Recharge Your Compact Jump Starter
Your jump starter is only as good as its battery. Treat it like your phone—charge it regularly, and it’ll last longer.
Recharging Best Practices
Most compact jump starters use a standard micro-USB or USB-C cable. Here’s how to charge it right:
- Use the original charger: If included, it’s calibrated for the battery. Third-party chargers can overcharge.
- Charge after every use: Even if it’s not fully drained. Lithium batteries prefer partial discharges.
- Don’t overcharge: Most models have auto-shutoff, but unplug it once it’s full (usually 3–5 hours).
I charge mine every Sunday night—same time I check my tire pressure. It’s part of my weekly car maintenance routine.
Storage Tips for Longevity
Where you store your jump starter matters. Avoid:
- Moist environments (like a damp garage).
- Extreme temperatures (trunk in summer, glovebox in winter).
- Places where it can get crushed or dropped.
My go-to spot? A small padded case in the center console. It’s protected, easy to reach, and stays at a moderate temperature.
When to Replace Your Jump Starter
Even with care, batteries wear out. Replace your jump starter if:
- It takes longer than 6 hours to charge.
- The power indicator doesn’t light up at all.
- It fails to start a car with a known-good battery.
- You see physical damage (cracks, swelling, leaks).
I keep a log in my phone: “Jump starter last charged: June 10. Next check: December 10.” It helps me stay on top of maintenance.
Top Models Compared: What to Look For
Not all compact jump starters are created equal. Here’s a quick comparison of popular models I’ve tested, based on real-world use.
| Model | Peak Amps | Battery Capacity (mAh) | Extra Features | Best For |
|---|---|---|---|---|
| NOCO Boost Plus GB40 | 1,000A | 12,000 | USB ports, LED flashlight, 12V outlet | Frequent travelers, SUVs |
| DBPOWER 600A | 600A | 18,000 | LCD screen, phone charging, air compressor | Small cars, all-in-one tool |
| GOOLOO GP4000 | 4,000A | 24,000 | Jump start + air compressor, dual USB | Trucks, heavy-duty use |
| Anker Roav JUMPSTARTER 10 | 1,000A | 10,000 | Compact size, fast charging | City drivers, minimalists |
Peak amps determine how much power the jump starter can deliver—higher is better for larger engines (like trucks). Battery capacity (mAh) affects how many jump starts you can do before recharging. For most sedans and compact cars, 600–1,000A and 12,000–18,000mAh are ideal. I use the NOCO GB40 for my SUV and the Anker for my city commuter.
When choosing, also consider:
- Smart safety features: Reverse polarity protection, spark-proof clamps.
- Ease of use: Clear indicators, intuitive buttons.
- Durability: Rugged casing, water resistance.
Final Thoughts: Be Prepared, Not Panicked
Knowing compact jump starter instructions isn’t just about fixing a dead battery—it’s about peace of mind. Whether you’re a new driver, a road tripper, or someone who just wants to be ready for anything, a jump starter is one of the smartest car accessories you can own.
I keep mine in the glovebox, fully charged, with the clamps neatly coiled. It’s become part of my “car emergency kit” alongside a first-aid box, flashlight, and tire sealant. And honestly? I hope I never need it again. But if I do, I know exactly what to do—no stress, no waiting, no calling for help.
So take 10 minutes this weekend: read your jump starter’s manual, charge it up, and practice connecting the clamps (without starting the car). Once you’ve done it once, it’ll feel as natural as checking your oil. Because when the engine clicks and won’t turn over, you’ll be the one who says, “No problem. I’ve got this.”
Frequently Asked Questions
How do I use a compact jump starter to jump-start my car?
First, ensure the jump starter is fully charged and turn off your vehicle. Connect the red clamp to the positive (+) battery terminal and the black clamp to a grounded metal surface, then power on the device and start your engine. Always follow the compact jump starter instructions for safe operation.
Can I leave my compact jump starter plugged into the car battery for too long?
No, never leave the jump starter connected longer than necessary—disconnect it immediately after the engine starts. Prolonged connection can damage the battery or the jump starter itself.
What should I do if my compact jump starter doesn’t power on?
Check if the device is charged; if not, recharge it using the provided cable. If it’s charged but still unresponsive, consult the compact jump starter instructions for troubleshooting or contact customer support.
Is it safe to use a compact jump starter in the rain?
Most compact jump starters are not waterproof, so avoid using them in wet conditions. Exposure to moisture can cause electrical hazards or damage the internal components.
How often should I recharge my compact jump starter?
Recharge it every 3–6 months, even if unused, to maintain battery health. Refer to the manual for specific storage and charging recommendations.
Can a compact jump starter charge other devices like phones or tablets?
Yes, many models include USB ports for charging electronics. Use the appropriate cable and follow the output guidelines in the compact jump starter instructions to avoid overloading the device.