
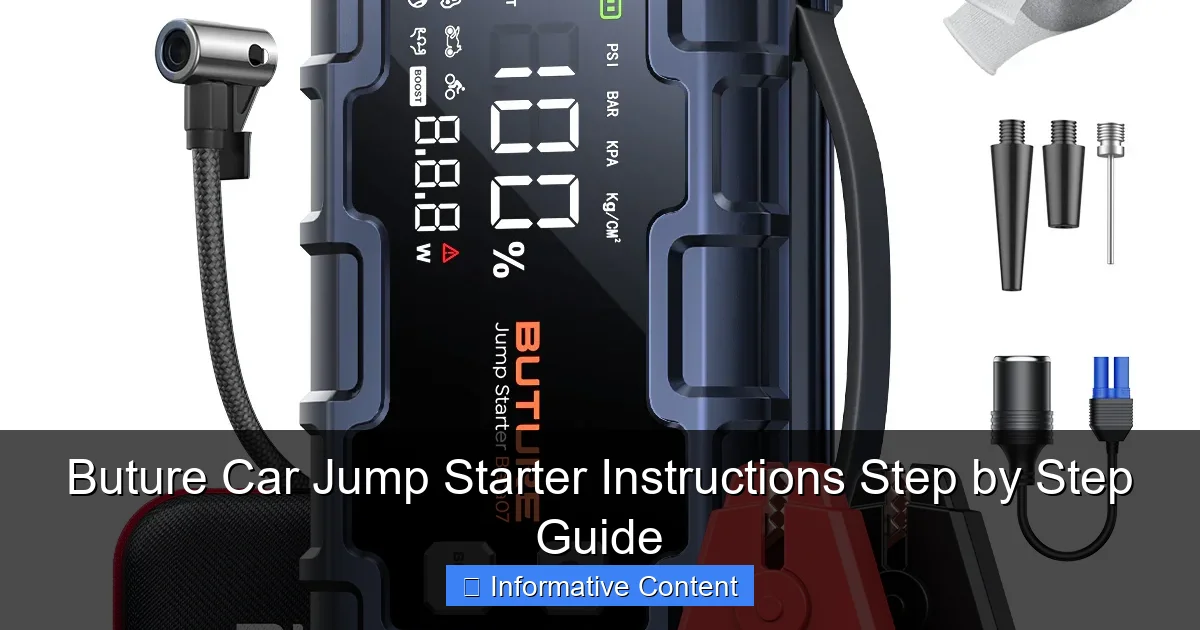
Featured image for buture car jump starter instructions
Image source: ibuture.com
Master your Buture car jump starter in minutes with this clear, step-by-step guide designed to get you back on the road fast. From safety checks to jump-starting your vehicle, follow simple instructions to avoid common mistakes and ensure reliable performance every time.
Key Takeaways
- Read the manual first: Always review safety guidelines before using the Buture jump starter.
- Charge fully before use: Ensure 100% battery to avoid jump-start failure.
- Connect red first: Attach positive (red) clamp to the dead battery’s positive terminal.
- Spark-proof design: Safe, reverse-polarity protection prevents damage if clamps are reversed.
- Press and hold: Activate jump mode for 3+ seconds to deliver power safely.
- Store properly: Keep in a cool, dry place to extend battery lifespan.
📑 Table of Contents
- Why You Need a Buture Car Jump Starter (And How to Use It Right)
- Getting Started: What’s in the Box and How to Charge
- Step-by-Step Buture Car Jump Starter Instructions
- Safety Tips and Common Mistakes to Avoid
- Beyond Jump-Starting: Other Uses for Your Buture Device
- Maintenance and Long-Term Care
- Final Thoughts: Your Reliable Roadside Companion
Why You Need a Buture Car Jump Starter (And How to Use It Right)
Picture this: you’re running late for work, the kids are screaming in the backseat, and your car won’t start. The battery is dead—again. You call a friend, wait for roadside assistance, or worse, push the car down a hill like it’s 1985. We’ve all been there. But what if I told you there’s a smarter, faster, and more reliable way to get back on the road without relying on anyone else? Enter the Buture car jump starter—a compact, powerful, and user-friendly device that’s become my go-to emergency tool.
Unlike traditional jumper cables that require another vehicle (and a kind stranger), the Buture jump starter is a self-contained powerhouse. It’s like carrying a spare battery in your trunk—no waiting, no awkward small talk with strangers, just instant peace of mind. But here’s the thing: even the best tool is useless if you don’t know how to use it. That’s why I’m sharing a step-by-step Buture car jump starter instructions guide based on real-world use, trial and error, and a few “why won’t this work?!” moments. Whether you’re a first-time user or just need a refresher, this guide will walk you through everything—from charging the device to safely jump-starting your car, with practical tips to avoid common mistakes.
Getting Started: What’s in the Box and How to Charge
Unboxing Your Buture Jump Starter
When you first open the box, you’ll find more than just the jump starter. Here’s what’s included (and why each item matters):
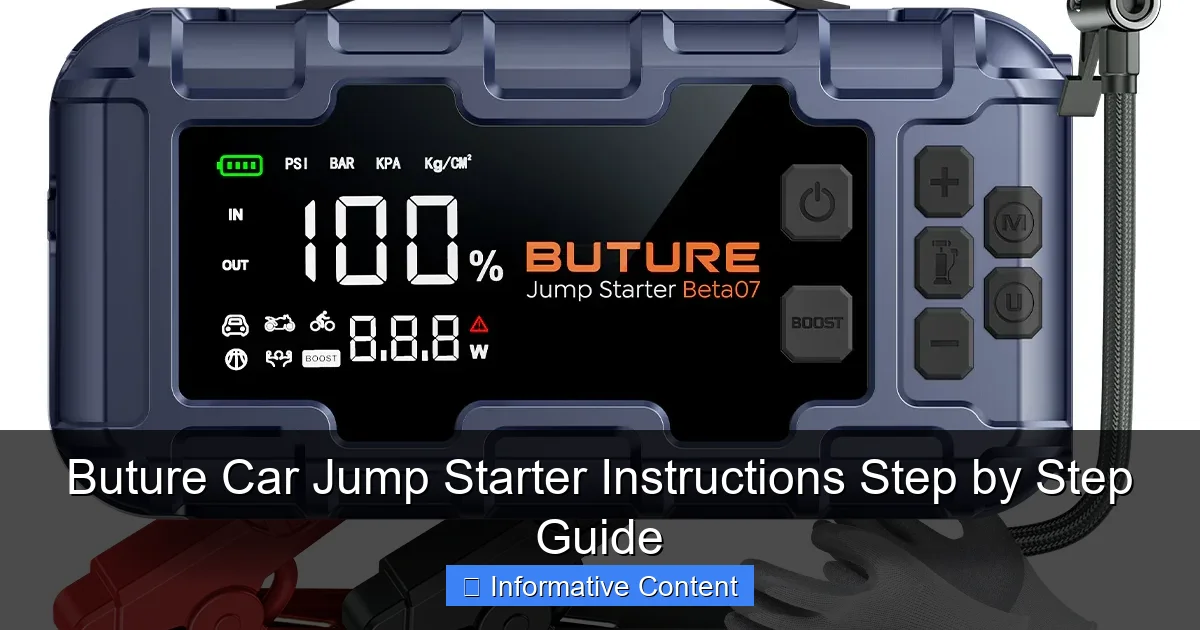
Visual guide about buture car jump starter instructions
Image source: ibuture.com
- The Buture jump starter unit: Compact, lightweight, and usually with a built-in LED flashlight (a lifesaver at night).
- Smart jumper clamps: These aren’t your grandpa’s cables. They’re equipped with reverse polarity protection, overload protection, and spark-proof technology. More on this later.
- USB charging cable: For recharging the jump starter and powering your phone or tablet.
- Wall charger and car charger: Yes, you can charge it at home or in your vehicle. Handy for keeping it ready.
- User manual: Keep it! It has safety warnings and troubleshooting tips.
Pro tip: Store the clamps in the included carrying case to avoid losing them or damaging the connectors. I once left mine loose in my trunk, and the alligator clips scratched the jump starter’s surface. Oops.
Charging Your Buture Jump Starter: The Right Way
Before your first use, charge the Buture jump starter fully. Here’s how:
- Use the wall charger (faster) or car charger (if you’re on the go).
- Plug the USB cable into the jump starter’s input port (usually labeled “DC IN”).
- The LED indicator will blink while charging. A solid light means it’s fully charged.
How long does it take? Most models charge in 3–5 hours. My Buture 1200A model took 4 hours using the wall charger. Never leave it charging overnight—overcharging can shorten battery life. Also, avoid charging in extreme temperatures (below 32°F or above 104°F). I once left mine in my car during a heatwave, and the battery drained faster than usual. Lesson learned.
How to Check the Battery Level
Before heading out, always check the charge level. Most Buture models have an LED indicator with 4 bars:
- 4 bars: 75–100% charged
- 3 bars: 50–74% charged
- 2 bars: 25–49% charged
- 1 bar: Below 25% (needs charging)
Real-world example: I once tried to jump-start my car with only 1 bar left. It worked—but barely. The engine cranked slowly, and I risked damaging the jump starter. Now I charge it to 100% after every use.
Step-by-Step Buture Car Jump Starter Instructions
Step 1: Turn Off the Car and Prepare
Before connecting anything, turn off the vehicle. This is critical. If the engine is running, you risk short-circuiting the jump starter. Here’s what else to do:
- Set the parking brake.
- Remove keys from the ignition.
- Ensure all lights, radio, and accessories are off.
Why this matters: A live electrical system can draw too much power, triggering the jump starter’s overload protection (and leaving you stranded).
Step 2: Connect the Jumper Clamps
Now, connect the clamps to the car battery. Here’s the Buture car jump starter instructions sequence:
- Red clamp to the positive (+) terminal: Look for a red cap or a “+” sign on the battery. Wiggle the clamp to ensure a snug fit.
- Black clamp to the negative (-) terminal or a metal ground: If the battery has a “-” sign, use it. If not, attach the black clamp to an unpainted metal surface (e.g., a bolt on the engine block). Never connect it to the negative terminal if the battery is damaged—gas fumes can ignite.
Pro tip: If your battery is under the hood, use a flashlight to locate the terminals. I once spent 10 minutes searching in the dark before realizing my car’s battery was behind the wheel well. Read your vehicle manual!
Step 3: Power On the Buture Jump Starter
Press the power button on the jump starter. The LED indicators will light up. Wait 2–3 seconds for the device to initialize. Listen for a beep—this confirms the clamps are properly connected and the jump starter is ready.
Common mistake: If you don’t hear a beep, check the clamps. Loose connections are the #1 reason jump starters fail. I once forgot to tighten the red clamp, and the jump starter stayed silent. A quick fix, but it taught me to double-check.
Step 4: Start the Engine
Now, start your car. Turn the key or press the ignition button. The engine should crank immediately. If it doesn’t:
- Wait 20–30 seconds and try again.
- Check the clamps—are they secure?
- Ensure the jump starter isn’t in “low power” mode (some models have a switch).
Success story: My neighbor’s SUV wouldn’t start in freezing weather. The Buture jump starter powered it up on the first try. The key? He’d charged it weekly, even in winter.
Step 5: Disconnect and Recharge
Once the engine runs:
- Turn off the jump starter (press the power button).
- Remove the black clamp first, then the red clamp. This order prevents sparks.
- Let the car run for 10–15 minutes to recharge the battery.
Critical: Recharge your Buture jump starter within 24 hours. Lithium batteries degrade if left discharged. I keep mine plugged in during my commute so it’s always ready.
Safety Tips and Common Mistakes to Avoid
Don’t Ignore the Safety Features
Buture jump starters come with built-in protections. Here’s what they do—and why you shouldn’t bypass them:
- Reverse polarity protection: Prevents damage if you connect the clamps backward. The jump starter will beep and flash an error light.
- Overload protection: Shuts off power if the current draw is too high (e.g., trying to jump a large diesel engine).
- Spark-proof technology: No sparks when connecting, reducing fire risk.
Real mistake: A friend once ignored the “reverse polarity” alarm and forced the clamps on. The jump starter shut down, and he had to reset it. Always follow the beep alerts.
Common Mistakes (and How to Fix Them)
- Mistake: Using a low-charged jump starter. Fix: Charge it to 100% before use.
- Mistake: Connecting to a damaged battery. Fix: If the battery is cracked, leaking, or swollen, don’t use the jump starter. Replace the battery first.
- Mistake: Storing it in extreme temperatures. Fix: Keep it in your car’s glove compartment or trunk (not the engine bay).
- Mistake: Forgetting to turn off the car. Fix: Make it a habit—turn off the engine before connecting anything.
When the Buture Jump Starter Won’t Work
Even the best tools have limits. If your Buture jump starter fails:
- Check the battery voltage: Use a multimeter. If the car battery is below 5V, the jump starter may not recognize it.
- Try a different ground point: Sometimes, the engine block has better conductivity than the battery terminal.
- Let the car battery rest: After a deep discharge, wait 5 minutes before trying again.
Example: My jump starter once failed to start a car with a completely dead battery (0V). The fix? I used it to power a portable charger, which slowly revived the battery enough for the jump starter to work.
Beyond Jump-Starting: Other Uses for Your Buture Device
Power Bank for Phones and Devices
Most Buture jump starters have USB ports. Use the included cable to charge:
- Smartphones (5V/2A)
- Tablets (5V/2.1A)
- GPS devices
Tip: A fully charged Buture 1200A model can charge an iPhone 13 about 3 times. I keep mine in my backpack during road trips—it’s a game-changer when the gas station charger is broken.
LED Flashlight and Emergency Modes
The built-in flashlight has multiple modes:
- Steady light: For under-the-hood repairs.
- SOS strobe: Flashes in a distress pattern (great for roadside emergencies).
- Red light: Preserves night vision (useful for camping).
Personal story: I got a flat tire at night. The SOS mode alerted a passing driver, who stopped to help. The flashlight also let me change the tire safely.
Air Compressor (Select Models)
Some Buture models include a built-in air compressor. Use it to:
- Inflate tires
- Sports equipment
- Pool toys
How to use: Attach the air hose to the valve, set the PSI, and press start. My Buture 1800A model inflated a car tire from 20 PSI to 35 PSI in 4 minutes.
Maintenance and Long-Term Care
How Often to Recharge
Lithium batteries lose charge over time, even when unused. Here’s a maintenance schedule:
| Storage Time | Action |
|---|---|
| 0–3 months | No action needed |
| 3–6 months | Recharge to 50% |
| 6–12 months | Recharge to 100%, then use once to cycle the battery |
Why this matters: Storing a lithium battery at 0% for months can damage it permanently. I set a calendar reminder to recharge mine every 4 months.
Cleaning and Storage
- Wipe the clamps with a dry cloth after use. Dirt can reduce conductivity.
- Store in a cool, dry place. Humidity can corrode metal parts.
- Keep the carrying case—it protects the device from dust and impacts.
When to Replace Your Buture Jump Starter
Most models last 3–5 years. Replace it if:
- The battery won’t hold a charge.
- The clamps are damaged.
- The LED flashlight stops working.
Tip: Register your device on Buture’s website for a 12–24 month warranty extension. I got a free replacement after 2 years when my model developed a charging issue.
Final Thoughts: Your Reliable Roadside Companion
The Buture car jump starter isn’t just a tool—it’s peace of mind. I’ve used mine in subzero winters, sweltering summers, and even after accidentally leaving my lights on. It’s saved me time, money, and the embarrassment of flagging down strangers. But remember: no device is foolproof. The Buture car jump starter instructions I’ve shared here work because they’re based on real experience—not marketing fluff.
To get the most out of your Buture jump starter, treat it like you would a fire extinguisher: keep it charged, know how to use it, and maintain it regularly. And when the moment comes (and it will), you’ll be ready. No more waiting, no more stress—just turn the key, hear the engine roar, and smile. That’s the power of being prepared.
Frequently Asked Questions
How do I use the Buture car jump starter for the first time?
Before using your Buture car jump starter, fully charge it using the included USB cable. Connect the jumper clamps to the battery terminals (red to positive, black to negative) and start your vehicle. Always follow the safety instructions in the user manual.
Can I use the Buture jump starter on both 12V and 24V batteries?
Most Buture car jump starters support 12V vehicles, including cars, SUVs, and motorcycles. Check your model’s specifications to confirm compatibility—some versions may not support 24V systems like heavy-duty trucks.
What should I do if the Buture jump starter doesn’t turn on?
Ensure the device is charged for at least 4–6 hours. If it still won’t power on, reset it by holding the power button for 10 seconds or contact Buture support for troubleshooting.
How long does the Buture car jump starter hold its charge?
A fully charged Buture jump starter can retain its power for 3–6 months when stored in a cool, dry place. Recharge it every 3 months to maintain optimal performance.
Is it safe to leave the Buture jump starter connected to the battery?
No—disconnect the clamps immediately after starting the engine to prevent overheating or damage. The Buture jump starter includes safety features like reverse polarity protection, but prolonged connection is not recommended.
Can I use the Buture jump starter as a power bank?
Yes! Most Buture models feature USB ports to charge phones, tablets, or other devices. Use the included USB cable and press the power button to activate the power bank mode.