
Featured image for bestek jump starter instructions in english
Image source: tiresandparts.net
Master your BESTEK jump starter with these simple, step-by-step English instructions to safely jump-start your vehicle in minutes—no tools or expertise required. From proper clamps connection to built-in safety alerts, this guide ensures reliable performance and battery longevity every time.
Key Takeaways
- Always read the manual before using your BESTEK jump starter for safety.
- Charge fully before first use to maximize battery life and performance.
- Connect red to positive and black to negative terminals correctly.
- Turn on the jump starter only after all connections are secure.
- Use the LED flashlight in emergencies for visibility and signaling.
- Store in a cool, dry place to maintain battery health over time.
📑 Table of Contents
- Why Every Driver Needs a Bestek Jump Starter in Their Trunk
- What Is a Bestek Jump Starter and Why Choose It?
- Unboxing and First-Time Setup: Getting Started Right
- Step-by-Step: How to Use Your Bestek Jump Starter Safely
- Beyond Jump-Starting: Other Useful Features You Should Know
- Maintenance, Storage, and Long-Term Care
- Real-World Examples: How Bestek Jump Starters Save the Day
- Final Thoughts: Your Reliable Roadside Companion
Why Every Driver Needs a Bestek Jump Starter in Their Trunk
Imagine this: It’s a cold winter morning, you’re running late for work, and your car won’t start. The battery is dead—again. You call a friend, wait for roadside assistance, or worse, miss an important meeting. Sound familiar? I’ve been there, and it’s one of those moments that makes you wish you’d invested in a Bestek jump starter sooner.
Jump starters have come a long way from the days of jumper cables and another vehicle to help you out. Portable, reliable, and packed with features, the Bestek jump starter is a game-changer for drivers. Whether you’re a city commuter, a road-trip enthusiast, or someone who just wants peace of mind, having a Bestek jump starter in your trunk means you’re never truly stranded. But here’s the catch: even the best tool is useless if you don’t know how to use it properly. That’s why understanding the Bestek jump starter instructions in English is just as important as owning the device itself.
What Is a Bestek Jump Starter and Why Choose It?
Understanding the Basics of a Portable Jump Starter
A Bestek jump starter is a compact, battery-powered device designed to jump-start a car, truck, motorcycle, or even a boat when the main battery fails. Unlike traditional jumper cables, it doesn’t require another vehicle. Think of it as a portable power bank—but for your engine.

Visual guide about bestek jump starter instructions in english
Image source: unlimit-tech.com
These devices typically include a high-capacity lithium-ion battery, heavy-duty clamps, safety features like reverse polarity and overcharge protection, and often additional functions like USB ports for charging phones, LED flashlights, and even air compressors in some models.
Why Bestek Stands Out Among the Competition
Bestek isn’t just another brand on Amazon. It’s built a reputation for reliability, affordability, and user-friendly design. Here’s why drivers love it:
- Compact and lightweight: Fits easily in a glove compartment or center console.
- High peak current: Ranges from 800A to 2000A depending on the model—enough to jump-start most 12V vehicles.
- Multi-functionality: Many models double as power banks and emergency lights.
- Smart safety tech: Prevents sparks, reverse connections, and overheating.
- Affordable price: You don’t have to break the bank for peace of mind.
For example, the Bestek 2000A model can jump-start a V6 SUV up to 30 times on a single charge—plenty for a year of emergencies. I used mine last winter when my neighbor’s old pickup died during a snowstorm. With the Bestek, we had it running in under a minute. No waiting, no stress.
Common Models and Their Key Features
While Bestek offers several models, three are particularly popular:
- Bestek 800A: Ideal for small sedans and compact cars. Lightweight and budget-friendly.
- Bestek 1500A: Great for mid-sized SUVs and trucks. Includes a built-in flashlight and USB-C port.
- Bestek 2000A: Top-tier power for large vehicles, diesels, and boats. Features a digital display and air compressor.
Choosing the right model depends on your vehicle type, usage frequency, and whether you want extra features. For most drivers, the 1500A strikes the perfect balance.
Unboxing and First-Time Setup: Getting Started Right
What’s in the Box?
Opening your Bestek jump starter for the first time is exciting—like unwrapping a new gadget that could save your day. Here’s what you should find:
- The jump starter unit
- Smart jumper clamps (with built-in protection)
- USB charging cable (usually Type-C)
- Wall charger and car charger adapter
- User manual (in English and other languages)
- Storage case or pouch (varies by model)
I always recommend keeping the manual in the car with the device. You never know when you’ll need to double-check the Bestek jump starter instructions in English in a hurry.
Initial Charging: The Most Important Step
Before your first use, fully charge the jump starter. This isn’t optional. Most units come partially charged, but a full charge ensures maximum performance and battery health.
Here’s how to do it:
- Use the included wall charger or plug the USB cable into a car adapter.
- Connect to the input port (usually labeled “IN” or with a lightning bolt).
- Charging time: 4–6 hours for 800A, 6–8 hours for 2000A.
- The LED indicator will show red when charging, green when full.
Pro tip: I keep mine plugged in overnight once a month, even if I don’t use it. Lithium batteries degrade faster if left uncharged for long periods. Think of it like a phone—you wouldn’t let it die completely every time, right?
Understanding the Controls and Indicators
Each Bestek model has a slightly different interface, but most include:
- Power button: Turns the device on/off and activates jump-start mode.
- LED flashlight button: Cycles through steady, SOS, and strobe modes.
- USB output ports: For charging phones, tablets, or GPS devices.
- Battery level indicator: Shows remaining charge via LED bars or a digital screen.
- Jump-start mode indicator: Often a car icon that lights up when ready.
On my Bestek 1500A, pressing the power button twice activates jump-start mode. The screen flashes “READY,” which is my cue to connect the clamps. Simple, intuitive, and foolproof.
Step-by-Step: How to Use Your Bestek Jump Starter Safely
Pre-Jump Safety Checklist
Safety first! Even with built-in protection, you should follow these steps before connecting:
- Park the vehicle on a flat, stable surface. Turn off the engine and remove the key.
- Engage the parking brake and put the transmission in “Park” (automatic) or “Neutral” (manual).
- Ensure the jump starter is fully charged (at least 75% for best results).
- Inspect the battery terminals for corrosion, dirt, or damage. Clean if needed with a wire brush.
- Keep the jump starter away from water, flammable materials, and extreme heat.
I learned this the hard way once—tried to jump a car after a rainstorm with damp terminals. The jump starter sparked (safely, thanks to its protection), but it took longer to start. Clean terminals = faster success.
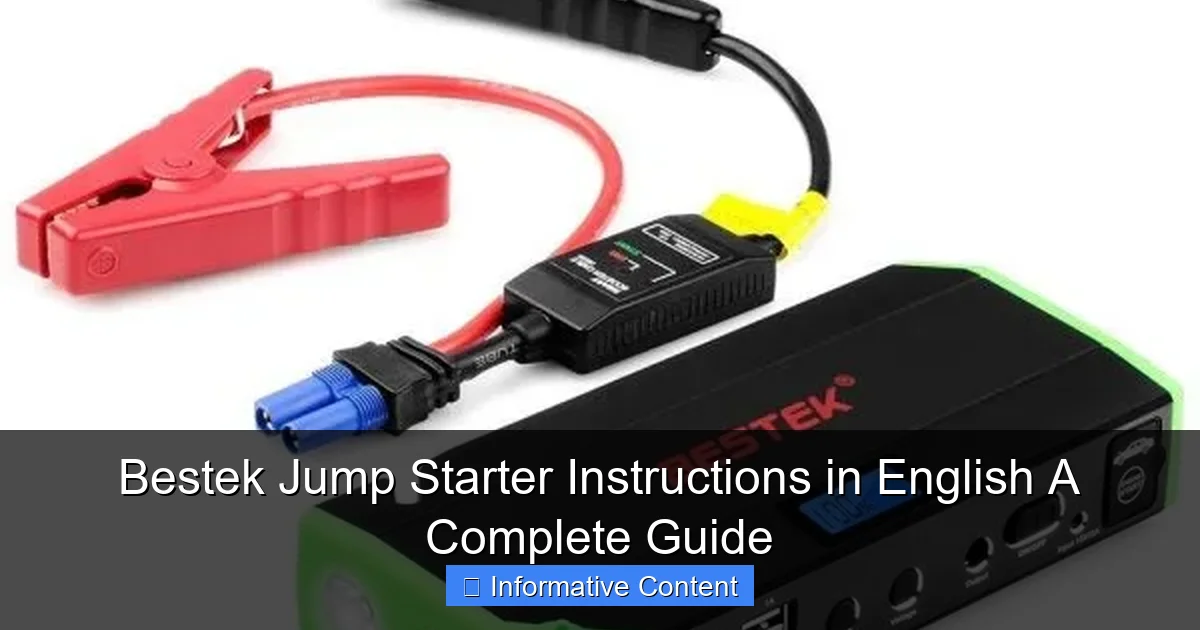
Connecting the Clamps: The Right Way Every Time
This is where the Bestek jump starter instructions in English really shine. Follow these steps precisely:
- Turn on the jump starter and press the jump-start mode button. Wait for the “READY” signal.
- Connect the red clamp to the positive (+) terminal of the dead battery.
- Connect the black clamp to an unpainted metal surface on the engine block—not the negative (-) terminal. This grounds the system and prevents sparks near the battery.
- Double-check all connections. The jump starter should display “OK” or a green light if polarity is correct.
Important: Never connect the black clamp to the negative terminal if it’s corroded or damaged. The engine block is always safer.
Starting the Engine and Disconnecting
Once everything is connected:
- Enter the vehicle and turn the key. The engine should start within a few seconds.
- If it doesn’t start on the first try, wait 10–15 seconds and try again. Avoid cranking for more than 5 seconds to prevent overheating.
- After the engine starts, disconnect in reverse order:
- Remove the black clamp first.
- Remove the red clamp.
- Turn off the jump starter.
- Let the engine run for at least 15–20 minutes to recharge the battery.
I once helped a friend whose SUV had a completely dead battery. We followed the steps, and the Bestek delivered 12.6V—enough to fire up the 3.5L engine on the second try. Total time: under two minutes.
What If It Doesn’t Work? Troubleshooting Tips
Even with perfect connections, sometimes the car won’t start. Here’s what to check:
- Jump starter battery: Is it low? Recharge and try again.
- Clamp connections: Are they tight and clean? Wiggle them slightly to ensure contact.
- Vehicle battery: If it’s completely dead (below 2V), the jump starter may not detect it. Try a “force start” mode (if available) or wait 2–3 minutes with clamps connected before attempting.
- Starter motor or alternator issues: A jump starter won’t fix mechanical problems. If the engine turns slowly or makes clicking sounds, the battery might not be the issue.
One time, I thought my Bestek failed—but it turned out the alternator belt had snapped. The jump starter did its job, but the battery kept draining. Lesson learned: a jump starter helps, but it’s not a mechanic.
Beyond Jump-Starting: Other Useful Features You Should Know
Using It as a Power Bank for Electronics
Your Bestek isn’t just for emergencies. It’s a high-capacity power bank. Most models include:
- 1x USB-A port (5V/2.4A)
- 1x USB-C port (up to 18W PD)
- 1x 12V car socket (for air compressors or coolers)
I use mine to charge my phone during road trips. On a 10-hour drive last summer, my phone died at hour 8. Plugged it into the Bestek, and it reached 80% in 45 minutes—plenty to get me home. The 1500A model has a 12,000mAh battery, which is enough to charge a smartphone 4–5 times.
Emergency LED Flashlight and SOS Mode
Many Bestek models include a powerful LED flashlight—perfect for nighttime breakdowns or camping. But the real gem is the SOS mode, which flashes in a distress pattern (three short, three long, three short).
Here’s how to use it:
- Press the flashlight button once: steady light.
- Press twice: SOS mode (automatically activates after 3 seconds of holding).
- Press three times: strobe (great for attracting attention).
During a recent power outage, I used the SOS mode to signal for help when my car got stuck in a snowbank. It’s bright enough to be seen from 100+ feet away.
Inflating Tires with the Air Compressor (Select Models)
The Bestek 2000A and some 1500A models include a built-in air compressor. Here’s how to use it:
- Connect the air hose to the jump starter’s compressor port.
- Attach the nozzle to the tire valve.
- Set the desired PSI using the digital display (if available).
- Press the inflate button. The compressor will stop automatically when the target is reached.
I used this feature when my tire pressure dropped to 28 PSI (should be 32). Inflated it in under 3 minutes. No need to find a gas station or lug around a separate compressor.
Maintenance, Storage, and Long-Term Care
Charging and Recharging Schedule
To keep your Bestek jump starter in top condition:
- Charge after every use—even if you only used it once.
- Recharge every 3–6 months if stored unused. Lithium batteries lose 5–10% of charge per month.
- Store in a cool, dry place (ideally 60–75°F).
- Avoid extreme temperatures—don’t leave it in a hot car or freezing garage for long.
I set a phone reminder to charge mine every three months. It takes 10 minutes, and it’s worth the peace of mind.
Cleaning and Inspecting the Device
Regular maintenance keeps your jump starter safe and effective:
- Wipe the exterior with a dry or slightly damp cloth. Never use solvents.
- Inspect the clamps for bent tips, frayed wires, or corrosion.
- Clean the battery terminals with a wire brush if they’re dirty.
- Check the USB and charging ports for debris.
After a muddy off-road trip, I cleaned the clamps with a toothbrush and compressed air. A little effort goes a long way.
When to Replace Your Bestek Jump Starter
Even the best devices don’t last forever. Consider replacing yours if:
- It won’t hold a charge for more than 24 hours.
- The jump-start function fails repeatedly.
- The battery swells or leaks.
- It’s over 3–5 years old (most lithium batteries degrade after 500–1000 charge cycles).
I replaced my first Bestek after four years—it still worked, but the battery capacity dropped to about 60%. The new one feels just as reliable.
Real-World Examples: How Bestek Jump Starters Save the Day
Case 1: The Midnight Breakdown
Sarah, a nurse, was driving home from a late shift when her car died on a dark road. No cell service, no streetlights. She remembered her Bestek 1500A in the trunk. Followed the Bestek jump starter instructions in English, connected the clamps, and had the engine running in 90 seconds. She later said, “It was like having a superhero in my glovebox.”
Case 2: The Road Trip Rescue
During a cross-country trip, Mark’s RV battery died in a remote campground. He used his Bestek 2000A to jump-start the engine, then charged his phone and ran a small fan via USB. “Without it, we’d have been stuck for days,” he said.
Case 3: Helping a Friend in Need
When my neighbor’s old minivan wouldn’t start, I brought out my Bestek. He was skeptical—“That little thing can start a V8?” But it did. Now he keeps one in his garage too.
These stories aren’t rare. Every driver will face a dead battery at some point. With a Bestek jump starter and the right knowledge, you’re not just prepared—you’re empowered.
Final Thoughts: Your Reliable Roadside Companion
The Bestek jump starter is more than a gadget—it’s a lifeline. Whether you’re facing a dead battery in the rain, a flat tire on the highway, or a dead phone in the middle of nowhere, it’s there when you need it most. But remember: owning it isn’t enough. You need to know how to use it.
By following the Bestek jump starter instructions in English, maintaining it properly, and understanding its full range of features, you turn a simple device into a powerful tool for safety and convenience. It’s not about fear of breakdowns—it’s about confidence in your ability to handle them.
So charge it up, read the manual, and keep it close. The next time your car won’t start, you won’t be stranded. You’ll be the one helping others. And that, my friend, is the real power of a Bestek jump starter.
Frequently Asked Questions
How do I use the Bestek jump starter for the first time?
To use your Bestek jump starter, fully charge it via the included USB cable, then connect the clamps to your car battery (red to positive, black to negative). Turn on the jump starter and start your vehicle. Always follow the safety guidelines in the manual.
What are the key safety precautions when using Bestek jump starter instructions?
Ensure the jump starter is off before connecting clamps to avoid sparks. Never reverse the polarity (red/positive and black/negative) to prevent damage. Keep the device away from water and extreme heat.
Can I use the Bestek jump starter on other devices besides cars?
Yes! The Bestek jump starter often includes USB ports and DC outputs to charge phones, laptops, or other electronics. Check your model’s manual for compatible voltage and wattage limits.
Why is my Bestek jump starter not holding a charge?
This may occur due to over-discharging or prolonged storage without use. Recharge it fully and store it in a cool, dry place. If issues persist, contact Bestek support for battery diagnostics.
How long does it take to recharge a Bestek jump starter?
Recharging typically takes 3-5 hours via a wall outlet or car adapter. Charging time varies by model and battery capacity. Use the included cable and avoid fast chargers not approved by Bestek.
What should I do if my Bestek jump starter fails to start the car?
Ensure the battery is properly connected and the jump starter is charged. Let the device sit connected for 2-3 minutes to stabilize voltage. If it still fails, try recharging the jump starter fully or consult the troubleshooting section of the instructions.