
Featured image for armor all jump starter kit instructions
Image source: cdn1.1800flowers.com
Master your Armor All jump starter kit safely and efficiently with these clear, step-by-step instructions. Designed for both beginners and seasoned users, this guide walks you through proper connection, jump-starting procedures, and essential safety precautions to protect your vehicle and yourself. Get reliable performance every time—no guesswork, just quick, confident results.
Key Takeaways
- Always inspect clamps for damage before connecting to battery terminals.
- Charge fully before first use to ensure maximum jump-starting power.
- Connect red clamp first to positive terminal, then black to ground.
- Never leave connected for more than 30 seconds to avoid overheating.
- Store in a cool, dry place to prolong battery life and performance.
- Use safety goggles to protect eyes during jump-starting process.
- Follow LED alerts closely to detect errors or low battery status.
📑 Table of Contents
- Why Every Driver Should Have a Jump Starter Kit
- What’s in the Box? Unboxing Your Armor All Jump Starter Kit
- Step-by-Step: How to Use Your Armor All Jump Starter Kit
- Safety First: Key Precautions When Using the Jump Starter
- Maintenance and Charging: Keeping Your Jump Starter Ready
- Troubleshooting Common Issues and When to Seek Help
- Final Thoughts: Your Reliable Roadside Companion
Why Every Driver Should Have a Jump Starter Kit
Let’s be honest—no one plans for a dead battery. It always seems to happen at the worst possible moment. Maybe you’re rushing to work, late for a meeting, or stranded in a dimly lit parking lot after a night out. I remember one freezing winter morning when my car refused to start. I was in my driveway, coffee in hand, and my phone battery was at 3%. No jumper cables, no helpful neighbor in sight. That’s when I realized: I needed a backup plan.
Enter the Armor All jump starter kit. It’s not just another gadget—it’s peace of mind in a compact, portable package. Unlike traditional jumper cables that require another vehicle, this little powerhouse can bring your car back to life all on its own. Whether you drive a sedan, SUV, or even a small truck, having a reliable jump starter like this one can save you time, stress, and even towing fees. But here’s the thing: it only works if you know how to use it safely and correctly.
In this guide, I’ll walk you through every step of using your Armor All jump starter kit—from unboxing to jump-starting your vehicle, troubleshooting common issues, and keeping it in top shape. Think of this as a friendly, no-nonsense conversation with a buddy who’s been through the same dead-battery panic you’re trying to avoid.
What’s in the Box? Unboxing Your Armor All Jump Starter Kit
When you first open your Armor All jump starter kit, it’s easy to feel a bit overwhelmed. There are several components, and it’s important to understand what each one does before you need it in an emergency. Let’s break it down piece by piece so you know exactly what you’re working with.

Visual guide about armor all jump starter kit instructions
Image source: shop.cluballiance.aaa.com
Main Components and Their Functions
- Jump starter unit: This is the brain and power source. It contains a rechargeable lithium-ion battery (typically 12V, 12,000–18,000 mAh), LED indicators for battery level, and safety features like reverse polarity and short-circuit protection.
- Smart jumper cables (clamps): Unlike old-school cables, these are “smart” because they have built-in circuitry to prevent sparks and protect your vehicle’s electronics. One end connects to the jump starter, the other to your car battery.
- USB charging cable: Used to recharge the jump starter from a wall outlet, car charger, or even a power bank. Most kits come with a 12V car adapter and a USB-A to USB-C or micro-USB cable.
- Wall charger: A compact adapter to plug into a standard household outlet. Charging time varies (usually 3–5 hours), so it’s best to charge it after every use.
- Carrying case: A soft or hard-shell case to keep everything organized and protected. This is a small but crucial feature—especially if you’re storing it in your trunk where it can get tossed around.
- User manual: Don’t skip this! It includes safety warnings, charging instructions, and troubleshooting tips tailored to your model.
Quick Tips for First-Time Setup
Before you tuck your kit away, take 10 minutes to set it up properly:
- Charge it fully: Even if it comes partially charged, give it a full charge using the wall adapter. This ensures maximum capacity and activates the battery’s health cycle.
- Label the case: Use a permanent marker or sticker to write “Jump Starter – Keep Charged” on the outside. It’s a simple reminder that could save you during a panic moment.
- Store it upright: Keep the unit in a cool, dry place—ideally in your car’s glove compartment or trunk storage bin. Avoid extreme heat (like in a hot trunk during summer) or freezing temperatures for long periods.
Pro tip: I keep mine in a small, insulated bag with a silica gel pack to reduce moisture. It’s overkill, but after my first jump starter died from humidity, I learned my lesson.
Step-by-Step: How to Use Your Armor All Jump Starter Kit
Now that you know what’s in the box, let’s get to the heart of the matter: how to jump-start your car safely. This isn’t like connecting old jumper cables where you just “hook and go.” The Armor All kit is smarter, but it still requires careful steps to avoid damage to your vehicle or the unit itself.
Step 1: Prepare Your Vehicle
- Park your car on a flat surface and engage the parking brake.
- Turn off all electronics (radio, AC, lights) and remove the key from the ignition.
- Pop the hood and locate the battery. If it’s covered by a plastic shield, remove it carefully.
- Inspect the battery terminals for corrosion (white or greenish crust). If present, clean with a wire brush or baking soda paste before connecting the clamps.
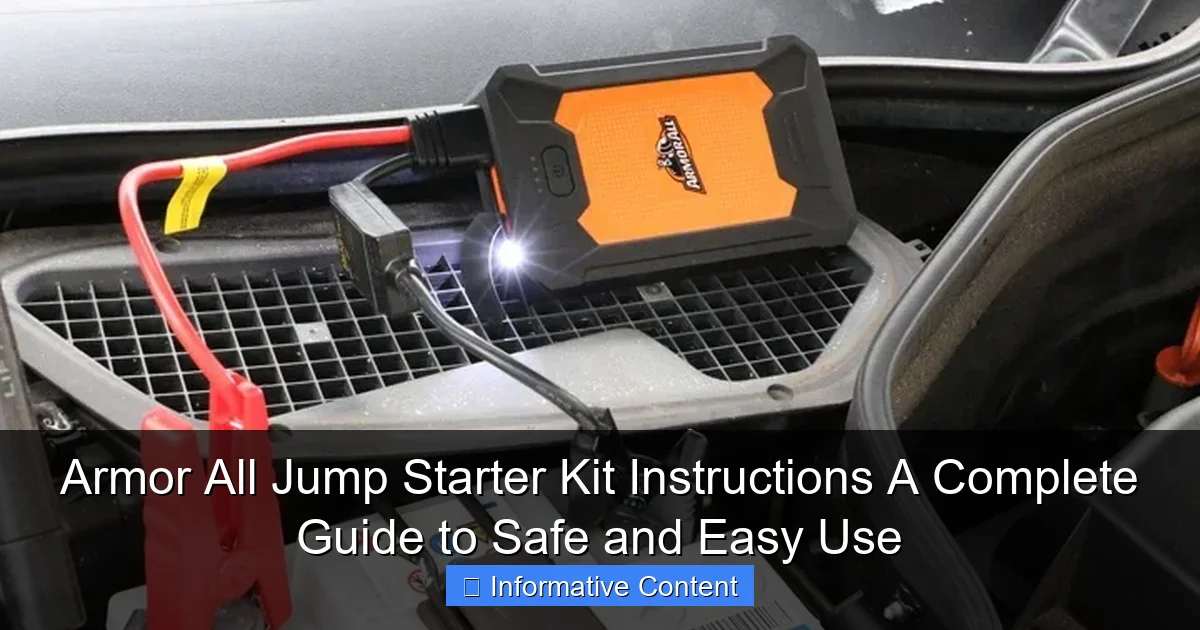
Step 2: Connect the Jumper Cables
Here’s where many people make mistakes. Always follow this order:
- Connect the red (positive) clamp to the positive terminal on your car battery. The terminal is usually marked with a “+” and may have a red cover.
- Connect the black (negative) clamp to a bare metal surface on the engine block or chassis. Never connect it directly to the negative battery terminal—this reduces the risk of sparks near the battery, which could ignite hydrogen gas.
- Double-check the connections. Wiggle the clamps to ensure they’re secure and not touching any moving parts.
Real-life example: My friend once connected the black clamp to the negative terminal and got a small spark. Nothing happened, but the jump starter’s safety alarm beeped and shut off. We had to restart the process. Lesson learned: follow the manual.
Step 3: Power On the Jump Starter
- Press the power button on the jump starter. The LED lights should indicate the battery level (e.g., 3 out of 4 bars).
- Wait 30–60 seconds. This allows the unit to stabilize and prepare for the jump.
- Some models have a “boost” or “jump” button—press it now if your manual recommends it.
Step 4: Start Your Engine
- Try starting your car. Do not crank for more than 5 seconds. If it doesn’t start, wait 2 minutes before trying again. Over-cranking can overheat the starter and drain the jump starter.
- If it starts, let it run for 2–3 minutes to allow the alternator to begin charging the battery.
- If it still won’t start after 3 attempts, disconnect the jump starter and check for other issues (e.g., faulty starter, fuel pump).
Step 5: Disconnect and Store
Once your car is running:
- Turn off the jump starter.
- Remove the black clamp first, then the red clamp.
- Coil the cables neatly and return everything to the case.
- Recharge the jump starter as soon as possible—even if it still has 50% battery.
Important: Never leave the jump starter connected while driving. It’s not a battery charger and can be damaged by voltage surges.
Safety First: Key Precautions When Using the Jump Starter
Jump-starting a car isn’t dangerous—if you follow the rules. The Armor All kit includes safety features, but human error is still the biggest risk. Let’s talk about the most common pitfalls and how to avoid them.
1. Reverse Polarity: What It Is and How to Avoid It
Reverse polarity happens when you connect the clamps to the wrong terminals. This can fry your car’s electronics or damage the jump starter. The good news? Most Armor All models have reverse polarity protection.
Here’s what to do:
- Always double-check terminal markings before connecting.
- If the jump starter beeps, flashes red, or displays an error code, immediately disconnect and re-check the connections.
- Never force a connection. If a clamp doesn’t fit, the terminal may be corroded or damaged—clean or repair it first.
2. Short-Circuit Prevention
A short circuit occurs when the clamps touch each other or a conductive surface. This can cause sparks, overheating, or even a fire. To prevent this:
- Keep the clamps separated when not in use. I use a rubber band to secure them together.
- Never lay the jump starter on a metal surface while connected.
- Use the protective rubber covers on the clamps when storing.
3. Overheating and Over-Cranking
Jump starters aren’t designed for continuous use. Over-cranking (holding the ignition for too long) can:
- Overheat the jump starter’s internal components.
- Reduce battery life over time.
- Trigger thermal shutdown (the unit turns off automatically).
Tip: If your car doesn’t start after 3 tries, stop and troubleshoot. A persistent no-start could mean a deeper issue (e.g., bad starter motor, fuel delivery problem).
4. Battery and Environmental Safety
- Never expose the unit to water or extreme temperatures. Lithium-ion batteries can catch fire if damaged or overheated.
- Store in a dry place. If condensation forms, let it dry completely before use.
- Dispose of the unit properly at a battery recycling center when it reaches end-of-life.
Maintenance and Charging: Keeping Your Jump Starter Ready
A jump starter is only as good as its charge. Think of it like a phone—you wouldn’t wait until it’s dead to plug it in, right? The same applies here.
How and When to Recharge
- After every use, charge the unit fully, even if it still shows 30–40% battery.
- Every 3 months, if not used, perform a full charge-discharge cycle to maintain battery health.
- Use only the charger provided. Third-party chargers may not match voltage requirements and can damage the battery.
Charging time varies by model:
| Model (Example) | Battery Capacity (mAh) | Wall Charger Time | Car Charger Time | USB Charger Time |
|---|---|---|---|---|
| Armor All 12,000 mAh | 12,000 | 4–5 hours | 5–6 hours | 6–8 hours |
| Armor All 18,000 mAh | 18,000 | 5–6 hours | 6–7 hours | 7–9 hours |
| Armor All 20,000 mAh (Pro) | 20,000 | 6–7 hours | 7–8 hours | 8–10 hours |
Signs Your Jump Starter Needs Attention
- Battery drains quickly: If it goes from 100% to 20% in a month without use, the battery may be degrading.
- LED lights flicker or don’t light up: Could indicate a faulty circuit or dead battery.
- Unit feels warm during charging: Normal to a degree, but if it’s hot to the touch, stop charging and let it cool.
Cleaning and Storage Tips
- Wipe the unit with a dry or slightly damp cloth. Never use solvents.
- Clean clamps with a wire brush if they’re corroded.
- Store in the original case to prevent dust and impact damage.
- Keep away from children and pets—clamps can pinch, and the unit contains a battery.
My personal routine: Every Sunday, I check the charge level and top it off if needed. It takes 2 minutes and gives me peace of mind.
Troubleshooting Common Issues and When to Seek Help
Even the best jump starters can run into issues. Here’s how to handle the most common problems—and when to admit defeat and call for help.
Jump Starter Won’t Turn On
- Check the battery level: If all LEDs are off, it may be deeply discharged. Try charging for 15 minutes first.
- Inspect the power button: If it’s stuck or unresponsive, the unit may need repair.
- Reset the system: Some models have a reset button or require holding the power button for 10 seconds.
Car Still Won’t Start After Jump
This doesn’t always mean the jump starter failed. Consider:
- Weak or dead battery: Even a jump start can’t revive a completely dead battery. Try a longer crank (5 seconds) and wait 2 minutes between attempts.
- Faulty starter motor: If you hear a clicking sound but no engine turn, the starter may be the issue.
- Fuel or electrical problem: Check fuel gauge, fuses, and listen for the fuel pump humming when you turn the key to “ON.”
Error Codes and Alarms
Armor All kits often have LED indicators or beep codes:
- Red flashing light: Reverse polarity or connection issue.
- Rapid beeping: Short circuit or overheating.
- No lights, no sound: Dead battery or internal fault.
When to call support: If the unit shows persistent errors, won’t charge, or fails to jump a known-good battery, contact Armor All customer service. Most kits come with a 1–2 year warranty.
Extreme Weather Challenges
- Cold weather: Lithium-ion batteries lose efficiency in cold temps. Store the unit inside your home or car cabin (not trunk) during winter.
- Hot weather: Don’t leave it in a hot car. Temperatures above 110°F (43°C) can degrade the battery.
Final Thoughts: Your Reliable Roadside Companion
The Armor All jump starter kit isn’t just a tool—it’s a lifeline. Whether you’re a daily commuter, a weekend road-tripper, or someone who just wants to avoid the hassle of calling a tow truck, this device delivers. It’s compact, user-friendly, and packed with safety features that older jump starters simply don’t have.
But remember: technology is only as smart as the person using it. Take the time to read the manual, charge it regularly, and practice the steps in a safe environment. I recommend doing a “dry run” at home—connect the clamps, power on the unit, and simulate a jump start (without cranking the engine). It builds confidence and helps you spot any issues before you’re stranded.
And here’s a final tip: keep a printed copy of these instructions in the case. When you’re stressed, fumbling with a phone screen or trying to remember steps is the last thing you need. A quick-reference guide can make all the difference.
At the end of the day, a dead battery doesn’t have to mean disaster. With your Armor All jump starter kit, a little know-how, and this guide, you’re ready for whatever the road throws at you. Stay charged, stay safe, and drive with confidence.
Frequently Asked Questions
How do I use the Armor All Jump Starter Kit for the first time?
To use the Armor All Jump Starter Kit, fully charge the device before its initial use, then connect the clamps to the battery terminals (red to positive, black to negative) and power on the unit. Follow the included Armor All Jump Starter Kit instructions to ensure proper connection and avoid sparks.
Can the Armor All Jump Starter Kit charge other devices?
Yes, many models include USB ports to charge phones, tablets, or other small electronics. Refer to your Armor All Jump Starter Kit instructions for specific output capabilities and recommended usage times.
What safety precautions should I take when jump-starting a car?
Always wear safety glasses, ensure the jump starter is on a stable surface, and never touch the clamps together. The Armor All kit includes built-in protections, but proper connection order (positive first, then negative) is critical.
How long does the Armor All Jump Starter hold its charge?
Most models retain a charge for 3–6 months when stored properly. Check the instructions to confirm your model’s specs, and recharge it every few months if unused to maintain optimal performance.
Why won’t my Armor All Jump Starter turn on?
This could be due to a low battery or a faulty connection. Try recharging the unit fully and inspect the power button and cables for damage. Consult the troubleshooting section of your kit’s guide.
Is the Armor All Jump Starter Kit compatible with diesel engines?
Higher-capacity models (e.g., 12V/24V) can handle diesel engines, but smaller versions may not. Always check your vehicle’s requirements and the jump starter’s peak amps in the product manual.