
Featured image for using a battery charger to jump start
Image source: static.pakwheels.com
Using a battery charger to jump start your car is a safe, reliable alternative to traditional jumper cables when done correctly. Modern smart chargers deliver controlled power to revive dead batteries without sparks or surges, making them ideal for beginners and frequent drivers. Always follow manufacturer instructions to avoid damage and ensure a quick, hassle-free restart.
Key Takeaways
- Use a battery charger with jump-start mode to safely power a dead battery without another vehicle.
- Connect red clamp to positive terminal and black to negative or grounded metal to avoid sparks.
- Ensure the charger is off before connecting to prevent electrical surges or damage to the battery.
- Follow the charger’s instructions carefully for proper voltage and charging time to avoid overcharging.
- Start the engine once charging begins if the charger supports jump-start functionality for quick ignition.
- Disconnect clamps in reverse order after use to maintain safety and protect electrical systems.
📑 Table of Contents
- Why a Dead Battery Doesn’t Have to Ruin Your Day
- How a Battery Charger Works for Jump Starting (And Why It’s Different)
- Choosing the Right Battery Charger for Jump Starting
- Step-by-Step Guide: How to Use a Battery Charger to Jump Start Your Car
- Common Mistakes and How to Avoid Them
- Data Table: Charger Performance Comparison
- Final Thoughts: Be Prepared, Stay Safe
Why a Dead Battery Doesn’t Have to Ruin Your Day
We’ve all been there—rushing to get to work, school, or an appointment, only to turn the key in the ignition and hear… nothing. That dreaded silence, or maybe a slow, groaning crank, means your car battery is dead. It’s frustrating, stressful, and often inconvenient. But here’s the good news: you don’t always need another car or a jump box to get back on the road. Using a battery charger to jump start your vehicle is not only possible but often a smarter, safer, and more reliable option—especially if you’re prepared.
Unlike traditional jump-starting with jumper cables and another vehicle, a battery charger gives you control, reduces risks, and can even help extend your battery’s life. Whether you’re a seasoned DIYer or someone who just wants to avoid being stranded in a grocery store parking lot, learning how to use a battery charger to jump start your car is a skill worth mastering. It’s not about replacing jump boxes or cables—it’s about having options. And in this guide, I’ll walk you through everything you need to know: the right tools, the right steps, common mistakes, and how to do it safely and easily, no matter your experience level.
How a Battery Charger Works for Jump Starting (And Why It’s Different)
Before we dive into the how, let’s clear up a common misconception: a battery charger isn’t the same as a jump starter. A jump starter is a portable power bank that delivers a high burst of current to crank the engine. A battery charger, on the other hand, is designed to replenish a battery’s charge over time. But with the right type and technique, you can use a charger to jump start your car—just not in the same flashy, instant way.

Visual guide about using a battery charger to jump start
Image source: bigeasymart.com
Understanding the Types of Battery Chargers
Not all battery chargers are created equal when it comes to jump starting. Here’s a quick breakdown of the types you’ll encounter:
- Trickle Chargers (Float Chargers): Deliver a low, steady charge (typically 1–2 amps). Great for maintenance but not suitable for jump starting. They’re too slow to provide the cranking amps needed to start an engine.
- Smart Chargers (Automatic/Intelligent): Most modern chargers fall into this category. They detect battery voltage, adjust charging rates, and switch to float mode when full. Many have a “boost” or “jump start” mode that delivers a temporary high current (e.g., 10–30 amps) to help start the engine.
- Manual Chargers: Require you to set the voltage and amperage. Riskier, as overcharging or incorrect settings can damage the battery or cause sparks.
- Jump Starters with Charging Capability: Hybrid devices that act as both portable jump starters and chargers. They’re convenient but not the focus here—we’re talking about dedicated chargers.
The key takeaway? For jump starting, you need a smart charger with a boost or jump mode. These chargers temporarily deliver higher current (usually for 3–5 minutes) to help the engine turn over, while still protecting the battery from damage.
Why Use a Charger Instead of Jumper Cables?
You might be thinking, “Why bother with a charger when I can just borrow a car and use jumper cables?” Great question. Here’s why a charger can be a better choice:
- No second vehicle needed. If you’re at home or alone, you don’t have to wait for a friend or call roadside assistance.
- Safer for sensitive electronics. Modern cars have complex computer systems. A sudden surge from another car’s battery (especially if mismatched) can cause voltage spikes. A smart charger delivers a controlled, gradual charge.
- Less risk of reverse polarity. Jumper cables require careful connection. A charger usually has reverse-polarity protection and clear indicators.
- Can revive deeply discharged batteries. Some batteries are too low for jumper cables to work. A charger can slowly bring them back to life.
- Long-term battery health. After jump starting, a charger can fully recharge the battery, reducing the chance of repeat failures.
For example, last winter, my neighbor’s SUV wouldn’t start after sitting unused for two weeks. The battery was at 8.2 volts—too low for jumper cables to work. I used a 10-amp smart charger with a boost mode. After 10 minutes of charging, the voltage rose to 10.5 volts, and the engine started on the first try. No drama, no sparks, no waiting for someone to help.
Choosing the Right Battery Charger for Jump Starting
Not every charger can handle jump starting. Picking the wrong one could mean wasted time, a dead battery, or even safety hazards. Here’s what to look for.
Key Features to Look For
- Boost or Jump Mode: This is non-negotiable. Look for chargers labeled with “boost,” “jump start,” or “engine start” modes. These temporarily increase output (e.g., 10–30 amps) to help crank the engine.
- Amperage Output: For jump starting, aim for at least 10–15 amps in boost mode. Lower amps (like 2–5 amps) won’t provide enough cranking power. However, avoid extremely high amps (e.g., 50+ amps) unless you’re experienced—they can stress older batteries.
- Smart Charging Technology: Automatic voltage detection, temperature compensation, and multi-stage charging (bulk, absorption, float) ensure safe, efficient charging.
- Reverse Polarity and Overload Protection: Safety features that prevent damage if you connect the clamps wrong or if the battery is faulty.
- Compatibility: Most car batteries are 12-volt lead-acid (flooded or AGM). Make sure your charger supports your battery type. Some also work with lithium batteries.
- Portability and Cord Length: A 10–12 foot cord gives you flexibility. Compact models are easier to store in your trunk.
Top Recommended Models (Real-World Examples)
Based on reliability, safety, and user feedback, here are a few chargers I’ve used or seen work well:
- NOCO Genius 10: 10-amp smart charger with a 30-amp boost mode. Compact, rugged, and works with AGM, gel, and lithium batteries. Great for most cars and SUVs.
- Schumacher SC1281: 15-amp charger with a 40-amp boost. Affordable and widely available. Ideal for larger vehicles or cold weather.
- Ctek MXS 5.0: Premium 5-amp charger with a 10-amp boost. Excellent for long-term maintenance and gentle revival of deeply discharged batteries.
- Black & Decker BC15BD: 15-amp charger with a 40-amp jump start mode. Budget-friendly and user-friendly with clear LED indicators.
One thing I’ve noticed: chargers with microprocessor-controlled charging (like the NOCO and Ctek) are far less likely to overcharge or misread battery conditions. They’re worth the extra cost if you plan to use the charger regularly.
Step-by-Step Guide: How to Use a Battery Charger to Jump Start Your Car
Now for the main event—how to actually do it. This process is straightforward, but safety and sequence matter. Follow these steps carefully.
Step 1: Safety First
- Park on a flat, dry surface. Turn off the ignition, engage the parking brake, and remove the key.
- Wear safety glasses and gloves. Batteries contain acid and can spark.
- Check for damage. If the battery case is cracked, swollen, or leaking, do not attempt to jump start. Replace it instead.
- Ensure ventilation. Batteries emit hydrogen gas, which is explosive. Work in an open area, not in a closed garage.
Step 2: Prepare the Charger and Battery
- Plug in the charger to a grounded electrical outlet. Use an extension cord only if necessary, and make sure it’s rated for the charger’s amperage.
- Turn off the charger before connecting it to the battery.
- Locate the battery. In most cars, it’s under the hood. Some (like BMWs or older Hondas) are in the trunk or under the rear seat. Refer to your owner’s manual if unsure.
- Clean the terminals. Use a wire brush or battery cleaner to remove corrosion. Poor contact can cause sparks or poor charging.
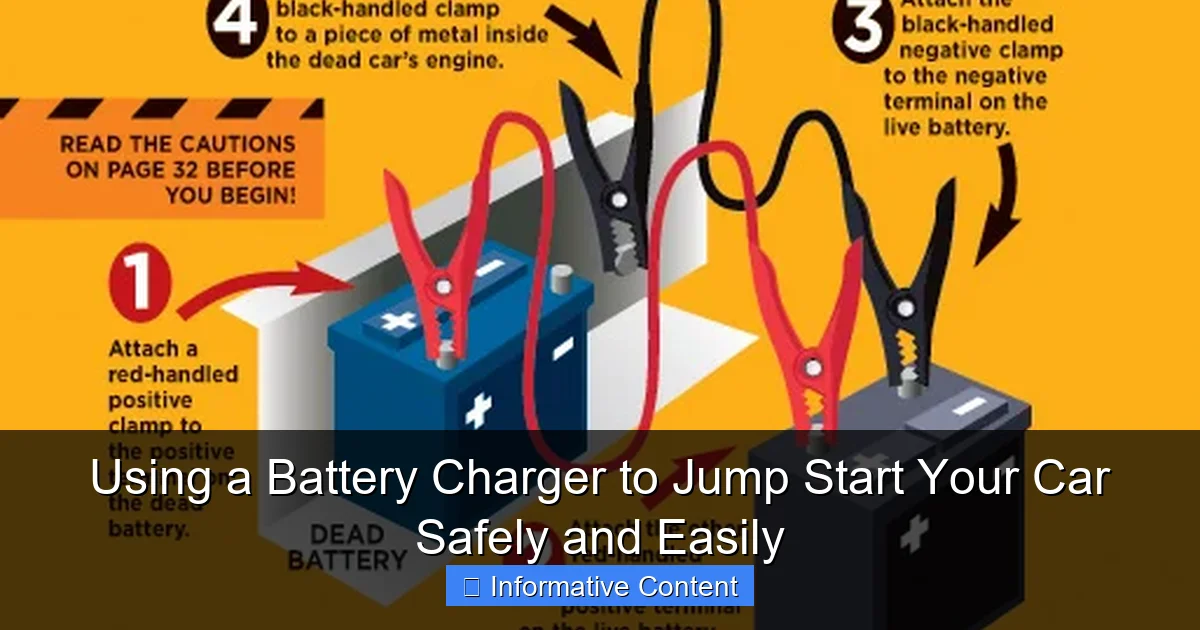
Step 3: Connect the Charger
Always follow this order:
- Connect the red (positive) clamp to the positive (+) terminal of the battery.
- Connect the black (negative) clamp to the negative (-) terminal. If the terminal is corroded or hard to reach, attach it to a clean, unpainted metal part of the engine block (a “ground” point).
- Double-check the connections. Make sure the clamps are secure and not touching each other or any moving parts.
Pro tip: If the battery is in a tight space, use a magnetic clamp holder or zip tie to keep the cables out of the way.
Step 4: Set the Charger and Begin Charging
- Select the correct battery type (e.g., standard, AGM, gel) on the charger.
- Choose the boost or jump mode. This activates the high-current output needed to start the engine.
- Turn on the charger. Most smart chargers will display battery voltage and charging status.
- Wait 5–10 minutes. This gives the battery time to build up enough charge for cranking. You’ll see the voltage rise on the display (e.g., from 8.0V to 10.5V).
Step 5: Start the Engine
- Try starting the car. Turn the key or press the start button. If it doesn’t start, wait another 5 minutes and try again.
- Once started, let the engine run for 1–2 minutes. This stabilizes the electrical system.
- Turn off the charger before disconnecting the clamps.
- Disconnect the clamps in reverse order: black first, then red.
Important: If the car doesn’t start after 15–20 minutes of charging, the battery may be too far gone or there could be another issue (like a bad starter or alternator). Don’t keep trying—call for help or have the battery tested.
Step 6: Recharge the Battery Fully
After jump starting, don’t just unplug the charger and drive off. The battery is still weak and will likely die again. Keep the charger connected in normal (non-boost) mode and let it fully recharge the battery—usually 4–12 hours, depending on the charger and battery condition.
This step is often overlooked, but it’s crucial. A fully charged battery reduces strain on the alternator and prevents repeat failures.
Common Mistakes and How to Avoid Them
Even with the right tools, small mistakes can lead to big problems. Here are the most common ones—and how to fix them.
Mistake 1: Using a Trickle Charger
Trickle chargers deliver only 1–2 amps. They’re great for maintaining a battery but won’t jump start a car. I once tried this with a 2-amp charger on a dead battery. After 30 minutes, the voltage barely moved from 7.8V. The car wouldn’t start. Lesson learned: always check if your charger has a boost mode.
Mistake 2: Connecting Clamps Backwards
Reversing the positive and negative clamps can fry your car’s electronics or damage the charger. Most smart chargers have reverse-polarity protection, but it’s still risky. Always double-check the color coding and terminal markings.
Mistake 3: Starting the Car While the Charger Is Still Connected
Modern chargers are designed to handle this, but older models or low-quality chargers can be damaged by the sudden current draw when the engine starts. It’s safer to wait until the engine is running, then turn off the charger before disconnecting.
Mistake 4: Not Fully Recharging the Battery
Jump starting is a temporary fix. If you don’t recharge the battery afterward, it will die again—often within days. I’ve seen people jump start their car in the morning, drive to work, and then get stranded at the end of the day because the battery wasn’t fully charged.
Mistake 5: Ignoring Battery Health
A battery that dies repeatedly may be old or damaged. Most car batteries last 3–5 years. If yours is older, jump starting it might just be delaying the inevitable. After a jump, have the battery and alternator tested at an auto parts store (most do it for free).
Data Table: Charger Performance Comparison
| Charger Model | Boost Mode (Amps) | Normal Charge Rate | Time to Start (Avg.) | Battery Types | Best For |
|---|---|---|---|---|---|
| NOCO Genius 10 | 30A | 10A | 5–8 min | Lead-acid, AGM, Gel, Lithium | Daily drivers, SUVs |
| Schumacher SC1281 | 40A | 15A | 5–10 min | Lead-acid, AGM | Larger vehicles, cold climates |
| Ctek MXS 5.0 | 10A | 5A | 10–15 min | Lead-acid, AGM | Maintenance, deep-cycle |
| Black & Decker BC15BD | 40A | 15A | 5–10 min | Lead-acid | Budget-friendly, occasional use |
| NOCO Boost Plus GB40 | 1000A (jump only) | N/A (portable) | Instant | Lead-acid, AGM | Portable emergencies |
Note: “Time to start” is an average for a moderately discharged battery (8–10V). Results vary based on battery age, temperature, and engine size.
Final Thoughts: Be Prepared, Stay Safe
Using a battery charger to jump start your car isn’t just a backup plan—it’s a smarter, more controlled way to handle a dead battery. Unlike the frantic scramble of finding another car or the risk of voltage spikes from jumper cables, a charger gives you time, safety, and peace of mind.
But here’s the real win: it turns a crisis into an opportunity. Instead of just getting back on the road, you can fully recharge your battery, check its health, and avoid the same problem next week. And if you invest in a quality smart charger, it becomes a long-term tool—not just for emergencies, but for maintaining your car’s electrical system.
So, whether you’re a weekend mechanic or someone who just wants to avoid the stress of a dead battery, take the time to learn this skill. Keep a reliable charger in your garage or trunk. Read the manual. Practice the steps. And the next time you turn the key and hear silence, you’ll know exactly what to do—safely, easily, and with confidence.
Because the best kind of jump start isn’t the fastest. It’s the one that keeps you moving, without the stress.
Frequently Asked Questions
Can you use a battery charger to jump start a car?
Yes, you can use a battery charger with a jump-start function to revive a dead car battery. However, ensure the charger has enough power (measured in cranking amps) to match your vehicle’s requirements.
How do I safely use a battery charger to jump start my vehicle?
First, connect the charger’s red clamp to the positive terminal and the black clamp to a grounded metal surface. Then, plug in the charger, set it to the appropriate mode, and start the car after a few minutes of charging.
Is it better to use a battery charger or jumper cables to jump start?
A battery charger offers more control and safety, especially if you’re alone, while jumper cables require another vehicle. Using a charger to jump start avoids voltage surges that can damage electronics.
How long should I charge a dead battery before trying to jump start?
Most smart chargers need 5–10 minutes in “jump start” mode before attempting to start the car. For deeply discharged batteries, a slow charge (30+ minutes) may be necessary for reliable results.
Can all battery chargers jump start a car?
Not all chargers can jump start—only those with a dedicated “jump start” or “boost” mode. Always check the charger’s specifications to confirm it supports using a battery charger to jump start.
What safety precautions should I take when jump starting with a charger?
Wear safety glasses, ensure the charger is off while connecting, and avoid touching clamps together. Keep the area ventilated to prevent explosive gas buildup from the battery.