
Featured image for 2016 crv jump start instructions
Image source: unitedautoinsurance.com
Jump-starting your 2016 Honda CR-V is quick and safe when you follow the correct steps. Always connect the jumper cables in the proper order—positive to positive, negative to unpainted metal—to avoid damage to the electrical system. Refer to your owner’s manual for exact battery location and safety precautions, especially since the battery is in the engine bay.
Key Takeaways
- Always turn off the ignition before connecting jumper cables to avoid electrical damage.
- Locate the battery terminals under the hood, marked positive (+) and negative (−).
- Connect red clamp first to the dead battery’s positive terminal, then the live battery’s.
- Attach black clamp last to the live battery’s negative terminal, then a grounded metal point.
- Start the working vehicle and let it run for 2–3 minutes before attempting a jump.
- Remove cables in reverse order to prevent sparks and battery damage after a successful start.
- Drive for 20+ minutes post-jump to fully recharge the battery and avoid stalling.
📑 Table of Contents
- Why Jump Starting Your 2016 Honda CR-V Matters
- Understanding Your 2016 CR-V’s Battery System
- Tools and Equipment You’ll Need
- Step-by-Step 2016 CRV Jump Start Instructions
- Common Mistakes and How to Avoid Them
- After the Jump: What to Do Next
- Battery and Jump Start Data Table
- Final Thoughts: Be Prepared, Stay Safe
Why Jump Starting Your 2016 Honda CR-V Matters
We’ve all been there—running late for work, fumbling with your keys, only to be met with the dreaded silence of a dead battery. If you own a 2016 Honda CR-V, you’re not alone. Whether it’s from leaving the lights on overnight or extreme weather draining your battery, a flat battery is a common but fixable issue. And the good news? Jump starting your CR-V is easier than you think, especially when you have the right steps and tools at hand.
As someone who once spent an hour waiting for roadside assistance in a freezing parking lot, I learned the value of knowing how to jump start a car. It’s not just about saving time and money—it’s about peace of mind. This guide walks you through the 2016 CRV jump start instructions step by step, ensuring you’re prepared the next time your battery calls it quits. Whether you’re a first-time car owner or a seasoned driver, this guide is designed to be your go-to resource for a quick, safe, and stress-free jump start.
Understanding Your 2016 CR-V’s Battery System
Before you grab the jumper cables, it helps to understand how your CR-V’s electrical system works. The 2016 Honda CR-V comes with a 12-volt lead-acid battery, typically located under the hood on the driver’s side. This battery powers everything from your ignition to the infotainment system, and like all batteries, it can lose charge over time—especially in cold weather or after short drives that don’t allow full recharging.
Visual guide about 2016 crv jump start instructions
Image source: i.ytimg.com
Where to Find the Battery
Pop the hood, and you’ll see the battery on the left (driver’s) side, near the front of the engine bay. It’s housed in a black plastic case with two terminals: a red (positive) and a black (negative). Honda also includes a jump start terminal—a small, red-covered stud near the battery—designed specifically for jump starting. This is a key detail: you don’t always need to access the battery terminals directly, which is safer and cleaner.
Why Use the Jump Start Terminal?
The jump start terminal is a dedicated positive connection point. Why does this matter? Directly connecting jumper cables to the battery terminals can cause sparks near the battery, which releases flammable hydrogen gas. Using the jump start terminal reduces this risk. Plus, it’s easier to reach and less likely to get corroded.
- Jump start terminal: Red plastic cap, labeled “+”, located on the fuse box cover or nearby bracket.
- Negative ground point: A bare metal bolt or unpainted surface on the engine block or chassis—usually near the battery.
Pro tip: Before jump starting, inspect the battery for cracks, leaks, or heavy corrosion. If you see any, don’t jump start—replace the battery first. A damaged battery can be dangerous.
Battery Health and Common Causes of Failure
Your CR-V’s battery typically lasts 3–5 years. But several factors can shorten its life:
- Extreme temperatures (both hot and cold)
- Frequent short trips (less time for the alternator to recharge)
- Parasitic drain (e.g., a glove box light left on)
- Old age or lack of maintenance
If you’re jump starting more than once a year, it might be time to test the battery or alternator. Most auto parts stores offer free battery and charging system tests—take advantage of them!
Tools and Equipment You’ll Need
You don’t need a mechanic’s toolkit to jump start your 2016 CR-V, but having the right gear makes the process safer and faster. Here’s what you should have on hand:
Essential Jump Start Tools
- Jumper cables: Look for 4–6 gauge cables, at least 12 feet long. Thicker cables carry more current, which is crucial for cold starts.
- Another vehicle with a working battery (or a portable jump starter): A second car is traditional, but a lithium-ion jump starter (like NOCO or DBPOWER) is a great alternative—no second car needed.
- Protective gloves and safety glasses: Even though it’s low risk, it’s smart to protect your hands and eyes from sparks or acid splashes.
- Owner’s manual: Keep it handy for reference, especially if you’re unsure about terminal locations.
Choosing the Right Jumper Cables
Not all cables are created equal. Here’s a quick guide:
- 4-gauge: Best for larger vehicles or cold climates. Delivers more amps, faster.
- 6-gauge: Good for compact SUVs like the CR-V. Affordable and widely available.
- 8-gauge: Only for very light use—not recommended for reliable jump starts.
Tip: Avoid coiled or tangled cables. They can overheat and reduce current flow. Always lay them out straight before use.
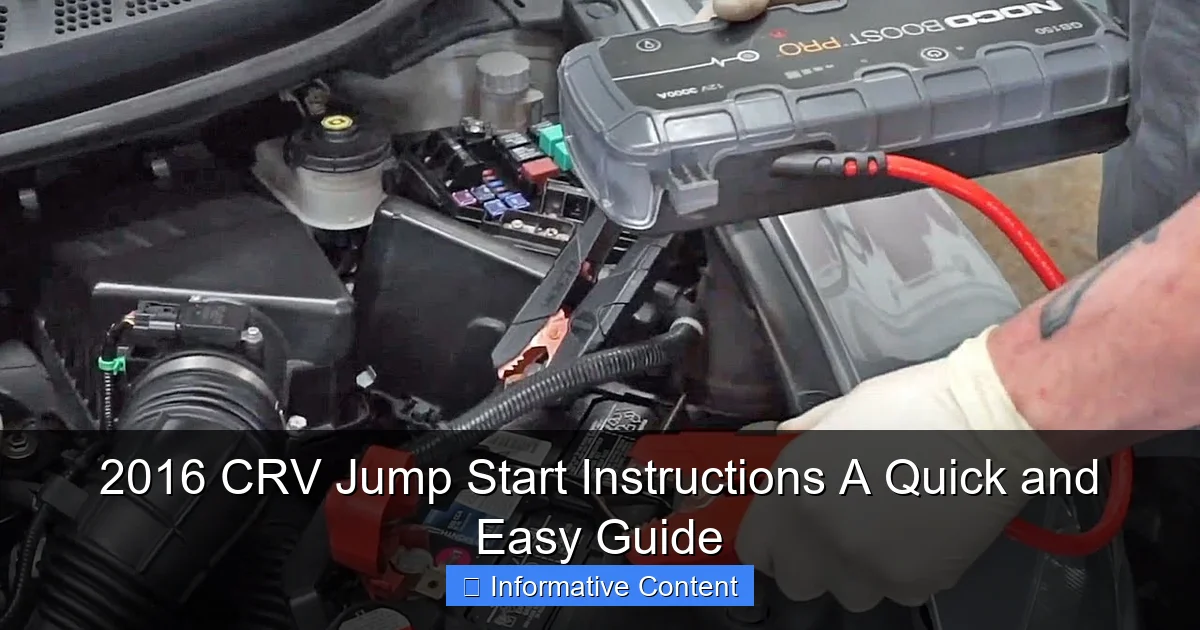
Portable Jump Starters: A Modern Alternative
If you don’t want to rely on another driver, a portable jump starter is a game-changer. These compact devices store power and can jump your CR-V multiple times on a single charge. Look for models with:
- At least 1000 peak amps
- USB ports (to charge your phone while waiting)
- Reverse polarity protection (prevents damage if cables are connected backward)
I keep a NOCO Boost Plus in my CR-V’s trunk. It’s saved me twice—once in a snowstorm, once in a mall parking lot. It’s worth every penny.
Step-by-Step 2016 CRV Jump Start Instructions
Now, let’s get to the heart of the matter: the actual jump start. Follow these steps carefully to ensure a safe and successful start.
Step 1: Position the Vehicles Safely
Park the working vehicle close enough for the jumper cables to reach, but don’t let the bumpers touch. Turn off both vehicles and set the parking brakes. Put both cars in “Park” (automatic) or “Neutral” (manual), and engage the emergency brake.
Safety note: Make sure both vehicles are on level ground. Avoid slopes or wet areas. If it’s raining, cover the engine bay with a tarp to keep water out of electrical connections.
Step 2: Connect the Jumper Cables in the Correct Order
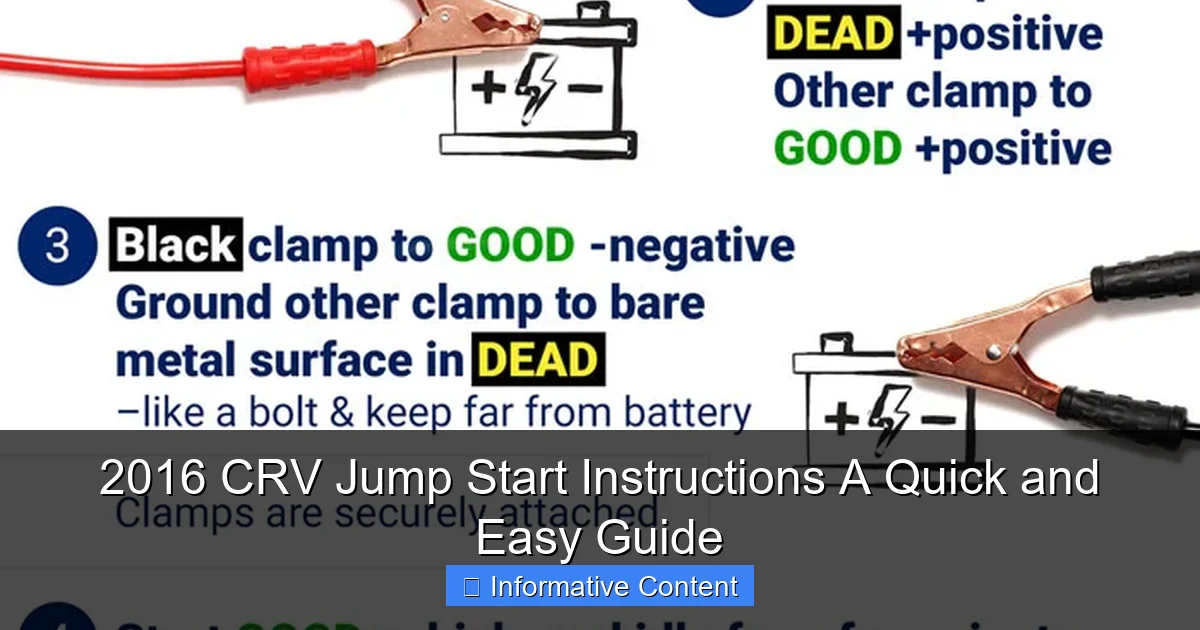
This is where many people make mistakes. Always follow this sequence:
- Connect red clamp to the dead battery’s positive terminal (or the jump start terminal in your CR-V).
- Connect the other red clamp to the working battery’s positive terminal.
- Connect black clamp to the working battery’s negative terminal.
- Connect the final black clamp to a grounded metal surface on the dead car—not the dead battery’s negative terminal. Use an unpainted bolt on the engine block or a metal bracket.
Why not the dead battery’s negative terminal? Connecting to a ground point prevents sparks near the battery, reducing the risk of explosion from hydrogen gas.
Step 3: Start the Working Vehicle
Start the engine of the working vehicle and let it run for 3–5 minutes. This allows the alternator to charge the dead battery slightly. Keep the engine at around 2,000 RPM (a little above idle) by gently pressing the accelerator.
Pro tip: If it’s cold outside, let the donor car run for up to 10 minutes. Cold batteries hold less charge and need more time to accept a jump.
Step 4: Attempt to Start Your CR-V
Now, try starting your 2016 CR-V. Turn the key or press the start button. If it starts, great! If not, wait another 2–3 minutes and try again. Don’t crank the engine for more than 10 seconds at a time. Long cranking can overheat the starter.
If it still won’t start, check your connections. Are the clamps secure? Is the jump start terminal clean? Sometimes a loose connection is the culprit.
Step 5: Disconnect the Cables in Reverse Order
Once your CR-V is running, disconnect the cables in the opposite order:
- Remove the black clamp from the grounded metal on your CR-V.
- Remove the black clamp from the working battery.
- Remove the red clamp from the working battery.
- Remove the red clamp from your CR-V’s jump start terminal.
Important: Never let the clamps touch each other or any metal while connected. This can cause a short circuit.
Step 6: Let Your CR-V Run
After disconnecting, let your CR-V run for at least 15–30 minutes. This gives the alternator time to recharge the battery. Drive around if possible—short idles don’t generate much charge.
Bonus tip: Turn off all accessories (AC, radio, lights) while driving to reduce electrical load and help the battery recharge faster.
Common Mistakes and How to Avoid Them
Even with clear instructions, things can go wrong. Here are the most common jump start errors—and how to prevent them.
Connecting Cables in the Wrong Order
Reversing the order can damage electronics or cause sparks. Always follow the red-red-black-black sequence. If you’re using a portable jump starter, the device usually has clear labels—follow them.
Real-life example: A friend once connected the black clamp to the dead battery’s negative terminal first. It sparked violently, and the battery vented gas. Not dangerous, but scary! Using the ground point avoids this.
Cranking Too Long or Too Often
Repeated long cranking (over 10 seconds) can burn out the starter motor. If your CR-V doesn’t start after 2–3 attempts, wait 1–2 minutes between tries to let the starter cool.
Forgetting to Turn Off Accessories
Leaving the headlights, radio, or climate control on during the jump can overload the system. Turn everything off before connecting cables. This reduces strain on the donor battery and your CR-V’s electrical system.
Using Damaged or Thin Jumper Cables
Frayed, thin, or corroded cables can’t deliver enough current. Inspect your cables regularly. Look for:
- Exposed wires
- Brittle insulation
- Loose clamps
Replace them every 5 years or sooner if damaged.
Ignoring the Jump Start Terminal
Many people jump straight to the battery terminals. But Honda designed the jump start terminal for a reason—use it! It’s safer, cleaner, and reduces the risk of sparks near the battery.
After the Jump: What to Do Next
Your CR-V is running—great! But the work isn’t over. Here’s what you should do next to prevent future dead batteries.
Drive for at Least 30 Minutes
The alternator needs time to recharge the battery. A 15-minute drive isn’t enough. Take a longer route or drive to the store. Avoid short trips for the next few days.
Check for Electrical Issues
Ask yourself: Why did the battery die? Common culprits include:
- Leaving lights or the radio on
- A weak or old battery (3+ years old)
- A failing alternator (check for dimming lights or a battery warning light)
If the battery dies again within a few days, get it tested. Most auto shops do this for free.
Test the Charging System
Use a multimeter to check the battery voltage while the engine is running. It should read 13.8–14.4 volts. Anything below 13.5 volts suggests a problem with the alternator or voltage regulator.
How to test:
- Set the multimeter to DC voltage (20V range).
- Connect red to positive, black to negative.
- Start the engine and observe the reading.
Replace the Battery if Needed
If your battery is over 4 years old, consider replacing it—even if it starts fine. A weak battery can leave you stranded. Look for a battery with at least 600 CCA (Cold Cranking Amps) for reliable winter starts.
Keep a Portable Jump Starter Handy
After my first jump, I bought a portable jump starter. It’s now a permanent part of my emergency kit. It’s compact, easy to use, and doesn’t require another car. Perfect for solo drivers or remote areas.
Battery and Jump Start Data Table
| Component | Specification | Recommendation |
|---|---|---|
| Battery Type | 12V Lead-Acid (Group 35) | Replace every 3–5 years |
| Recommended CCA | 600–700 CCA | Higher CCA for cold climates |
| Jump Start Terminal Location | Red stud near fuse box (driver’s side) | Use instead of battery positive |
| Ground Point | Unpainted metal on engine block | Avoid painted or plastic surfaces |
| Jumper Cable Gauge | 4 or 6 gauge | 4-gauge for cold weather |
| Charging Time After Jump | 15–30 minutes | Drive to maximize alternator output |
Final Thoughts: Be Prepared, Stay Safe
Jump starting your 2016 Honda CR-V isn’t rocket science—but it does require attention to detail. By following these 2016 CRV jump start instructions, you can get back on the road quickly and safely, without relying on strangers or expensive towing. Whether you use jumper cables or a portable jump starter, the key is preparation.
Keep your tools organized, inspect your battery regularly, and don’t ignore warning signs like slow cranking or dim lights. A little maintenance goes a long way. And remember: the jump start terminal and ground point are your friends—use them to minimize risk.
Next time your CR-V won’t start, don’t panic. Take a deep breath, grab your cables, and follow the steps. You’ve got this. And if you ever find yourself helping someone else? Pay it forward. Because we’ve all been that person waiting in the cold, hoping for a jump.
Frequently Asked Questions
How do I jump start a 2016 Honda CRV safely?
To jump start your 2016 CRV, park the donor vehicle close (without touching), turn off both engines, and connect the jumper cables in order: red to dead battery’s positive (+), red to donor’s positive (+), black to donor’s negative (-), and black to an unpainted metal surface on your CRV. Start the donor vehicle first, then your CRV.
Where is the battery located in a 2016 Honda CRV for jump starting?
The 2016 CRV battery is located under the hood in the engine compartment, typically on the driver’s side. Look for a black plastic cover labeled “+” and “-“; remove it to access the terminals for jump starting.
Can I use a portable jump starter on my 2016 CRV?
Yes, a portable jump starter works well for a 2016 CRV jump start. Connect the red clamp to the positive (+) terminal, black to a grounded metal surface, and power on the device before attempting to start the engine.
What are common mistakes to avoid during a 2016 CRV jump start?
Avoid reversing jumper cable connections, letting clamps touch, or using damaged cables. Never attempt a 2016 CRV jump start if the battery is cracked or leaking—seek professional help instead.
How long should I drive after a 2016 CRV jump start to recharge the battery?
Drive your CRV for at least 20-30 minutes post jump start to allow the alternator to recharge the battery. For optimal results, avoid short trips and use accessories like AC/radio sparingly during this time.
What if my 2016 Honda CRV won’t start even after jump starting?
If the 2016 CRV jump start fails, the issue may be a faulty starter, alternator, or battery corrosion. Check connections, test the battery voltage (should be ~12.6V), or contact a mechanic for further diagnosis.