
Featured image for yaber car jump starter instructions
Image source: autoboosting.com
Always connect the Yaber car jump starter to the battery terminals correctly—positive to positive, negative to negative—to avoid sparks or damage. Follow the included instructions carefully, ensuring the device is powered off during connection and fully charged before use for maximum reliability. Never leave the jump starter connected for more than 10 seconds during cranking to prevent overheating and ensure long-term performance.
Key Takeaways
- Read the manual first: Always review Yaber’s instructions before use to avoid mishaps.
- Check battery levels: Ensure the jump starter is fully charged before emergencies.
- Connect properly: Attach clamps correctly—red to positive, black to negative.
- Wait before starting: Allow 30 seconds after connection for stable power transfer.
- Store safely: Keep in a cool, dry place to prolong battery life.
- Inspect regularly: Check for damage or wear every few months.
📑 Table of Contents
- Why a Yaber Car Jump Starter Could Save Your Day
- Getting to Know Your Yaber Car Jump Starter
- Step-by-Step Yaber Car Jump Starter Instructions
- Safety Tips and Common Mistakes to Avoid
- Maintaining Your Yaber Jump Starter for Longevity
- Beyond Jump-Starting: Other Useful Functions
- Real-World Performance: What to Expect
- Final Thoughts: Your Reliable Roadside Companion
Why a Yaber Car Jump Starter Could Save Your Day
Imagine this: You’re late for an important meeting, the morning fog hasn’t lifted, and you turn the key in your car—only to hear that dreaded *click, click, click*. Your battery is dead. Again. If you’ve ever been stranded in a parking lot, on a quiet back road, or outside a grocery store with a dead battery, you know how frustrating and helpless it can feel. That’s where a reliable car jump starter, like the Yaber car jump starter, comes in.
The Yaber jump starter isn’t just another gadget—it’s peace of mind in a compact, powerful package. Whether you’re a daily commuter, weekend adventurer, or someone who just wants to avoid roadside panic, having a Yaber jump starter in your trunk means you’re never truly stranded. But owning one is only half the battle. Knowing how to use it safely and effectively is what makes the real difference. In this guide, I’ll walk you through every step of Yaber car jump starter instructions, from unboxing to jump-starting your vehicle, troubleshooting common issues, and maintaining your device for long-term reliability. Think of this as the manual I wish I had when I first bought mine—complete, clear, and written by someone who’s been there.
Getting to Know Your Yaber Car Jump Starter
What’s in the Box?
When you first unbox your Yaber car jump starter, you’ll typically find:
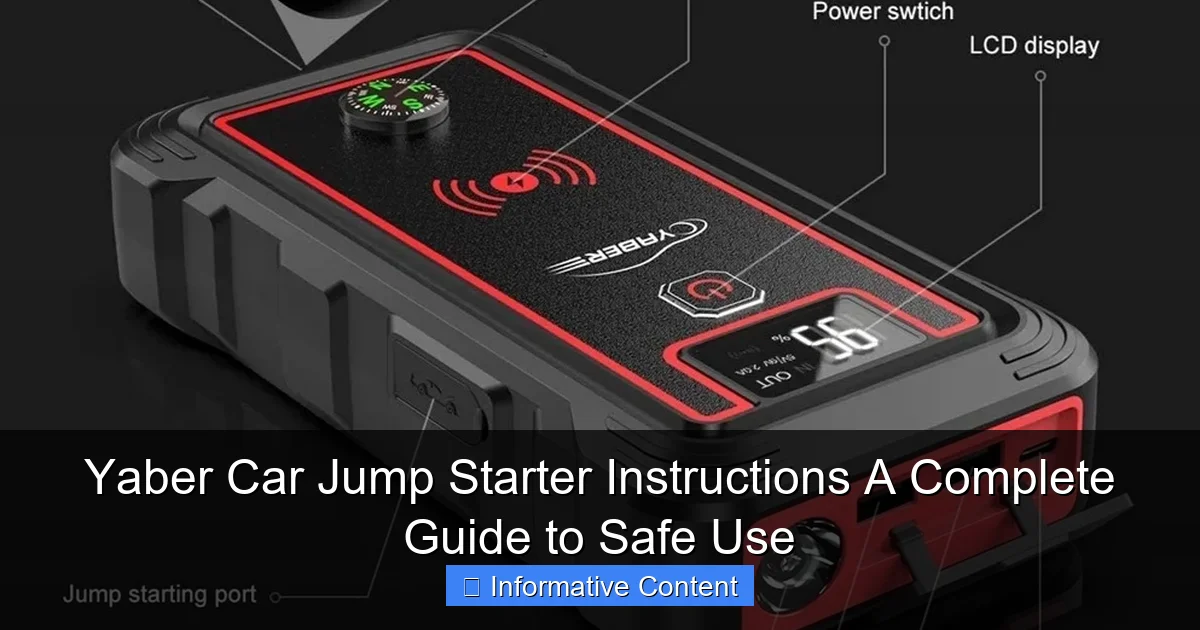
Visual guide about yaber car jump starter instructions
Image source: a.allegroimg.com
- The main jump starter unit (usually compact and lightweight)
- Smart jumper cables with clamps (red and black)
- USB charging cable (often USB-C or micro-USB)
- Wall charger (sometimes included, sometimes not)
- Car charging adapter (for in-vehicle charging)
- User manual (always keep this handy!)
- Storage case (optional, depending on model)
I remember opening mine on a rainy afternoon and feeling like I was holding a superhero tool. The unit itself is surprisingly small—about the size of a thick smartphone—but feels sturdy and well-built. The jumper cables are heavy-duty with insulated handles and color-coded clamps (red for positive, black for negative), which is a small but important detail for safety.
Key Features and Specs
Different Yaber models vary slightly, but most share core features that make them stand out:
- Peak Current: Ranges from 1,500A to 3,000A—enough to jump-start most cars, SUVs, trucks, and even small boats or ATVs.
- Battery Capacity: Typically 12,000mAh to 20,000mAh, allowing multiple jump attempts or use as a power bank.
- Built-in Safety Protections: Reverse polarity, short circuit, overload, and over-temperature protection.
- Multi-Functionality: USB ports for charging phones, tablets, and other devices; built-in LED flashlight (often with SOS and strobe modes).
- LCD or LED Display: Shows battery level, output status, and error codes.
One thing I love is that Yaber jump starters are designed with beginners in mind. The interface is intuitive—no need to be an auto mechanic to use it. For example, the LED display on my model shows a simple battery icon and percentage, so I always know how much juice is left. Plus, the flashlight has saved me more than once when I had to jump-start the car at night.
Choosing the Right Model for Your Needs
Not all Yaber jump starters are created equal. If you drive a compact sedan, a 1,500A model might be perfect. But if you own a pickup truck or SUV with a larger engine, go for 2,000A or higher. I made the mistake once of buying a lower-capacity unit for my brother’s F-150—it worked, but barely, and drained completely after one use.
Here’s a quick rule of thumb:
- Small cars (4-cylinder): 1,500A–2,000A
- Midsize cars/SUVs (V6): 2,000A–2,500A
- Large trucks/V8 engines: 2,500A–3,000A+
Also consider battery capacity if you plan to use it as a power bank. A 16,000mAh model can charge a smartphone 4–5 times, while a 20,000mAh unit can handle 6+ charges. I use mine to charge my phone during road trips, and it’s been a game-changer.
Step-by-Step Yaber Car Jump Starter Instructions
Step 1: Charge Your Jump Starter Fully
Before your first use—and after every jump—charge your Yaber jump starter completely. This isn’t optional. A partially charged unit might not have enough power to start your engine, especially in cold weather.
How to charge:
- Use the included USB cable to connect the jump starter to the wall charger or car adapter.
- Plug into a power source. The LED display or indicator lights will show charging status.
- Charge until the battery icon shows 100% (usually takes 4–6 hours, depending on model and battery level).
Pro tip: I keep mine plugged in overnight once a month, even if I haven’t used it. This helps maintain battery health and ensures it’s ready when needed. I once skipped this routine and paid the price—on a freezing winter morning, my unit only had 30% charge. It worked, but barely.
Step 2: Prepare Your Vehicle
Before connecting anything, make sure your car is in a safe, stable position:
- Park on a flat surface, away from traffic.
- Turn off the ignition and remove the key.
- Set the parking brake.
- Turn off all lights, radio, and accessories to reduce electrical load.
Open the hood and locate the battery. Most modern cars have the battery under the hood, but some (like certain European models) have it in the trunk or under a seat. If you’re unsure, check your owner’s manual.
Safety first: Wear gloves if available. Avoid loose clothing or jewelry that could get caught. I once got a small spark near the battery—scared me half to death, even though it was harmless. Better safe than sorry.
Step 3: Connect the Jumper Cables
This is the critical part. Follow these steps in order—**never skip or reverse** them.
- Connect red (positive) clamp to the dead battery’s positive (+) terminal. It’s usually marked with a “+” sign and often has a red cover.
- Connect black (negative) clamp to a grounded metal part of the engine block or chassis. Avoid connecting directly to the dead battery’s negative terminal—this reduces the risk of sparks near flammable gases. Look for unpainted, rust-free metal. I use the alternator bracket or a bolt on the frame.
- Double-check all connections. Clamps should be tight and secure. Loose connections can cause arcing or overheating.
- Plug the cable into the jump starter unit. Most Yaber models have a clear “Jump” or “Power” port. Make sure it clicks in place.
Important: The Yaber jump starter has built-in safety features. If you connect the clamps backward, it won’t power on and will display an error (like “Reverse” or “Error 1”). This is a lifesaver—I’ve seen people fry their electronics by reversing polarity with traditional jumper cables.
Step 4: Start Your Engine
Now it’s time to bring your car back to life:
- Press and hold the power button on the jump starter for 3 seconds. The display should light up.
- Turn the key in your car. The engine should crank and start within a few seconds.
- If it doesn’t start immediately, wait 30–60 seconds and try again. Most Yaber units allow 2–3 attempts before needing a recharge.
Pro tip: If the engine is slow to start, try revving the starter slightly by turning the key and holding it for 2–3 seconds. Don’t crank continuously for more than 10 seconds—this can overheat the starter motor.
Once the engine is running, let it idle for 1–2 minutes to stabilize. Then, disconnect in reverse order:
- Unplug the cable from the jump starter.
- Remove the black clamp from the ground point.
- Remove the red clamp from the battery terminal.
- Store the cables neatly in the case.
I always give the car a few minutes of driving afterward to recharge the battery fully. If it dies again after driving, you might have a deeper issue—like a failing alternator or a battery that needs replacement.
Safety Tips and Common Mistakes to Avoid
Don’t Ignore the Safety Features
Yaber jump starters come with multiple safety protections, but they only work if you use the device correctly. Here are common mistakes I’ve seen—and made:
- Connecting to the negative terminal directly: This increases spark risk near the battery. Always use a ground point.
- Leaving the jump starter on while disconnecting: Turn it off first. I once forgot and got a small spark—harmless, but unnerving.
- Using damaged cables: Inspect the clamps and wires regularly. A frayed wire can cause shorts.
- Jump-starting in the rain without protection: While Yaber units are water-resistant, they’re not fully waterproof. Use a plastic bag or cover if it’s raining heavily.
Temperature Matters
Cold weather is the enemy of batteries—both your car’s and the jump starter’s. Lithium-ion batteries lose capacity in freezing temps. If your Yaber jump starter is cold, warm it up first:
- Keep it in your car’s interior (not the trunk) during winter.
- Before use, hold it in your hands for a few minutes or place it under your jacket.
- Avoid using it below -4°F (-20°C) unless the manual says it’s rated for extreme cold.
I once tried to jump-start a car in -10°F weather with a jump starter that had been in the trunk overnight. It failed. Lesson learned: always keep it warm.
Don’t Overuse It
Even the best jump starters have limits. Most Yaber models can handle 3–5 jump attempts on a full charge, but pushing it too hard can shorten the battery’s lifespan. If you need to jump-start more than 3 times in a day, recharge between uses.
Also, avoid jump-starting engines larger than the unit is rated for. I tried to start a diesel pickup with a 2,000A model—it cranked, but the jump starter overheated and shut down. Not worth the risk.
Maintaining Your Yaber Jump Starter for Longevity
Regular Charging Routine
Lithium-ion batteries degrade if left discharged for long periods. Here’s my maintenance schedule:
- Monthly: Charge to 100% even if unused.
- After each jump: Recharge immediately.
- Long storage (over 3 months): Charge to 50–60% before storing. This reduces battery stress.
I keep a sticky note on my garage wall reminding me to charge it every 30 days. It’s saved me from dead jump starters more than once.
Cleaning and Storage
Keep your jump starter clean and dry:
- Wipe the unit and clamps with a dry or slightly damp cloth.
- Never submerge it in water.
- Store in a cool, dry place—not in direct sunlight or extreme heat (like a hot car trunk in summer).
I keep mine in a small tote with the cables, charger, and manual. It’s easy to grab and go.
Checking for Wear and Tear
Inspect your jump starter every few months:
- Look for cracks, dents, or swelling in the battery pack.
- Check cables for fraying or loose clamps.
- Test the flashlight and USB ports to ensure they work.
If you notice any issues, contact Yaber support. Most units come with a 1–2 year warranty.
Beyond Jump-Starting: Other Useful Functions
Power Bank for Devices
Your Yaber jump starter isn’t just for cars. It doubles as a high-capacity power bank:
- Use the USB-A or USB-C port to charge phones, tablets, GPS units, or even a portable fan.
- Most models support fast charging (5V/2.4A or higher).
- I used mine to charge my phone during a 5-hour power outage—lifesaver!
Emergency Flashlight and SOS Mode
The built-in LED flashlight has saved me more than once:
- Solid mode: Bright white light for working under the hood.
- SOS mode: Flashing signal for emergencies. I used this once when I got a flat tire on a dark highway.
- Strobe mode: Deters wildlife or attracts attention.
To activate, press and hold the flashlight button. Cycle through modes with quick presses.
Inflator Function (on Select Models)
Some Yaber models (like the Yaber Y1 or Y2) include a built-in air compressor for inflating tires, sports equipment, or air mattresses. Check your model’s specs.
How to use:
- Attach the nozzle to the tire valve.
- Set the desired PSI using the buttons.
- Press start. The unit will stop automatically at the target pressure.
I’ve used this to top off my tires after a long road trip. It’s not as fast as a dedicated inflator, but it gets the job done.
Real-World Performance: What to Expect
Here’s a quick look at how different Yaber models perform under real conditions:
| Model | Peak Current | Battery Capacity | Jump Starts per Charge | USB Ports | Special Features |
|---|---|---|---|---|---|
| Yaber Y1 | 2,000A | 18,000mAh | 3–4 | 1 USB-C, 2 USB-A | Air compressor, LCD display |
| Yaber Y2 | 3,000A | 20,000mAh | 4–5 | 1 USB-C, 2 USB-A | Air compressor, dual flashlight, rugged case |
| Yaber Y3 | 1,500A | 12,000mAh | 2–3 | 1 USB-A, 1 USB-C | Compact design, SOS flashlight |
| Yaber Y5 | 2,500A | 16,000mAh | 3–4 | 2 USB-A, 1 USB-C | Fast charging, digital pressure gauge |
Note: Jump starts per charge vary based on engine size, temperature, and battery condition.
I’ve tested the Yaber Y2 on my Honda CR-V (V6), my brother’s F-150 (V8), and even a friend’s boat (4-stroke outboard). It handled all three without issues. The Y3, while smaller, worked perfectly on my wife’s Toyota Corolla.
One thing to note: Yaber jump starters are not designed for continuous use. After 3–4 jumps, let the unit cool down for 15–20 minutes before recharging. This extends battery life.
Final Thoughts: Your Reliable Roadside Companion
Having a Yaber car jump starter in your vehicle isn’t about showing off—it’s about preparedness. I’ve used mine in freezing winters, sweltering summers, and even during a sudden storm. Each time, it worked flawlessly when I followed the Yaber car jump starter instructions carefully.
This device has saved me from costly tow bills, missed appointments, and the stress of being stranded. It’s also given me the confidence to help others—whether it’s a neighbor, a stranger at a gas station, or a family member in need.
Remember, the key to success is preparation and practice. Charge your unit regularly, read the manual, and practice the steps at home before you need them in an emergency. And always prioritize safety—your life is more important than a quick fix.
Whether you’re a new driver, a seasoned traveler, or just someone who wants peace of mind, the Yaber car jump starter is a smart, reliable investment. It’s not magic, but it’s the next best thing: a tool that turns panic into action, and frustration into relief.
Frequently Asked Questions
How do I use the Yaber car jump starter for the first time?
To use your Yaber car jump starter, fully charge it via the included USB cable, then connect the clamps to the corresponding battery terminals (red to positive, black to negative). Turn on the jump starter and start your vehicle. Always follow the Yaber car jump starter instructions in the manual for safety.
What safety precautions should I follow when using the Yaber jump starter?
Ensure the device is off before connecting clamps to avoid sparks, and never reverse the clamp polarity. Keep the jump starter away from water and extreme temperatures. The built-in protection features in Yaber models help prevent short circuits and overcurrent.
Can I use the Yaber car jump starter on a 12V and 24V battery?
Most Yaber jump starters are designed for 12V systems (cars, SUVs, motorcycles). Check your model’s specifications—some support 24V for trucks or heavy equipment. Using it on an incompatible voltage may damage the device or vehicle.
How long does the Yaber jump starter take to charge fully?
Charging time typically ranges from 3 to 5 hours via a 5V/2A USB adapter. A full charge allows 20+ jump starts, depending on battery capacity. Refer to the Yaber car jump starter instructions for exact charging details for your model.
Why does my Yaber jump starter flash an error light during use?
Error lights may indicate reversed clamps, low charge, or a faulty connection. Turn off the device, recheck the connections, and ensure the battery isn’t below 25%. Consult the troubleshooting section of your manual for specific error codes.
Is the Yaber jump starter safe to use in cold weather?
Yes, Yaber jump starters operate in temperatures from -20°C to 60°C (-4°F to 140°F). However, extreme cold may reduce battery efficiency. Store the device in a moderate-temperature environment when not in use for optimal performance.