
Featured image for beatit jump starter instructions
Image source: i.ebayimg.com
Master your Beatit jump starter in minutes with this clear, step-by-step guide designed for fast, safe, and reliable jump-starting. Follow the simple instructions—from connecting clamps to starting your engine—to get back on the road without the guesswork or risk.
Key Takeaways
- Read the manual first: Always review safety guidelines before using the Beatit jump starter.
- Charge fully before use: Ensure 100% battery to avoid jump-start failures.
- Connect red clamp first: Attach to positive terminal to prevent sparks or damage.
- Verify LED indicator: Check for solid light confirming secure connection.
- Start vehicle within 30 seconds: Prevent overheating the jump starter’s circuits.
- Disconnect in reverse order: Remove black clamp first after successful ignition.
📑 Table of Contents
- Why You Need a Beatit Jump Starter (And How to Use It Right)
- Getting to Know Your Beatit Jump Starter
- Preparing for a Jump Start: Safety First
- Beatit Jump Starter Instructions: Step-by-Step Guide
- Beyond Jump Starting: Other Uses for Your Beatit
- Maintenance and Troubleshooting: Keep Your Beatit Ready
- Final Thoughts: Be Prepared, Not Stressed
Why You Need a Beatit Jump Starter (And How to Use It Right)
Imagine this: you’re running late for work, the car won’t start, and the battery is dead. No jumper cables in sight, and the nearest mechanic is miles away. It’s a stressful situation that happens more often than we’d like. That’s where the Beatit jump starter comes in—a compact, powerful, and reliable tool that can save the day without needing another vehicle.
Unlike traditional jumper cables, Beatit jump starters are standalone devices with built-in batteries. They’re designed to jump-start your car, truck, motorcycle, or even a lawnmower in seconds. But here’s the catch: even the best tool is useless if you don’t know how to use it. That’s why this guide is here—to walk you through every step of using your Beatit jump starter safely, effectively, and with confidence. Whether you’re a first-time owner or just need a refresher, you’ll find everything you need to know about Beatit jump starter instructions in one place.
Getting to Know Your Beatit Jump Starter
Before you even think about jump-starting a car, it helps to understand what you’re working with. The Beatit jump starter isn’t just a battery pack—it’s a multi-functional emergency tool with several components, each serving a specific purpose. Let’s break it down.
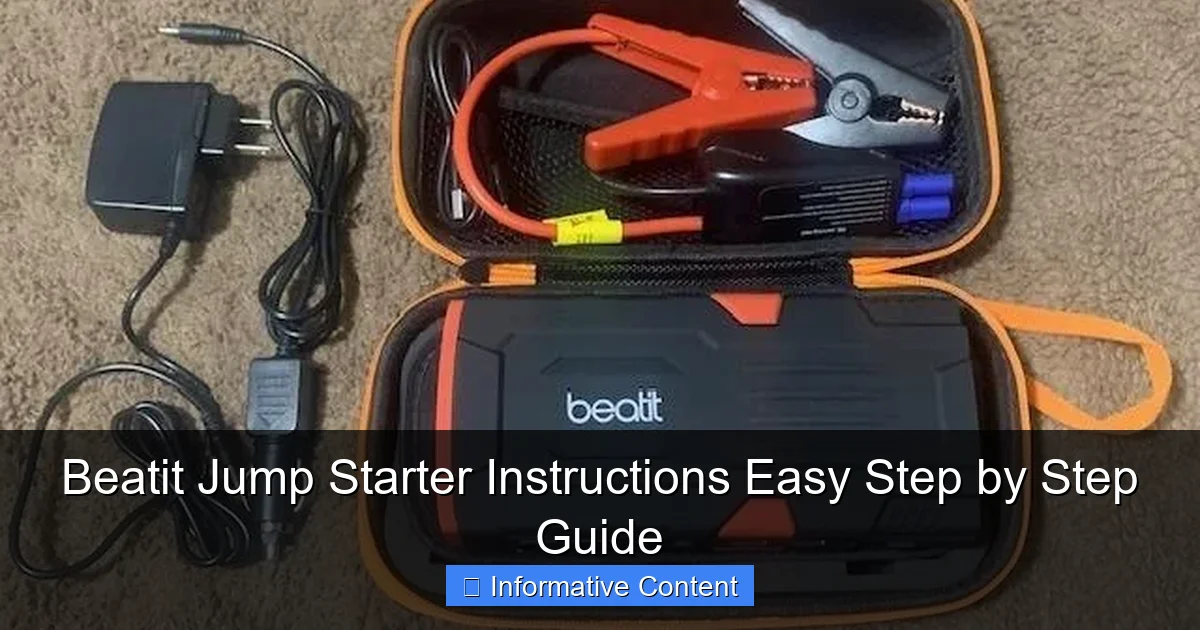
Visual guide about beatit jump starter instructions
Image source: i.ebayimg.com
Key Components and Their Functions
- Jump Starter Unit: The main body houses the lithium-ion battery. It’s lightweight, portable, and typically weighs between 1 to 3 pounds depending on the model (like the Beatit BT-D11 or BT-D12).
- Smart Clamps (Red & Black): These are the jumper cables. The red clamp connects to the positive (+) terminal of your car battery, and the black connects to a grounded metal surface or the negative (-) terminal.
- LED Flashlight: Most Beatit models include a built-in flashlight with multiple modes (steady, SOS, strobe). Handy for nighttime emergencies.
- USB Ports: Used to charge phones, tablets, GPS devices, or other electronics. Some models even support fast charging.
- Power Button & LED Indicator: Shows battery level (usually 4 bars) and powers the device on/off.
- Safety Features: Reverse polarity protection, over-current protection, and spark-proof technology to prevent accidents.
Pro tip: Always inspect your clamps and cables before use. Look for fraying, corrosion, or loose connections. A quick visual check can prevent issues down the road.
Understanding the LED Indicator Lights
The LED lights on your Beatit device are more than just a battery gauge—they’re your guide to safe operation. Here’s what each light typically means:
- 4 Green Bars: Fully charged (100%).
- 3 Green Bars: 75% charged—still plenty for a jump start.
- 2 Green Bars: 50% charged—okay for one jump, but consider recharging soon.
- 1 Green Bar: 25% charged—use sparingly and recharge immediately after.
- Red Flashing Light: Low battery or error detected (e.g., reversed clamps).
- Solid Red Light: Device is charging or in standby mode.
One user told me they once ignored the red flashing light and tried to jump-start a diesel truck. The device shut off automatically—thankfully! That’s the power of Beatit’s built-in safety systems. Always respect those lights.
Preparing for a Jump Start: Safety First
Jumping a car isn’t just about connecting cables and pressing a button. Safety is the most important part. A single mistake can damage your vehicle, the jump starter, or worse—cause injury. Here’s how to prepare properly.
What You’ll Need
- Your Beatit jump starter (charged!)
- The smart clamps (included)
- A well-lit, flat area (parking lot, driveway)
- Rubber gloves (optional but recommended)
- A clean rag (to wipe battery terminals)
Real-life example: I once tried to jump-start a car in a dimly lit garage. The battery terminals were covered in corrosion, and I accidentally connected the clamps backward. The Beatit device flashed red and shut down—no sparks, no drama. That’s when I realized how important visibility and clean terminals are.
Step-by-Step Pre-Jump Checklist
- Park Safely: Turn off the ignition, engage the parking brake, and place the car in park (or first gear for manual).
- Inspect the Battery: Look for cracks, leaks, or heavy corrosion. If the battery is damaged, do not jump start. Replace it instead.
- Clean the Terminals: Use a rag or terminal cleaner to wipe away dirt and corrosion. This ensures a solid connection.
- Check the Jump Starter: Make sure it’s charged (at least 2 bars) and the clamps aren’t frayed.
- Turn Off Electronics: In the car, turn off lights, radio, AC, and any accessories to reduce load during startup.
Safety note: Never lean over the battery when connecting clamps. Hydrogen gas can build up and ignite. Always stand to the side.
When NOT to Use Your Beatit Jump Starter
While Beatit jump starters are powerful, they’re not magic. Avoid using them in these situations:
- If the battery is frozen (look for bulging or cracked case).
- If the car has been submerged in water.
- If the engine makes unusual noises (could be mechanical issues, not battery-related).
- If the jump starter shows error lights or won’t power on.
Remember: the goal is to start the car, not risk further damage.
Beatit Jump Starter Instructions: Step-by-Step Guide
Now that you’re prepared, it’s time to jump-start your car. Follow these Beatit jump starter instructions carefully. I’ll walk you through each step with real-world tips from my own experience.
Step 1: Power On the Beatit Device
Press and hold the power button for 2–3 seconds until the LED lights turn on. You should see the battery level indicator (e.g., 4 green bars). If it’s below 2 bars, charge it first. A weak jump starter won’t deliver enough power.
Tip: If the device doesn’t turn on, check if the clamps are connected. Some models have a safety lock that prevents power-on if clamps are plugged in.
Step 2: Connect the Clamps Correctly
This is the most critical step. Follow the color-coded system:
- Red Clamp to Positive (+) Terminal: Attach the red clamp to the positive terminal of the car battery. It’s usually marked with a “+” and often covered by a red cap.
- Black Clamp to Ground: Connect the black clamp to an unpainted metal surface on the engine block, strut tower, or a designated grounding point. Never connect it to the negative (-) terminal if you can avoid it—this reduces spark risk.
Pro tip: If the engine is dirty, scrape a small area with the clamp’s tip to ensure a good connection. A poor ground can cause the jump to fail.
Step 3: Wait for the Ready Signal
After connecting both clamps, the Beatit device will detect the connection. You’ll hear a beep or see the LED light turn solid green (on most models). This means it’s ready to deliver power.
Important: If the red light flashes or you hear an alarm, disconnect immediately. This means the clamps are reversed or there’s a short. Double-check the connections and try again.
Step 4: Start the Engine
Now, get into the driver’s seat and turn the ignition. The engine should start within a few seconds. If it doesn’t:
- Wait 10–15 seconds and try again.
- If it still won’t start, wait 2–3 minutes to let the jump starter cool down. Then try once more.
Real story: My neighbor’s truck wouldn’t start on the first try. We waited 2 minutes, tried again, and it fired right up. Patience is key!
Step 5: Disconnect in the Right Order
Once the engine is running, disconnect in reverse order:
- Remove the black clamp from the ground.
- Remove the red clamp from the positive terminal.
- Turn off the Beatit device.
Never disconnect the clamps while the engine is running—it can cause voltage spikes that damage electronics.
Step 6: Let the Engine Run
Keep the engine running for at least 15–20 minutes to recharge the car battery. Avoid turning off the engine immediately. If you have a long drive, even better—your alternator will do the heavy lifting.
Beyond Jump Starting: Other Uses for Your Beatit
Your Beatit jump starter isn’t just for emergencies. It’s a versatile tool with several hidden features that can make your life easier. Let’s explore them.
Charging Your Phone or Tablet
Most Beatit models have USB-A and USB-C ports. To charge your phone:
- Turn on the Beatit device.
- Connect your phone using a charging cable.
- It will charge automatically. Some models even support 18W fast charging.
Example: During a camping trip, I used my Beatit to charge my phone, GPS, and a portable fan—all at the same time. It lasted over 6 hours with 50% battery left. Pretty impressive!
Using the LED Flashlight
Press the flashlight button to cycle through modes:
- Steady beam (for general use)
- SOS (flashing pattern for emergencies)
- Strobe (for signaling or visibility)
It’s bright enough to illuminate a dark engine bay or signal for help on the side of the road.
Inflating Tires (On Some Models)
Higher-end Beatit models (like the BT-D12) include a built-in air compressor. To use it:
- Attach the hose to the tire valve.
- Set the desired PSI on the digital display.
- Press start. It auto-stops when done.
This feature is a game-changer for road trips. I once used it to fix a slow leak and avoided a flat tire on a busy highway.
Powering Small Devices
With the right adapter, you can power:
- Portable coolers
- Car vacuum cleaners
- LED work lights
Just make sure the device’s wattage is under the Beatit’s max output (usually 150–300W).
Maintenance and Troubleshooting: Keep Your Beatit Ready
To ensure your Beatit jump starter works when you need it, regular maintenance is essential. Here’s how to keep it in top shape.
Charging and Storage Tips
- Charge Every 3 Months: Lithium batteries degrade if left uncharged. Even if unused, plug it in for a full charge every 90 days.
- Store in a Cool, Dry Place: Avoid extreme temperatures (below 32°F or above 104°F). A glove box or trunk organizer works well.
- Use the Original Charger: Third-party chargers can damage the battery or void the warranty.
Personal tip: I keep mine in a small pouch with the clamps and a USB-C cable. It’s always ready to grab in an emergency.
Common Issues and Fixes
Here’s a quick troubleshooting table based on real user experiences:
| Issue | Possible Cause | Solution |
|---|---|---|
| Device won’t turn on | Low battery or clamps connected | Disconnect clamps, charge for 2+ hours |
| Red flashing light | Reverse polarity or short circuit | Disconnect, check connections, reconnect |
| Engine won’t start | Weak battery or poor clamp connection | Clean terminals, ensure tight connection, wait 2 min before retry |
| USB not charging | Faulty cable or port | Try a different cable or reset the device |
| Flashlight not working | LED burnout or software glitch | Contact Beatit support for warranty claim |
When to Replace Your Beatit
Even the best devices don’t last forever. Consider replacing your Beatit if:
- It holds less than 50% charge after full charging.
- It fails to jump-start a car after 3 attempts (with correct use).
- The clamps or cables are damaged.
Most Beatit models have a 12–18 month warranty. Save your receipt and register your product online for faster support.
Final Thoughts: Be Prepared, Not Stressed
Owning a Beatit jump starter is like having a superhero in your trunk. But like any superhero, it needs to be ready when called. By following these Beatit jump starter instructions, you’re not just learning how to use a tool—you’re gaining peace of mind.
Remember: preparation beats panic. Keep your device charged, inspect it regularly, and practice the steps before an emergency. I’ve used mine in freezing winter mornings, rainy nights, and even for charging my phone during a blackout. It’s never let me down.
So the next time your car won’t start, don’t call a tow truck or wait for a kind stranger. Grab your Beatit, follow these steps, and get back on the road—safely, quickly, and with confidence. After all, the best emergency tool is the one you know how to use.
Frequently Asked Questions
How do I use the Beatit jump starter for the first time?
Begin by fully charging your Beatit jump starter using the provided USB-C cable. Connect the clamps to the battery terminals (red to positive, black to negative) and press the power button to initiate the jump-start process.
What are the key safety steps in the Beatit jump starter instructions?
Always ensure the jump starter is powered off before connecting clamps. Avoid touching metal parts of the clamps together and follow the LED indicator prompts to prevent reverse polarity or short circuits.
How long does the Beatit jump starter take to charge a dead car battery?
The Beatit jump starter typically delivers enough power to start a vehicle within 3–5 seconds of connection. Full recharge time for the device itself is 3–4 hours via a wall outlet or USB-C power source.
Can I use the Beatit jump starter in extreme weather conditions?
Yes, the Beatit jump starter works in temperatures ranging from -20°C to 60°C (-4°F to 140°F). However, avoid prolonged exposure to extreme heat or freezing conditions to preserve battery life.
Why won’t my Beatit jump starter turn on or respond?
Check if the battery is depleted and recharge it fully. If the issue persists, inspect the power button and connections for damage, or reset the device using the reset hole (if available).
Does the Beatit jump starter work on all vehicle types?
The Beatit jump starter supports most 12V vehicles, including cars, motorcycles, boats, and SUVs. Refer to the manual for engine size compatibility (up to 6.5L gas or 4.0L diesel).