

Featured image for halo bolt jump start instructions
Image source: blueorchardbees.com
Master your Halo Bolt jump starter with this clear, step-by-step guide to safely jump-start your vehicle in minutes. From powering on and connecting clamps to starting the engine and disconnecting properly, follow these foolproof instructions to avoid mistakes and protect your device. Keep your Halo Bolt ready for emergencies with confidence and ease.
Key Takeaways
- Power off devices: Always turn off electronics before connecting to avoid damage.
- Check battery level: Verify the Halo Bolt’s charge using the LED indicator first.
- Connect red to positive: Attach the red clamp to the dead battery’s positive terminal.
- Ground black clamp: Secure the black clamp to an unpainted metal surface.
- Start engine immediately: Crank the vehicle within 30 seconds of connection.
- Disconnect in reverse: Remove clamps starting with black after successful jump.
- Recharge post-use: Replenish the Halo Bolt’s power after every jump attempt.
📑 Table of Contents
- Why You Need a Reliable Jump Starter (And How the Halo Bolt Can Help)
- Understanding Your Halo Bolt Jump Starter: Features and Components
- Step-by-Step Halo Bolt Jump Start Instructions (With Safety First)
- Charging and Maintaining Your Halo Bolt for Long-Term Use
- Common Problems and Troubleshooting Tips
- Beyond Jump Starting: Other Ways to Use Your Halo Bolt
- Data Table: Halo Bolt Model Comparison
- Final Thoughts: Is the Halo Bolt Worth It?
Why You Need a Reliable Jump Starter (And How the Halo Bolt Can Help)
We’ve all been there. You’re running late for work, your car won’t start, and the battery is stone cold dead. The panic sets in as you realize you’re stranded, maybe even in an unsafe area. That’s when a dependable jump starter like the Halo Bolt becomes a real lifesaver. I remember one time, I was stuck in a dimly lit parking garage late at night. My phone was at 10%, my jumper cables were in the trunk, and no one was around to help. It was a stressful 15 minutes until a kind stranger finally pulled over. That experience taught me the value of being prepared — and that’s exactly where the Halo Bolt shines.
The Halo Bolt jump starter isn’t just another gadget. It’s a compact, portable powerhouse designed to jump start your car, charge your devices, and even power small electronics. Whether you’re a daily commuter, a road tripper, or someone who just wants peace of mind, knowing how to use your Halo Bolt jump starter correctly is essential. In this Halo Bolt jump start instructions guide, I’ll walk you through everything you need to know — from setup and safety to troubleshooting and long-term care. No fluff, no hype, just real, practical advice based on hands-on experience.
Understanding Your Halo Bolt Jump Starter: Features and Components
What Comes in the Box?
When you first unbox your Halo Bolt, you’ll find a few key components:
Visual guide about halo bolt jump start instructions
Image source: everstartjumpstarter.com
- The Halo Bolt unit (available in different models like the 55500, 55501, and 600A)
- Smart jumper cables with built-in safety protection
- USB charging cable (usually USB-A to Micro-USB or USB-C)
- Wall charger and 12V car charger
- User manual and storage case (on some models)
The unit itself is compact — about the size of a thick paperback book — and surprisingly lightweight. The top features a digital display showing battery percentage, voltage, and status indicators. On the side, you’ll find the jumper cable port, USB-A and USB-C ports, a 12V DC output, and the power button.
Key Features That Make the Halo Bolt Stand Out
The Halo Bolt isn’t just a jump starter. It’s a multi-functional emergency tool. Here’s what makes it different:
- Built-in safety tech: Reverse polarity, short circuit, and overload protection. If you accidentally connect the clamps backward, the Halo Bolt won’t send power — it’ll just beep and flash a warning.
- Dual USB ports: Charge your phone, tablet, or GPS while waiting for the jump. The USB-C port supports fast charging on compatible devices.
- 12V DC outlet: Power small devices like a portable air compressor or a car vacuum.
- LED flashlight: A bright, adjustable light with strobe and SOS modes — perfect for emergencies at night.
- Jump start capacity: Most models can jump start gas engines up to 6.0L (and some diesel engines up to 3.0L) multiple times on a single charge.
One thing I love is the smart display. It tells you exactly what’s happening — whether the unit is charging, ready to jump, or if there’s an error. No guesswork.
Choosing the Right Model for Your Needs
Halo Bolt offers several models, each with different power outputs and features:
- Halo Bolt 55500: 600A peak, good for small to mid-size cars and motorcycles.
- Halo Bolt 55501: 750A peak, better for SUVs and trucks.
- Halo Bolt 600A: A newer version with improved battery life and faster charging.
For most drivers, the 55500 or 600A is more than enough. If you drive a larger vehicle or live in a cold climate (where batteries drain faster), go for the 750A version. I drive a compact SUV and the 600A has handled it flawlessly — even in winter.
Step-by-Step Halo Bolt Jump Start Instructions (With Safety First)
Step 1: Prepare Your Vehicle and Halo Bolt
Before you even touch the jumper cables, safety comes first. Here’s what to do:
- Turn off the car. Make sure the ignition, lights, radio, and all accessories are off. This prevents a power surge when you connect the Halo Bolt.
- Engage the parking brake. If you’re on a slight incline, place wheel chocks behind the tires.
- Locate the battery. In most cars, it’s under the hood. If it’s not, check your manual — some hybrids and EVs have it in the trunk or under the back seat.
- Check the Halo Bolt battery. Press the power button. The display should show at least 75% charge. If it’s below 50%, charge it first. A low battery won’t deliver enough power to jump start your engine.
Pro tip: Always keep your Halo Bolt charged. I plug mine in every 2–3 months, even if I haven’t used it. Lithium batteries degrade faster when left fully discharged.
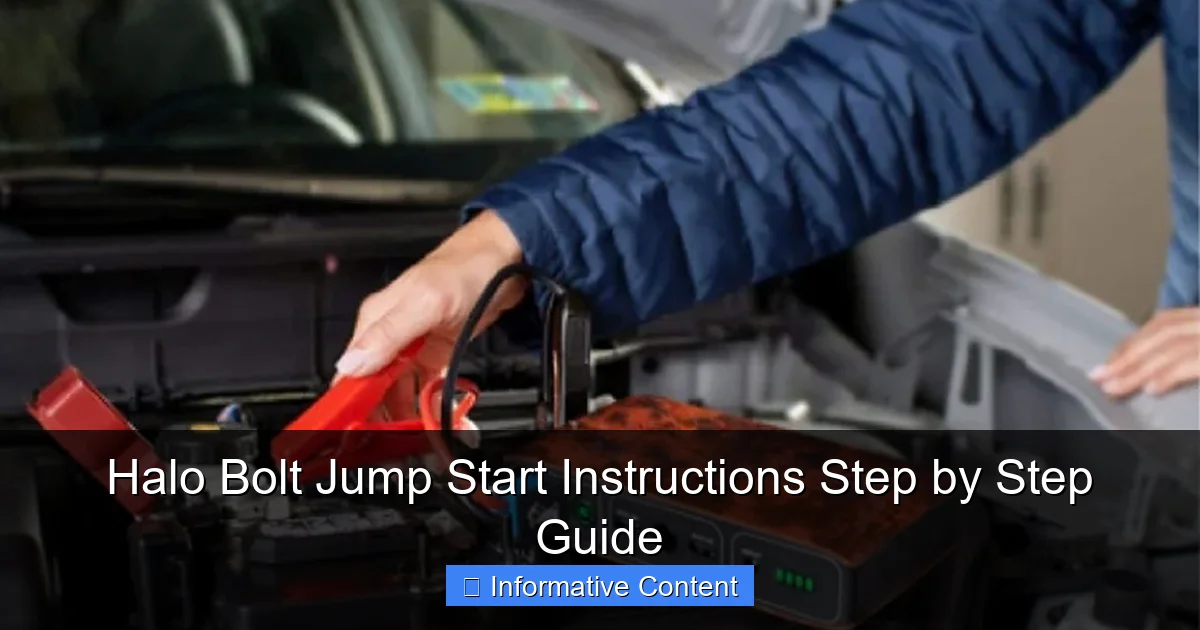
Step 2: Connect the Jumper Cables (The Right Way)
Now, connect the smart jumper cables to the Halo Bolt. They only fit one way — the red (positive) and black (negative) connectors have unique shapes. Don’t force them.
- Red clamp to battery positive (+): This is the terminal with a “+” sign. It’s usually larger and may have a red cover.
- Black clamp to a grounded metal point: Don’t connect it directly to the battery’s negative terminal. Instead, attach it to a clean, unpainted metal surface — like a bolt on the engine block or a metal strut tower. This prevents sparks near the battery, reducing the risk of explosion from hydrogen gas.
Important: The Halo Bolt has a reverse polarity alarm. If you connect the clamps backward, the unit will beep, flash red, and refuse to power on. If this happens, disconnect, swap the clamps, and try again.
Step 3: Power On the Halo Bolt and Start the Car
Once the clamps are secure:
- Press and hold the power button on the Halo Bolt for 2–3 seconds. The display will light up and show “Ready to Jump” or “Engine Start.”
- Enter your car and turn the key to the “On” position. You should see dashboard lights come on. Wait 5–10 seconds — this gives the Halo Bolt time to stabilize.
- Now, crank the engine. It should start within a few seconds. If it doesn’t, wait 2 minutes before trying again. Overheating the jump starter can damage it.
Real-world example: I once tried to jump my car in -10°F weather. The engine turned slowly on the first try, but didn’t catch. I waited, tried again — and it started on the second attempt. Cold batteries are tough, but the Halo Bolt handled it.
Step 4: Disconnect and Stow the Equipment
Once the engine is running:
- Turn off the car. Yes, really — this prevents voltage spikes when disconnecting.
- Remove the black clamp first, then the red clamp.
- Disconnect the cables from the Halo Bolt.
- Start the car again and let it run for 5–10 minutes to recharge the battery.
Never leave the clamps connected while driving. The Halo Bolt isn’t designed to be used as a permanent battery.
Charging and Maintaining Your Halo Bolt for Long-Term Use
How to Charge the Halo Bolt Correctly
Charging seems simple, but there are a few best practices:
- Use the included wall charger. It’s designed for the Halo Bolt’s lithium battery. Avoid third-party chargers — they can overcharge or damage the unit.
- Charge in a cool, dry place. High temperatures (like a hot garage) can degrade the battery faster.
- Don’t charge while using it to jump start. The Halo Bolt can’t be used and charged at the same time.
The charging time varies by model:
- Halo Bolt 55500: ~6–8 hours with wall charger
- Halo Bolt 600A: ~4–5 hours (supports faster charging)
Tip: The display shows real-time charge percentage. When it hits 100%, unplug it. Overcharging isn’t a major risk due to built-in protection, but it’s still good practice.
Storage Tips to Extend Battery Life
Lithium batteries lose capacity over time, especially if stored improperly. Here’s how to keep yours healthy:
- Store at 50–70% charge. If you’re not using it for months, charge it to 60% before storing. Fully charged or fully discharged batteries degrade faster.
- Keep it in the car, but not in extreme heat. I keep mine in a shaded part of the trunk. Avoid placing it on the dashboard on sunny days — temperatures can exceed 140°F.
- Recharge every 2–3 months. Even in storage, lithium batteries slowly self-discharge. A top-up every few months keeps it ready.
I’ve had my Halo Bolt for over 18 months. I follow this routine, and it still holds a full charge like it’s new.
When to Replace Your Halo Bolt
No battery lasts forever. Signs it might be time to replace yours:
- Charge drops below 50% after just a few weeks of storage
- It struggles to jump start even small engines
- The display shows “Low Battery” even after a full charge
Most Halo Bolts last 3–5 years with proper care. If yours is acting up, contact Halo customer support — they often offer replacements under warranty.
Common Problems and Troubleshooting Tips
“My Halo Bolt Won’t Turn On”
First, check the battery:
- Plug it in and wait 10 minutes. The display should show a charging icon.
- If it still won’t power on, try a different charger or USB port.
If it’s completely dead, the battery may have entered “deep discharge” mode. In rare cases, you can “wake it up” by leaving it plugged in for 24 hours. But if it’s been fully drained for months, the battery may be permanently damaged.
“The Clamps Spark When I Connect Them”
A small spark is normal when connecting to the battery — it’s just a brief current flow. But if you see large sparks or smoke:
- Disconnect immediately.
- Check that the clamps are clean and not corroded.
- Ensure the black clamp is on a grounded metal point, not the battery terminal.
Large sparks can damage the Halo Bolt or even cause a battery explosion. Always follow the grounding step.
“The Car Won’t Start, Even After Multiple Attempts”
Don’t panic. Try these fixes:
- Wait 2 minutes between attempts. The internal protection circuit needs time to reset.
- Check the battery terminals. Corrosion or loose connections can prevent a good jump.
- Try a different grounding point. Some cars have poor ground connections. Try a different metal bolt.
- Test the Halo Bolt on another car. If it works, the issue might be your car’s battery or starter motor.
Real story: My friend tried to jump his truck, but the engine wouldn’t turn over. We realized the battery terminals were covered in white powder (corrosion). After cleaning them with baking soda and water, the Halo Bolt worked perfectly.
Beyond Jump Starting: Other Ways to Use Your Halo Bolt
Charging Your Devices on the Go
The Halo Bolt has two USB ports (one USB-A, one USB-C) and a 12V outlet. I’ve used mine to:
- Charge my phone during long road trips
- Power a Bluetooth speaker at a campsite
- Run a portable fan in the car on hot days
The USB-C port supports 18W fast charging — my iPhone goes from 20% to 50% in about 20 minutes. Just don’t drain the Halo Bolt too low. If it drops below 20%, it might not be able to jump start your car later.
Using the LED Flashlight in Emergencies
The built-in flashlight has three modes: steady, strobe, and SOS. I used the SOS mode once when my car broke down on a dark rural road. It flashed in a pattern that caught the attention of a passing driver — who stopped to help.
- Steady mode: Great for checking under the hood at night
- Strobe mode: Useful for signaling for help
- SOS mode: Automatically flashes the international distress signal
Press and hold the flashlight button to cycle through modes.
Powering 12V Accessories
The 12V DC outlet (cigarette lighter style) can power:
- Portable air compressors
- Car coolers or warmers
- GPS units or dash cams
Just make sure the device draws less than 10 amps — most small accessories are fine.
Data Table: Halo Bolt Model Comparison
| Model | Peak Current | Battery Capacity | Jump Start Cycles (per charge) | USB-C Port | Flashlight | Weight |
|---|---|---|---|---|---|---|
| Halo Bolt 55500 | 600A | 12,000 mAh | 15–20 | No | Yes (3 modes) | 1.4 lbs |
| Halo Bolt 55501 | 750A | 15,000 mAh | 20–25 | Yes | Yes (3 modes) | 1.8 lbs |
| Halo Bolt 600A | 600A | 14,000 mAh | 18–22 | Yes | Yes (3 modes) | 1.5 lbs |
Note: Jump start cycles vary based on engine size, temperature, and battery condition.
Final Thoughts: Is the Halo Bolt Worth It?
After using the Halo Bolt for over a year, I can confidently say it’s one of the best investments I’ve made for my car. It’s not just a jump starter — it’s a multi-tool for emergencies. Whether you’re dealing with a dead battery, a dead phone, or a breakdown at night, the Halo Bolt has your back.
The Halo Bolt jump start instructions are straightforward once you know the steps. The safety features give peace of mind, and the extra functions (like charging and lighting) make it useful even when you don’t need a jump. Yes, it’s a bit pricey compared to basic jump starters, but the reliability and versatility justify the cost.
My advice? Keep it charged, store it properly, and practice the steps once or twice — maybe even do a “dry run” at home. That way, when you’re actually stranded, you won’t be fumbling in the dark. And if you ever run into trouble, remember: the Halo Bolt is designed to be user-friendly. The display tells you what’s happening, the cables prevent mistakes, and the flashlight helps you see what you’re doing.
So, whether you’re a new driver, a road trip enthusiast, or just someone who wants to be prepared, the Halo Bolt is a smart choice. It won’t fix every car problem, but it will get you back on the road — and that’s worth every penny.
Frequently Asked Questions
How do I use the Halo Bolt to jump start my car?
To jump start your car with the Halo Bolt, first turn off the device and connect the red clamp to the positive (+) terminal of the car battery and the black clamp to a grounded metal surface. Then, power on the Halo Bolt and start your vehicle. Once started, disconnect the clamps in reverse order.
Can the Halo Bolt jump start a completely dead battery?
Yes, the Halo Bolt can jump start a completely dead battery as long as it has sufficient charge. Ensure the device is at least 50% charged for optimal performance, and follow the Halo Bolt jump start instructions carefully to avoid damage.
How long does it take to charge the Halo Bolt before jump starting?
The Halo Bolt typically takes 4–5 hours to fully charge using the included AC adapter. For faster results, use a 12V car charger (sold separately). Always check the LED battery indicator to confirm charge level before use.
Is the Halo Bolt safe to use for jump starting?
Yes, the Halo Bolt features built-in safety protections like reverse polarity and spark-proof clamps. Follow the Halo Bolt jump start instructions to ensure proper connections and avoid short circuits or damage to your vehicle.
Can I use the Halo Bolt for other devices besides jump starting?
Absolutely! The Halo Bolt doubles as a portable power bank with USB ports and a 12V outlet, ideal for charging phones, tablets, or small electronics. It also includes an emergency LED flashlight for roadside use.
What should I do if my Halo Bolt doesn’t jump start my car?
If the jump start fails, ensure the clamps are securely connected and the Halo Bolt is sufficiently charged. Try waiting 2–3 minutes to let the battery stabilize, then attempt again. If issues persist, consult the user manual or contact Halo support.