
Featured image for instructions to jump start a car
Image source: static.pakwheels.com
Always connect the jumper cables in the correct order—positive to positive, then negative to the dead battery’s unpainted metal—to avoid sparks and damage. Ensure both vehicles are off, use quality cables, and let the donor car run for a few minutes before attempting to start the dead one. Once started, remove cables in reverse order and drive for at least 15 minutes to recharge the battery fully.
Key Takeaways
- Turn off all electronics: Prevent surges by powering down before jump starting.
- Connect red clamp first: Attach to dead battery’s positive terminal for safety.
- Link black clamp last: Ground to unpainted metal on the engine block.
- Start donor car first: Let it run 2–3 minutes to stabilize voltage.
- Wait before driving: Run the revived car 15+ minutes to recharge the battery.
- Remove cables in reverse: Disconnect black first, then red to avoid sparks.
📑 Table of Contents
- Why You Need to Know How to Jump Start a Car
- Understanding the Basics: How a Car Battery Works
- Tools and Materials You’ll Need
- Step by Step Instructions to Jump Start a Car Safely and Fast
- Safety Tips and Common Mistakes to Avoid
- What to Do After Jump Starting: Next Steps
- Conclusion: You’ve Got This!
Why You Need to Know How to Jump Start a Car
Imagine this: you’re late for work, you’re already stressed, and you turn the key in your car’s ignition—only to hear that dreaded click-click-click or, worse, silence. Your heart sinks. The battery is dead. But don’t panic. A dead battery is one of the most common car problems, and it’s also one of the easiest to fix—if you know what you’re doing.
Whether you’re a new driver or a seasoned one, knowing how to jump start a car is an essential life skill. It can save you time, money, and the embarrassment of calling roadside assistance for something you could have fixed yourself in minutes. More importantly, doing it safely protects you, your car, and others on the road. In this guide, I’ll walk you through step by step instructions to jump start a car safely and fast, based on real-world experience, expert advice, and a few lessons learned the hard way.
Understanding the Basics: How a Car Battery Works
Before you grab the jumper cables, it helps to understand what’s happening under the hood. A car battery is a rechargeable power source that provides the initial electrical jolt needed to start the engine. Once the engine runs, the alternator takes over and recharges the battery. But when the battery is drained—due to leaving lights on, cold weather, or a faulty charging system—it can’t deliver that spark.
Visual guide about instructions to jump start a car
Image source: militarystencils.com
Signs of a Dead or Weak Battery
- Dim headlights or interior lights
- Slow or no crank when turning the key
- Clicking sound when trying to start
- Dashboard warning lights (like the battery or check engine light)
- Electrical systems (radio, power windows) not working
For example, I once left my dome light on overnight. The next morning, my car wouldn’t start. I thought it was a major issue—until a neighbor pointed out the light was still on. That’s when I realized how small things can drain a battery fast.
Common Causes of Battery Drain
- Leaving lights or electronics on
- Extreme temperatures (cold weather slows chemical reactions in the battery)
- Old or worn-out battery (most last 3–5 years)
- Faulty alternator not recharging the battery
- Parasitic drain (something drawing power even when the car is off)
Understanding these causes helps you avoid future dead batteries. But if you’re already stuck, it’s time to learn how to jump start a car—the right way.
Tools and Materials You’ll Need
Jump starting a car doesn’t require a full toolbox, but having the right gear makes all the difference. Here’s what you need to do it safely and efficiently.
Essential Tools
- Jumper cables: Look for 4-gauge or 6-gauge cables, at least 10–20 feet long. Thicker cables (lower gauge number) deliver more current. I once used thin, old cables—they sparked and barely worked. Learned my lesson.
- A working vehicle (or a portable jump starter): You’ll need another car with a charged battery, or a standalone jump starter pack (more on that later).
- Protective gloves and safety glasses: Batteries contain acid and can spark. Protect your hands and eyes.
- Owner’s manual: Some cars have specific jump-starting procedures, especially hybrids or luxury models.
Optional but Helpful Items
- Portable jump starter: A battery-powered device that eliminates the need for another car. I keep one in my trunk after being stranded in a parking lot with no help in sight.
- Flashlight: For nighttime or dimly lit areas.
- Multimeter: To check battery voltage before and after. A healthy battery should read around 12.6 volts when off and 13.7–14.7 volts when running.
Choosing the Right Jumper Cables
Not all jumper cables are created equal. Here’s a quick guide:
| Cable Gauge | Length | Best For |
|---|---|---|
| 6-gauge | 12–16 ft | Most sedans and small SUVs |
| 4-gauge | 16–20 ft | Trucks, large SUVs, cold weather |
| 8-gauge | 10–12 ft | Light use, compact cars (not ideal for emergencies) |
Tip: Avoid cheap cables from gas stations. Invest in a quality set—you’ll use them once and be glad you did.
Step by Step Instructions to Jump Start a Car Safely and Fast
Now for the main event. Follow these steps carefully. Safety first—always.
Step 1: Position the Vehicles Correctly
Park the working car close to the dead one, but do not let them touch. Turn off both engines and set the parking brakes. Put both cars in park (automatic) or neutral (manual), and engage the handbrake.
Ideally, the batteries should be close enough for the cables to reach—usually 12–18 inches apart. If they’re too far, you’ll need longer cables. I once tried to stretch 10-foot cables between two cars parked diagonally—it didn’t end well. Now I always check cable length first.
Step 2: Turn Off All Electronics
In both vehicles, turn off:
- Headlights
- Radio
- AC/heating
- Phone chargers
- Any other accessories
This reduces the load on the battery and prevents voltage spikes when connecting cables.
Step 3: Identify the Battery Terminals
Pop the hood and locate the battery. Most are under a plastic cover—remove it if needed. You’ll see two terminals:
- Positive (+): Usually red or marked with a plus sign
- Negative (–): Usually black or marked with a minus sign
Some cars (like BMW or Tesla) have remote terminals. Check your manual. I once tried to jump a friend’s BMW and couldn’t find the battery—it was under the back seat! Always verify first.
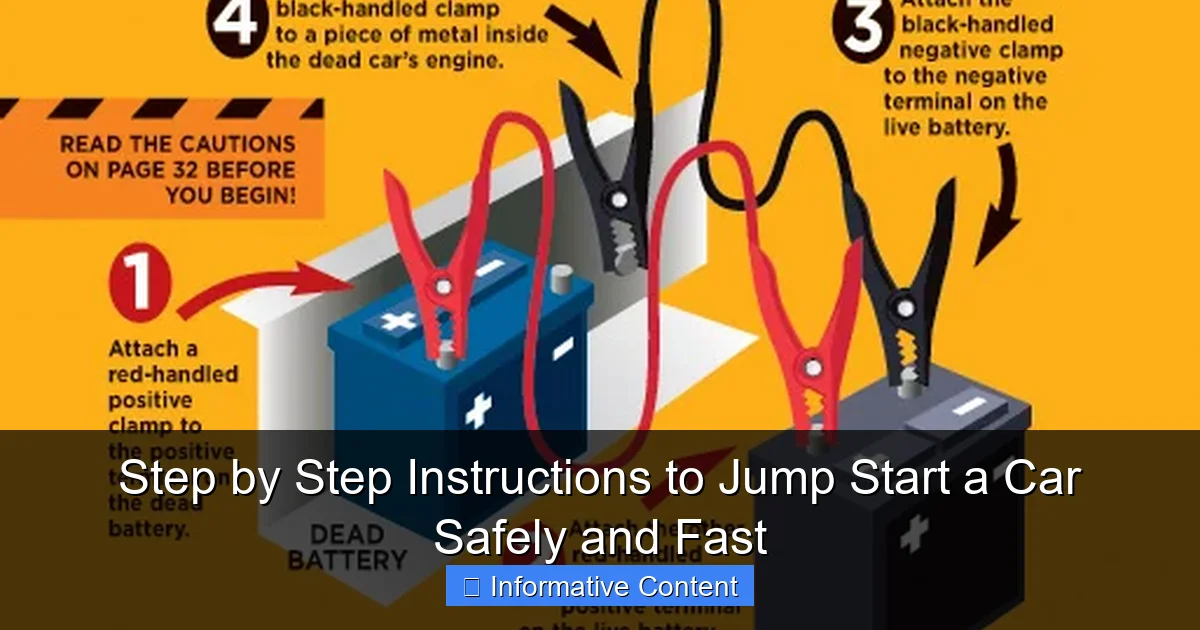
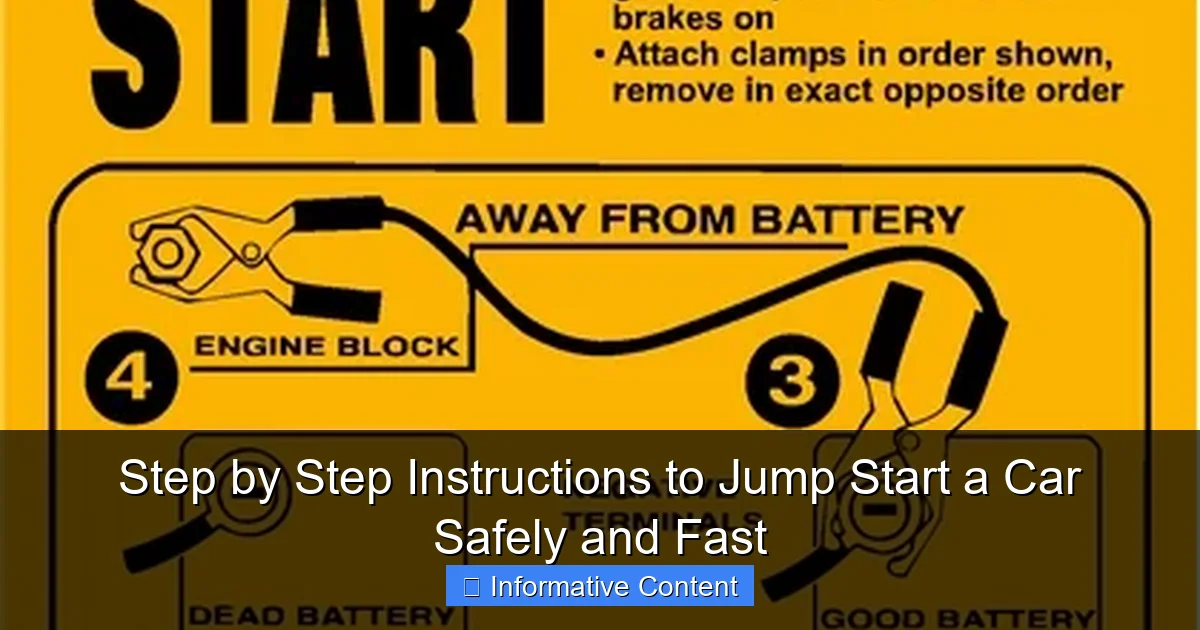
Step 4: Connect the Jumper Cables in the Right Order
This is critical. Connecting in the wrong order can cause sparks, damage electronics, or even explode the battery. Follow this sequence:
- Red to Dead (+): Attach one red clamp to the positive terminal of the dead battery.
- Red to Good (+): Attach the other red clamp to the positive terminal of the working battery.
- Black to Good (–): Attach one black clamp to the negative terminal of the working battery.
- Black to Ground (–): Attach the final black clamp to an unpainted metal surface on the dead car—like a bolt, bracket, or engine block. This is your “ground.” Never attach it directly to the dead battery’s negative terminal. Why? To reduce the risk of sparks near the battery, which could ignite hydrogen gas.
Example: I used a bolt near the alternator on my old Honda. It worked perfectly. A friend once clipped the black cable to the negative terminal—it sparked and scared everyone. Now he always grounds to metal.
Step 5: Start the Working Car
Start the engine of the working vehicle and let it run for 2–3 minutes. This allows the good battery to transfer some charge to the dead one. Don’t rev the engine—just let it idle.
Tip: If it’s cold outside, let it run a bit longer (5 minutes). Cold batteries hold less charge.
Step 6: Try Starting the Dead Car
Now, try starting the dead car. Turn the key and listen. If it starts—great! Let it run for 10–15 minutes to recharge the battery.
If it doesn’t start:
- Wait another 2–3 minutes and try again
- Check that all cables are secure
- Make sure the working car’s engine is still running
Still no luck? The battery might be too far gone, or there could be another issue (like a bad starter or alternator).
Step 7: Disconnect the Cables in Reverse Order
Once the car starts, disconnect the cables in the reverse order you connected them:
- Remove black clamp from the ground on the dead car
- Remove black clamp from the negative terminal of the good car
- Remove red clamp from the positive terminal of the good car
- Remove red clamp from the positive terminal of the dead car
Never let the clamps touch each other or any metal while connected—this can cause a short circuit.
Step 8: Let the Engine Run
Keep the jumped car running for at least 15–30 minutes. Drive it around if possible—this helps the alternator recharge the battery. Avoid turning it off immediately.
Safety Tips and Common Mistakes to Avoid
Jump starting is simple, but a few mistakes can lead to danger or damage. Here’s what to watch out for.
Never Mix Up the Cables
Connecting positive to negative (or vice versa) can fry your car’s electrical system. I’ve seen a friend’s car lose all dashboard lights after a mix-up. Always double-check colors and markings.
Don’t Jump a Swollen, Cracked, or Leaking Battery
If the battery looks damaged, do not attempt to jump it. A cracked case can leak acid. A swollen battery may explode. Replace it instead. Safety first.
Watch for Sparks
A small spark is normal when connecting the final ground clamp. But if there are big sparks, loud pops, or smoke, disconnect immediately. This could mean a short circuit or a bad battery.
Don’t Leave the Engine Off Too Long
After jump starting, drive for at least 30 minutes. Short trips (like 5 minutes) won’t fully recharge the battery. I once jumped my car and drove to the grocery store—only to be stuck again in the parking lot. Now I always take a longer drive or use a battery charger.
Use a Portable Jump Starter as a Backup
These compact devices are lifesavers. They’re battery-powered, easy to use, and eliminate the need for another car. I keep a NOCO Boost Plus in my trunk. It’s saved me twice—once in a remote parking lot, once during a snowstorm. No waiting for help.
Tip: Recharge your jump starter every 3–6 months, even if you don’t use it.
Don’t Rev the Engine While Connected
Some people think revving the working car helps charge the dead battery faster. It doesn’t—and it can damage the alternator or cause voltage spikes. Just let it idle.
What to Do After Jump Starting: Next Steps
Getting your car started is just the beginning. Now you need to figure out why the battery died and prevent it from happening again.
Test the Battery and Charging System
Visit an auto parts store (like AutoZone, O’Reilly, or Advance Auto) and ask for a free battery and alternator test. Most will do it on the spot. This tells you:
- Is the battery still good?
- Is the alternator charging properly?
- Is there a parasitic drain?
I once thought my battery was dead—turns out the alternator was failing. The test caught it early and saved me from being stranded again.
Replace the Battery if Needed
Batteries last 3–5 years. If yours is older, or the test shows low capacity, replace it. Look for a battery with the right size, cold-cranking amps (CCA), and reserve capacity. In cold climates, higher CCA is better.
Check for Parasitic Drain
If your battery dies after sitting for a few days, something may be drawing power. Common culprits:
- Aftermarket alarms or stereos
- Faulty glove box or trunk lights
- Bad modules (like a stuck relay)
A mechanic can test for this with a multimeter and ammeter.
Keep a Battery Charger or Jump Starter
Even after fixing the issue, keep a jump starter or trickle charger in your car. A trickle charger is great for long-term storage—it keeps the battery charged without overcharging.
Prevent Future Dead Batteries
- Turn off all lights and accessories before exiting
- Use a battery maintainer if the car sits for weeks
- Park in a garage or use a car cover in extreme weather
- Check battery terminals for corrosion (clean with baking soda and water)
Conclusion: You’ve Got This!
Knowing step by step instructions to jump start a car safely and fast is more than just a handy skill—it’s peace of mind. Whether you’re stranded in a parking lot, on a rural road, or during a cold winter morning, you can handle it with confidence.
Remember: safety first, follow the order, use the right tools, and don’t rush. And once you’re back on the road, take a few minutes to diagnose the root cause. A little prevention goes a long way.
So, keep those jumper cables in your trunk, invest in a portable jump starter, and share this guide with friends and family. Because the next time someone says, “My car won’t start,” you can say, “No problem—I’ve got you covered.”
Frequently Asked Questions
What are the correct steps to jump start a car safely?
To jump start a car safely, park the working vehicle close (but not touching), turn off both engines, and connect the red (positive) clamp to the dead battery’s positive terminal. Attach the other red clamp to the working battery, then the black clamp to the working battery’s negative terminal, and the final black clamp to an unpainted metal surface on the dead car. Start the working vehicle, let it run for 2-3 minutes, then attempt to start the dead car. Always follow proper instructions to jump start a car to avoid damage.
Can I jump start a car with a damaged battery?
Jump starting a severely damaged or leaking battery is unsafe and not recommended. If the battery is cracked, frozen, or emits a rotten egg smell (sulfur), replace it immediately. Attempting to jump start a compromised battery risks explosion or fire.
How long should I wait after connecting jumper cables before starting the car?
Wait 2-3 minutes after properly connecting the jumper cables to allow the dead battery to absorb some charge from the working vehicle. This reduces strain on both batteries and increases the chance of a successful jump start. Never force-start the engine—if it fails, wait longer or check cable connections.
What happens if I reverse the jumper cable clamps when jump starting?
Reversing the clamps (connecting positive to negative) can cause sparks, battery damage, or electrical system failure in both vehicles. Always follow the instructions to jump start a car: red to positive (+) first, then black to negative (-) or a metal ground.
Can I use a portable jump starter instead of another car?
Yes, portable jump starters (battery packs) are a convenient, safer alternative to another vehicle. Fully charge the jump starter beforehand, connect the clamps to the correct terminals, and follow the device’s instructions. They’re ideal for emergencies with no other cars nearby.
Why won’t my car start even after a jump—what should I do?
If the car doesn’t start after a jump, the issue may be more than just a dead battery—check the alternator, starter, or fuses. Let the engine run for 15-20 minutes post-jump to recharge the battery. If problems persist, consult a mechanic to diagnose the underlying issue.